ARTICLE
- Cooking’s high power use
- How to adapt an electric cooking device to solar power
- The advantages of solar electric cooking
- Our choice of building materials: Tiles, cork, mortar
- Self-made electric resistance heating element
- How to use the solar electric cooker
- Alternative cooker designs
STEP BY STEP BUILDING PROCESS
- What you need: materials and tools
- Step 1: build the structure
- Step 2: make the electric heat resistance.
- Step 3: add insulation, create the heat storage and embed the electric heat resistance.
- Step 4: secure the cooking chamber and add the remaining insulation.
- Step 5: finishing touches.
- Credits
Cooking’s high power use
Electric cooking devices are challenging to operate on an off-grid solar PV system. For example, an electric oven requires between 1,000 and 5,000 watts of power, while electric stove burners have an average power consumption of 1,000 to 3,000 watts per burner. If you want to use an oven and one electric stove burner simultaneously, you need a solar array of at least 32 square meters in optimal weather conditions - just to cook. 1
You can overcome this problem by storing solar power in lead-acid or lithium-ion batteries. If these batteries are powerful enough, they can temporarily provide you with a higher power supply than your solar array can deliver. Batteries are also necessary if you want to cook after sunset or in bad weather, which is likely the case. Unfortunately, batteries account for 70-90% of the costs and the energy invested in a solar PV system. 2
Cooking thus makes it difficult to completely disconnect a household from the power grid and switch to autonomous, smoke-free, small-scale power production. 3 That is especially so when you have a small budget and limited space for solar PV panels. For example, when I attempted to go off the grid in my apartment in Barcelona by using solar panels on the balcony and window sills, it was mainly the electric cookstove that thwarted my efforts. 4
How to adapt an electric cooking device to solar power?
Many of the devices we take for granted nowadays were designed for an era of abundant electricity generated by fossil fuels. However, the electric oven we build in this manual demonstrates that modern appliances can be redesigned for an era of intermittent, less concentrated power sources, such as wind and solar energy. Our oven is powered by a 100-watt solar panel, small enough (50x90cm) to fit on a balcony. Furthermore, it can cook after sunset, without the use of batteries.
The key to significantly reducing the power consumption of a cooking device is thermal insulation. Our electric solar oven has 5 cm of insulation on all six sides. Its power use is further reduced by a lower cooking temperature of about 120°C (248°F). You can cook all food safely at much lower temperatures than those typical in modern cooking devices - it just takes longer.
Our oven is powered by a 100-watt solar panel, small enough (50x90cm) to fit on a balcony.
The key to cooking after sunset without batteries is thermal mass. Rather than storing electricity from solar panels in a battery for operating the cooker at night, the heat supplied by the solar panel during the day is stored in the appliance itself. Because the oven retains a high temperature at sunrise, it’s quickly ready for cooking again in the morning. Connected to a solar panel, it’s almost always preheated and ready to use.
Thermal mass also allows the cooker to continue operating after periods of clouds and rain. Likewise, opening the oven door hardly affects the temperature inside. The heat is stored in the mortar and tiles, and the air temperature quickly returns to normal when the door is closed again.
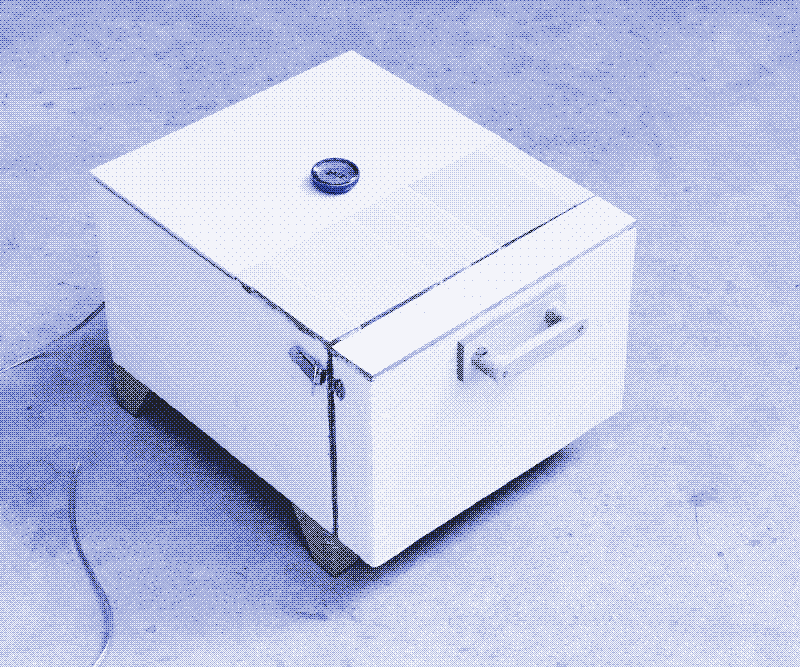
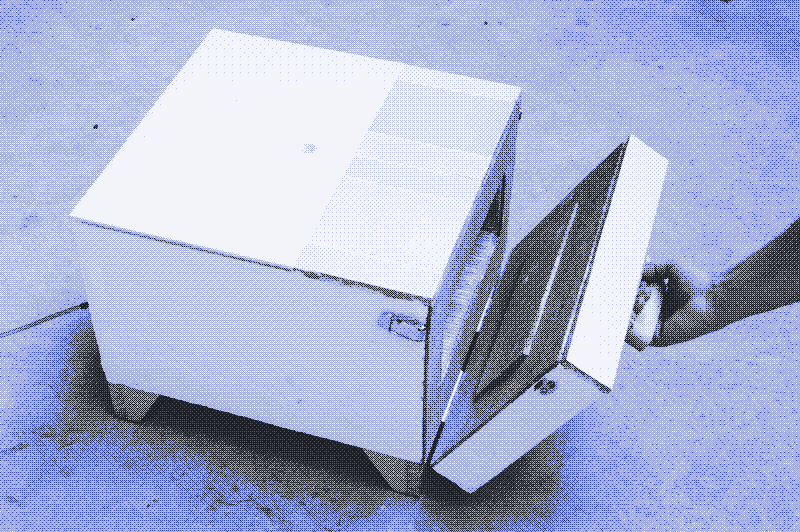
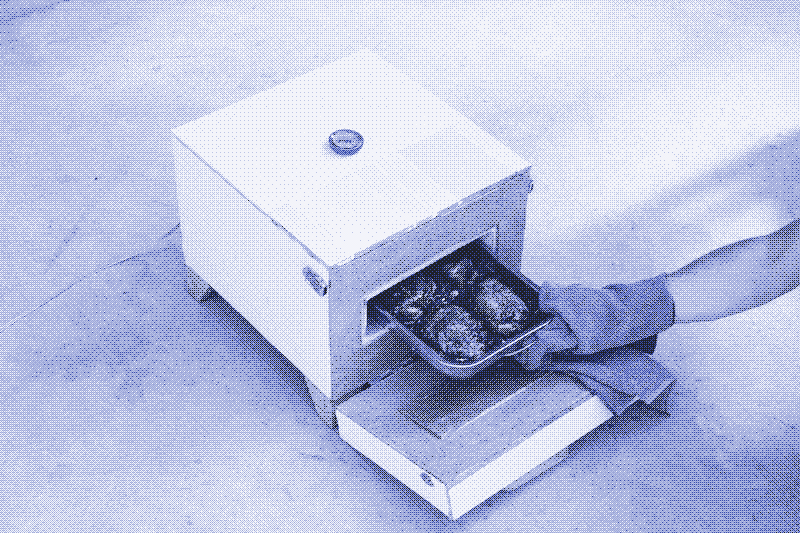
Our oven is heated by a self-made electric resistance that connects directly to the solar panel, without any intervening battery, solar charge controller, or voltage regulator. To maximize energy efficiency, the oven chamber is dimensioned around a metal oven tray and features a side door. Its shape and weight resemble those of a regular oven.
The advantages of solar electric cooking
The device we build in this manual is known as an “insulated solar electric cooker” or “ISEC”. The ISEC is a more recent and more sophisticated version of the “solar box cooker”, which is an insulated wooden box with one or more transparant glass plates on top. When a solar box cooker is put in the sun, its interior reaches temperatures that are high enough to boil water and cook food. 5
While an insulated solar electric cooker also consists of a well-insulated box, it does not have a glass plate on top. It’s powered by a solar PV panel instead, which is connected to an electric heating element inside the cooker. One could also describe the ISEC as a fireless cooker with an electric heater inside. 6
The conventional solar box cooker is a very simple device that works without electricity and is cheap and easy to build. 7 By comparison, the ISEC is a bit more complex to build and requires a high-tech solar panel. However, solar electric cooking has several important advantages that can make the extra effort worthwhile:
-
An electric solar oven can be located inside your kitchen. Conventional solar box cookers only work when they are outside in the sun. That is great for events and picnics, or if you have a garden. However, for many people, it would be more practical to have their cooking appliance in their kitchen. The ISEC makes this possible because only the solar panel needs to be outside. In winter, having the cooker inside will also increase its energy efficiency. It will lose less heat to the environment due to cold and wind.
-
An electric solar oven can be insulated on all sides. Solar box cookers cannot be insulated on the top side; otherwise, solar radiation cannot enter the appliance. 8 In contrast, an ISEC can be insulated on all sides, making it more energy efficient than a non-electric solar box cooker. You can further increase the oven’s insulation by draping one or more wool blankets or carpets over it, which is not possible with a non-electric solar box cooker.
-
An electric solar oven works well in cloudy weather. Conventional solar cookers require full sun to function effectively. That is especially true for parabolic cookers, which concentrate solar rays at a focal point; however, solar box cookers also exhibit low performance during cloudy weather. In contrast, the electric solar cooker can get around that problem by using more or larger solar PV panels. During sunny days, you can use the excess solar PV capacity for other purposes. 2
-
An electric solar oven needs no attention. Solar box cookers need to be turned towards the sun at least every 15-30 minutes. Parabolic solar cookers require even more frequent movement. In contrast, an ISEC requires no attention. Of course, you could turn the solar panels towards the sun every 15 minutes, which will speed up the heating of the ISEC’s interior. However, solar panels are less sensitive to solar orientation than solar box cookers. Once you have placed food in the insulated solar electric cooker, you can leave it alone.
-
An electric solar oven allows you to cook after sunset. By embedding the electric heating element in a material with a high thermal mass, an ISEC can remain at high temperature for many hours after sunset. While several methods exist to add heat storage to a conventional solar cooker, they are complex and don’t work very well. For example, adding thermal mass to a conventional solar box cooker would make it too heavy to move around and follow the sun. An ISEC with thermal energy storage is also heavy, but it can remain stationary.
Our choice of building materials
Low-tech Magazine did not invent the ISEC. Our experiments with insulated solar electric cookers, which began in the summer of 2024, are inspired by the work done at Cal Poly University and Living Energy Farm 910, which we described in an earlier article on direct solar power. 2 We borrowed ideas and knowledge from the manuals made by these pioneers, but we also saw some room for improvements, mostly in the choice of building materials. We also applied the concept of insulated solar cooking to a DIY coffeemaker.
Rather than glass wool, sheet metal, and plastic buckets, we have chosen to build our cooking device with tiles, cork, plaster, wood, and mortar.
Rather than glass wool, sheet metal, and plastic buckets, we have chosen to build our cooking device with tiles, cork, plaster, wood, and mortar. These materials are easier to obtain and to work with, and they are more aesthetically pleasing. We aimed to design an appliance that people would actually want to see in their kitchen, and which can be built and repaired with only a few standard tools. It remains to be seen how durable our material choices will be in the long term. Still, for now, the device has been operated extensively for several months without any significant signs of damage.
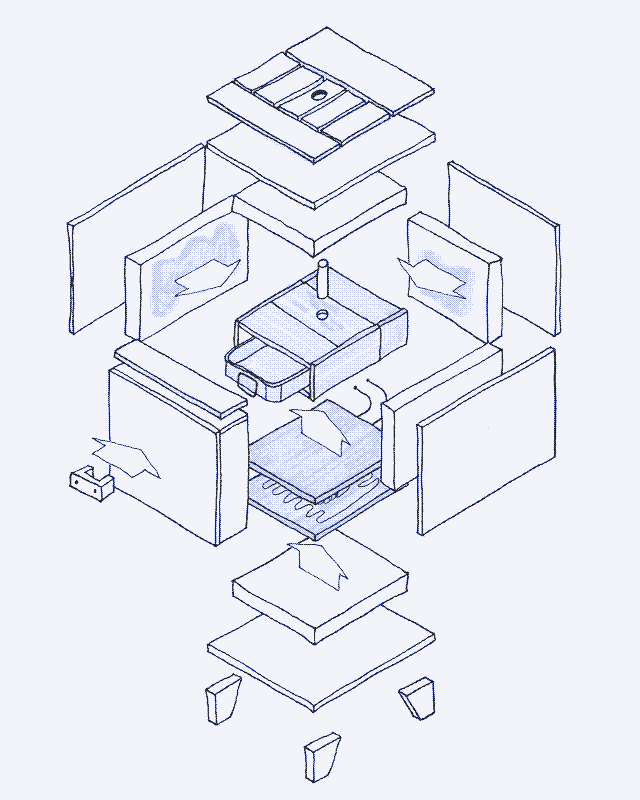
Our solar electric cooker consists of several key components: the structure (a wooden box), the electric heating element (nichrome wire), the insulation (cork), the thermal mass (mortar and tiles), and a solar PV panel.
Ceramic & terracotta tiles
The use of tiles is the distinctive feature of our design. Most ISECs built to date use aluminum for the inside oven compartment and metal or plastic (for example, a bucket) for the outside. However, making a water-tight aluminium box is not easy and requires specialist tools. Plastic works well as an outer shell, but it looks rather bad and may become brittle over time.
The use of tiles is the distinctive feature of our design.
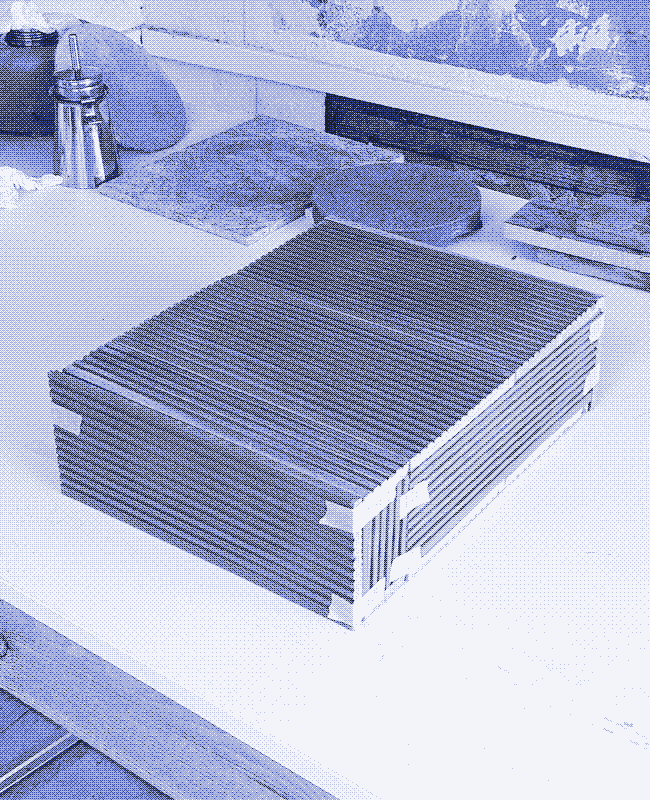
In our oven, thick terracotta tiles form the cooking chamber, providing a waterproof, fireproof, and easy-to-clean interior surface. The tiles prevent water from entering the insulation layer or the electrical system, and they ensure that the insulation does not become damaged by heat. 11 We also put tiles on the outside of the cooker, where they please the eye, protect the device against water damage from the outside, and make it easy to clean.
Tiles are easy and cheap to obtain: we collected all of them on the streets of Barcelona. Tiling can be accomplished with minimal skills and tools. You need a tile cutter if you want to cut tiles shorter, but you can avoid this by choosing the right size of tiles or by applying a “trencadís” technique, made famous by architect Antoni Gaudí. This technique involves dropping tiles so that they break and rearranging them altogether as a mosaic.
Using a tile cutter requires some practice, and you will likely break a few tiles as you learn. Make a groove in the tile by passing the sharp tungsten wheel several times across it. Then apply some pressure on both sides with your hands: the tile should break along the line. Some tiles are more challenging to cut than others. To fix tiles to wood, use a cement-based adhesive mortar. To attach tiles to cork, we applied a layer of plaster bands in some cases, as mortar doesn’t adhere well to cork. Use grout to seal the joints between tiles.
Cork or wool for insulation
Insulation is key to the workings of all solar cookers, including the ISEC. It’s the insulation that allows cooking with a very small solar panel. The heat accumulates over time because the insulation slows down the release of heat from the cooker to the outside environment. For insulation, we use a 5 cm layer of expanded cork on all six sides of our device. Expanded cork is a natural insulation material that provides excellent insulation. It’s made from cork waste, bound using steam. Standard cork sheets also work well.
For insulation, we use a 5 cm layer of expanded cork on all six sides of our device.
Cork is expensive, and it’s not a material you easily find on the streets. You can obtain a cheaper but more labour-intensive insulation material by cutting up discarded and second-hand wool clothes and blankets. Apart from cork and wool, there exist many other insulating materials. However, many are toxic or unpleasant to work with, and unlike cork and wool, they are often flammable. Cotton and cellulose are cheap and sustainable (waste) materials, but they do not insulate as well as cork or wool.
Mortar for heat storage
We made the base of our cooking device out of mortar, a material that retains a lot of heat. Thermal mass is the key to cooking after sunset. The solar panel stores heat in the oven rather than electricity in a battery. The mortar serves a dual function: it also safely encapsulates the electric heating element (see below). Every ISEC with a self-built heating element will have some thermal mass; however, we have made a thicker slab to enhance heat storage. The tiles of the oven chamber provide extra thermal mass.
The solar panel stores heat in the oven rather than electricity in a battery.
Mortar is composed of cement, sand, and water. Sold as a powder in bags, it must be mixed with water before application. You can also buy a bag of cement and mix it with sand and water to obtain mortar. Follow the instructions on the packaging for the powder-to-water ratio. Once cured, which takes several days, mortar becomes (and remains) hard. There’s no need to use refractory cement, which is made to withstand high temperatures in fireplaces and pizza ovens, because the temperature in our oven is not that high. Sand is an alternative material with a high thermal mass.
Heating element and electric system
Our oven is heated by an electric resistance element, which is connected directly to the solar panel. We initially used commercial heating elements in our prototypes, which yielded disappointing results. Therefore, we decided to build our own, based on the manual provided by the Living Energy Farm. 12 Building your own heating element involves extra work, but it’s worth the effort.
Many commercial heating elements have built-in thermostats, which can complicate temperature regulation inside the oven. They also require a voltage input that does not align with the voltage output of most solar panels, which introduces the need for an extra electronic component (a buck converter). Securely fixing commercial heating elements proved to be difficult as well, and we had trouble keeping moisture away from the electrical system; at one point, this resulted in an electrical fire.
Building your own heating element involves extra work, but it’s worth the effort.
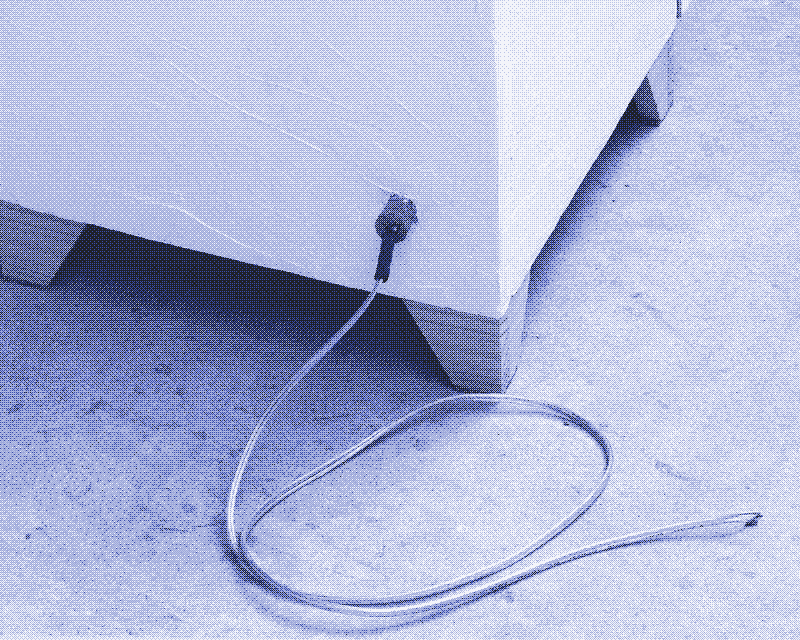
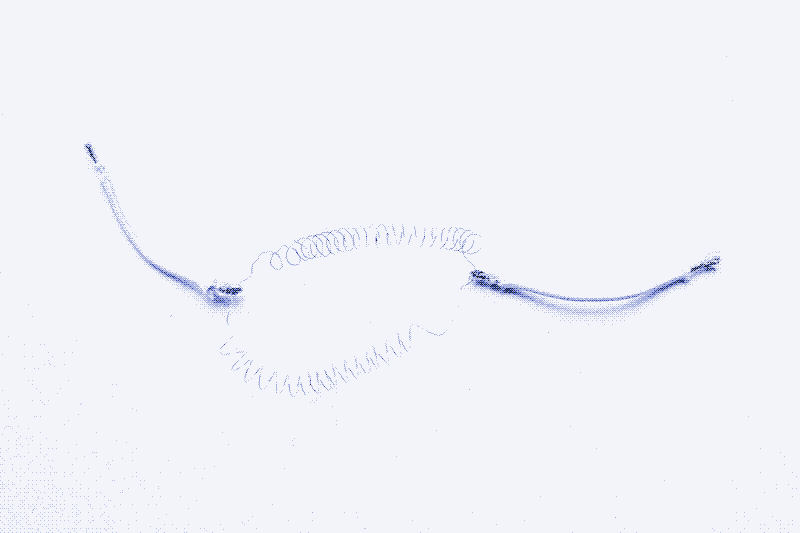
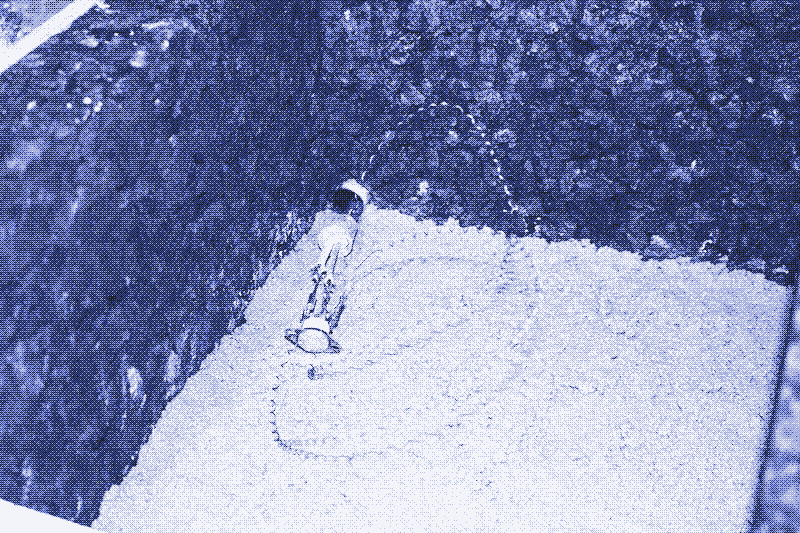
By embedding a self-made heating element in a mortar base, we solved all these problems. A custom-made electric resistance consists of a circuit made of nichrome wire, which is an alloy of nickel and chrome. The length and thickness of the nichrome wire determine its heat dissipation and power consumption, allowing you to precisely scale the circuit according to the voltage and current produced by your solar panel. You connect the nichrome circuit to the electric cables of the solar panel, with a short section of heat-resistant electric cable in between (see our manual).
Our solar electric cooker features a thermal fuse and an internal thermostat, both of which are embedded in the mortar layer. However, these components are not necessary when operating the oven on a solar panel without a battery. Nature already provides the thermostat: once the sun goes down, the heating element stops working, making it unlikely that the oven overheats.
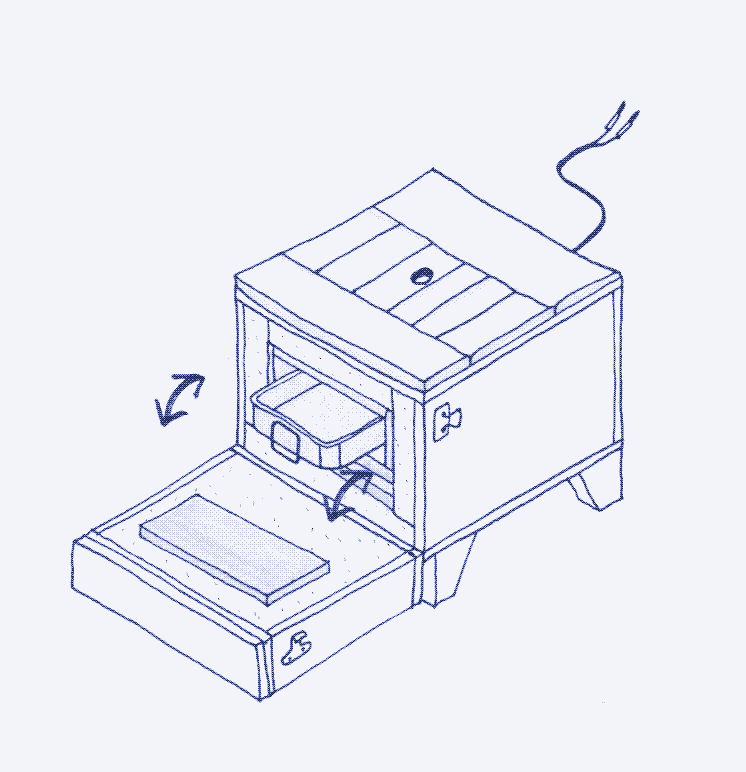
How to use the solar electric oven
Our cooking appliance can be used to cook raw food (vegetables, grains, meat, fish). It can also work as a (slow) microwave oven, warming up leftovers or a ready-made meal.
Food safety
Our oven reaches a maximum cooking temperature of about 120°C (248°F). To avoid food poisoning from potentially dangerous bacteria, food should either be refrigerated or heated to a minimum temperature of between 58 °C and 74°C (136°F-165°F), depending on the type of food, for at least 15 seconds. Cooked vegetables and fruits must reach a temperature of 58°C (136°F). Most meats and seafoods can be safely cooked at 63°C (145°F). Ground meats require a temperature of 71°C (160°F), and leftovers and poultry should reach 74°C (165°F). We monitor the temperature of the food using a food thermometer, which we inserted through the chimney hole at the top.
Keep in mind that the temperature inside the oven will drop once you put the food inside. You should not put frozen food inside, because the temperature will drop spectacularly, and it may take many hours before a safe cooking temperature is restored. For the same reason, the oven should be preheated before the food is placed inside. However, because it’s connected to a solar panel, our oven will be at a sufficiently high temperature for most of the time. You should not keep food in the solar cooker overnight, unless you are sure it maintains a safe temperature until the morning (our cooker does not).

Cooking time
It’s perfectly possible to build an insulated solar electric cooker that cooks food just as fast as a normal oven (see further). However, it makes a lot of sense to build a low-temperature, insulated “slow cooker” instead. First, it allows you to cook with a smaller solar panel. Second, slowly cooked food tastes better and retains more of its nutrients. Third, at lower cooking temperatures, food cannot burn and for that reason you don’t need to stir it either. The inconvenience of a longer cooking time is thus compensated for by a more relaxed and easier cooking process.
On average, it takes about twice as long to cook food compared to using a conventional oven. Most meals we make, cooking raw food, take between two and four hours. Heating leftovers or a ready-made meal takes about one hour. These time spans were measured in optimal weather conditions and with a preheated oven.
Cooking after sunset
Due to the cooker’s high thermal mass, it will take several hours to heat it when you first connect it to a solar panel. However, from the second day onwards, the solar panel will keep the cooker at a continuously high temperature, even for many hours after sunset. When fully charged at sunset, reaching a temperature of approximately 120°C (248°F), our electric cooker maintains a sufficiently high temperature to cook for 4-5 hours. Once the food gets in, the temperature drops but remains high enough (above 80°C/176°F) to cook food safely. The stored heat that remains at the end of the night allows us to restart the cooking process quickly in the morning - our oven is still above 40 or 50°C (104-122°F) at sunrise.
The stored heat that remains at the end of the night allows us to restart the cooking process quickly in the morning.
Draping one or more wool blankets over the oven at sunset further increases the heat storage, allowing for cooking a meal even later in the evening, or starting cooking even earlier the next day. You can also use blankets to raise the energy efficiency of the oven during the day, resulting in a higher cooking temperature.
Moisture
Depending on the food you prepare, excessive moisture in the cooking chamber can be a problem. The water in the food may evaporate and collect in the oven space. Therefore, our oven has a small chimney through which the moisture can escape. It can be closed with a cork cap if you want to keep the moisture inside. It is a good idea to leave the oven door open occasionally so that any moisture in the insulation layer can evaporate.
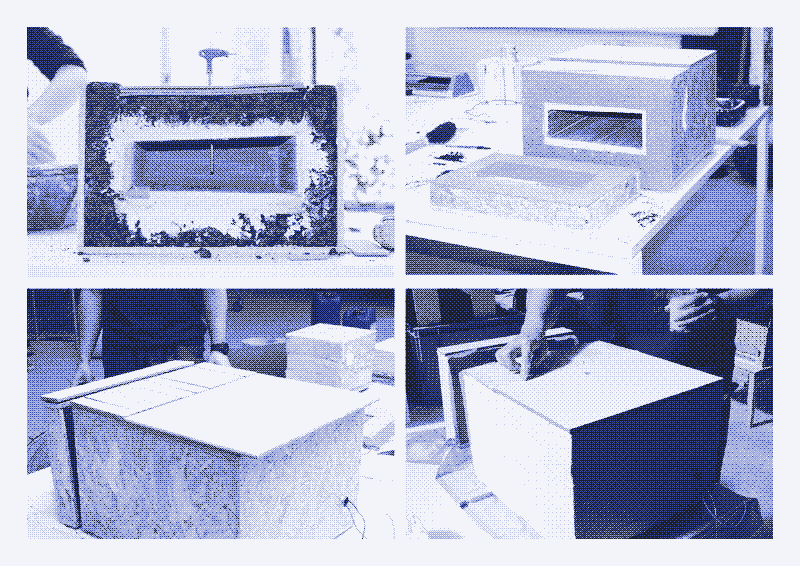
Alternative cooker designs
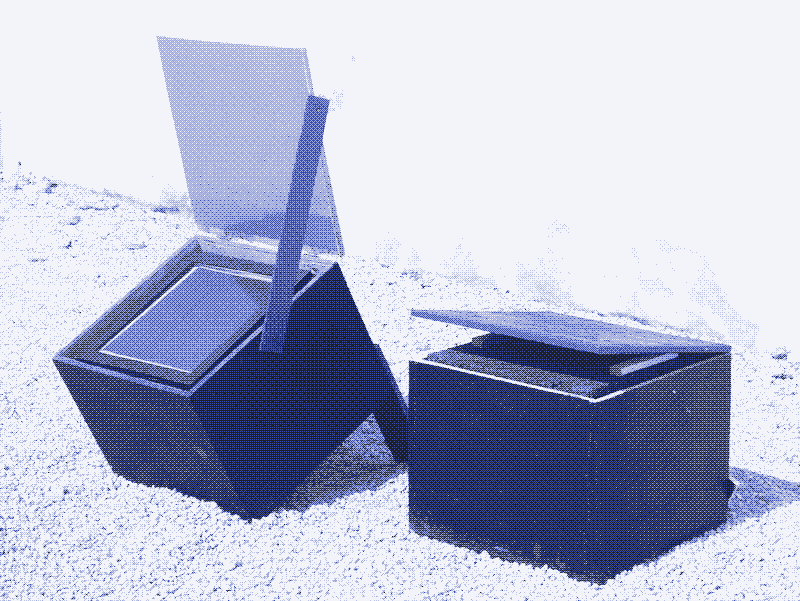
Because we shaped our cooker around an oven tray, it’s mostly suited for oven dishes. However, other designs are possible. An earlier prototype we built has a heat chamber the size of a soup pot, and so that one is better suited to prepare stews and soups. Whatever form you choose, it’s always a good idea to dimension your cooker around a specific cooking utensil. If you put a small pot into a large oven chamber, you will waste a significant amount of energy heating empty space.
Thicker insulation
The thicker the insulation layer, the more energy efficient the oven will be. A thicker insulation layer allows you to use a smaller solar panel for the same cooking time, or a faster cooking time using the same solar panel. A thicker insulation will also improve the heat storage. However, keep in mind that the device’s volume will increase exponentially. Another 5 cm of insulation on all six sides would have made our oven’s size unpractical for most kitchens.
Higher cooking temperature
If you want a solar electric cooker that cooks faster at a higher temperature, you should choose a larger solar panel and a more powerful heating element, and you should raise the setting of the thermostat and thermal fuse. Adding extra insulation also accelerates the cooking time. However, please note that we did not test our building materials at higher temperatures; therefore, proceed at your own risk.
Much depends on the local customs surrounding eating times, especially dinner. For example, European dinner times vary from about 17:00 to 19:00 in northern countries to between 21:00 and 23:00 in southern countries. The early dinner times in the north align with solar cooking. However, the late dinner times in the south would require more powerful cookers with higher temperatures and more thermal storage to cook after sunset, or to safely store a warm dish prepared in the morning.
More or less heat storage
While a solar electric cooker always needs insulation, you can build it with little or no thermal mass. The choice depends on how you want to use the device. With little to no thermal mass, the cooking appliance will heat up and cool down relatively quickly, and it will be somewhat lighter. But it won’t be able to cook after sunset. Many of the ISECs built by others are of this type.
On the other hand, it’s also possible to create a larger version of our solar cooker that can be used to cook for 24 hours a day. Add more thermal mass, insulation, and consider a higher oven temperature, as well as using a larger solar panel and a more powerful electric resistance. Such a cooking device would always be ready to use immediately, without any need for electricity storage, and it could work in industral kitchens or as a community cooking appliance.
You could also build a solar electric cooker with a heat storage consisting of metal rather than mortar. It does not allow you to cook after sunset, but it does enable you to reach higher cooking temperatures for a short time. That makes it possible to bake and fry food.
Step by step buiding guide
What you need
Cooking utensil
- Oven tray. To hold the food that you are cooking in the oven. This tray, which can be made of metal, ceramics, or heat-resistant glass, is the first thing to obtain, as you will dimension the oven around it.
Electric heating element & electrical system (see our separate manual)
- 100W solar panel.
- Nichrome wire.
- Heat-resistant electric cable.
- Thermal switch.
- Thermal fuse.
Structural materials
- Wood boards. The oven is built around a wooden structure. You can reuse an existing box or make it from scratch. Reclaimed wood or chipboard is fine, since none of it will be visible.
- Tiles. We use tiles for both the interior of the cooking chamber and the exterior of the oven.
- Wood screws.
- Hinges and hooks. To attach the oven door.
- Feet for the oven. We made these out of wood. Feet make it easier to lift and move the oven, and they protect the oven against water damage from below.
- Handle for the oven door. We made one out of wood.
Insulation materials
- Expanded cork boards. We used 5 cm thick expanded cork boards as insulation on all sides. We used roughly 1 m2 of expanded cork. You can also use regular cork or wool insulation. Avoid flammable materials such as cotton, wood chips, or any oil-based insulation material. Cork and wool are fire-resistant materials.
- Thin cork sheets (4 mm). You place them as a sealant between the oven door and body. You also use them to fill in the height differences between the expanded cork layers above the oven chamber.
Heat storage material
- Construction mortar. We use mortar to provide thermal mass for heat storage and to embed the electric resistance heater.
Fixing & filling materials
- Adhesive mortar. To fix the tiles to wood and cork surfaces.
- Grout. To fill up the space between the tiles.
Extra components
- Food thermometer. You need one with a long sensor, as it will have to travel through the thick insulation layer at the top to reach the food.
- Chimney pipe. Roll a tube of thin aluminum sheet, which you can cut out of a soda can. Alternatively, buy a metal tube of the correct size.
Tools
- Screwdriver
- Wood saw
- Drill (you need a concrete drill bit for the chimney opening)
- Soldering iron and tin
- Tile cutter (optional if you find the right size of tiles)
- Measuring tools
- Utility knife
- Mortar trowel and mixing container
Step 1: Build the structure
- Obtain an oven tray and measure it. We dimensioned our cooking device around a stainless steel tray approximately the size of an A4 sheet: 20 cm x 27 cm.
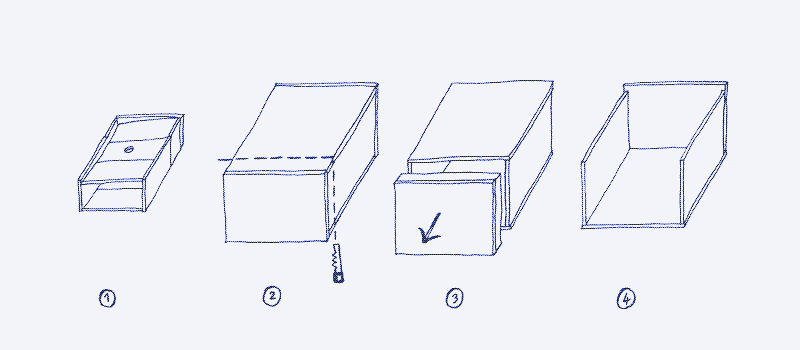
- fig 1. — Using tiles, create a box around the tray with enough room to slide in and out easily. The box will become the inner chamber of the solar cooker. For now, keep the structure together with tape. When determining the dimensions of the heating chamber, leave some space at the top of the oven tray to allow for heat circulation. Ideally, you find tiles that have the correct dimensions. Otherwise, cut the tiles to the correct dimensions using a tile cutter.
- Measure the exterior dimensions of the tiled oven chamber to calculate the dimensions of the wooden box that will surround it. Add 5 cm of space on all six sides to fit the expanded cork layer. At the bottom, add about 2-3 cm extra to account for the mortar, which will embed the heating element. Add 5 mm to the dimensions on all sides to ensure everything fits.
- fig 2. — Build the wooden box according to the calculated dimensions (don’t forget to add the wood thickness). Screw the wood together in a way that allows for the removal of the upper part later in the building process (see step 3). Measure everything a few times before you start cutting the wood, as it’s easy to make mistakes.
- fig 2-3. — To make sure that the door neatly aligns with the rest of the wood box, build the structure as a whole and then cut away (saw) the door part off the box. The door part needs to be 6 cm deep to fit in the insulating cork layer and the oven chamber tile on that side.
- fig 4. — Once you have cut the wood, unscrew the top board to gain better access inside.
Step 2: Make the electric heat resistance
- Create a resistive heating element using Nichrome wire. See our separate manual for instructions.
Step 3: Add insulation, create the heat storage and add the electric heat resistance
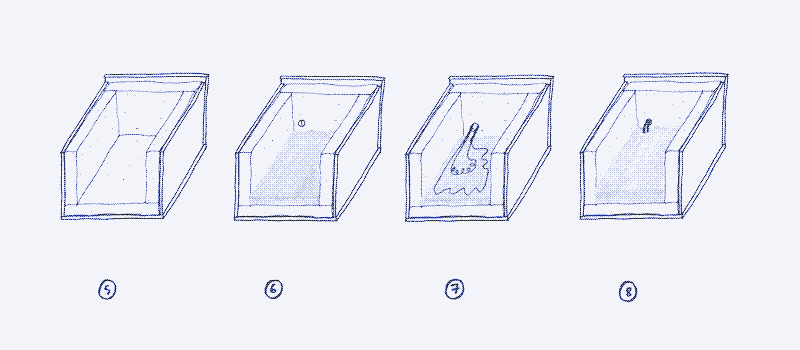
- fig 5. — Using a thin saw or utility knife, cut and glue the expanded cork insulation boards to cover all sides of the area. You can use wood glue or hot glue. Keep the top board apart to add it later.
- fig 6. — Mix some construction mortar with water and create a layer of about 10-15 mm on the bottom cork layer. Leave it to set for a couple of hours.
- fig 6. — At the back of the box, about 10mm above the mortar layer, pierce a hole through the cork and wood to channel the electric cables through.
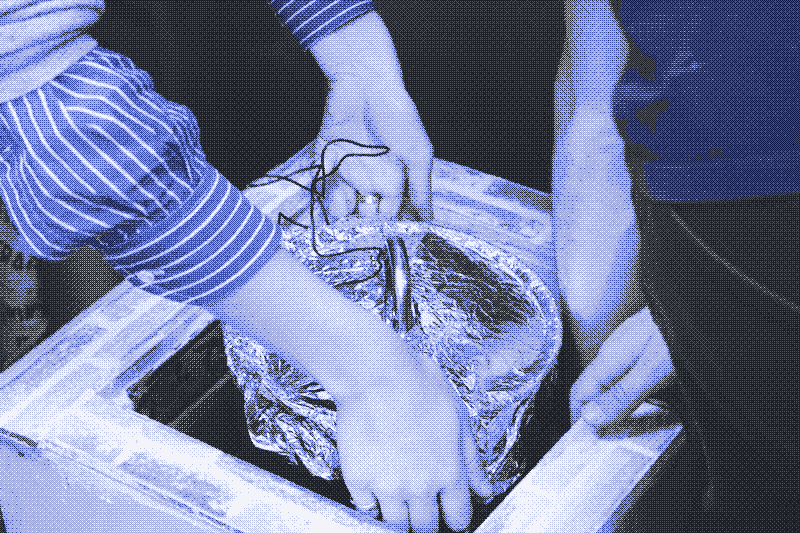
- fig 7. — Place the resistance circuit on top of the mortar bed and drive the heat-resistant cable endings through the hole in the back of the box. Make sure the nichrome wires don’t cross or touch, and that the (optional) fuse and thermal switch are also lying on top of the mortar.
- fig 8. — Pour another 10-15 mm of mortar to cover the circuit.
Phase 4: Fix the cooking chamber in place and complete the insulation
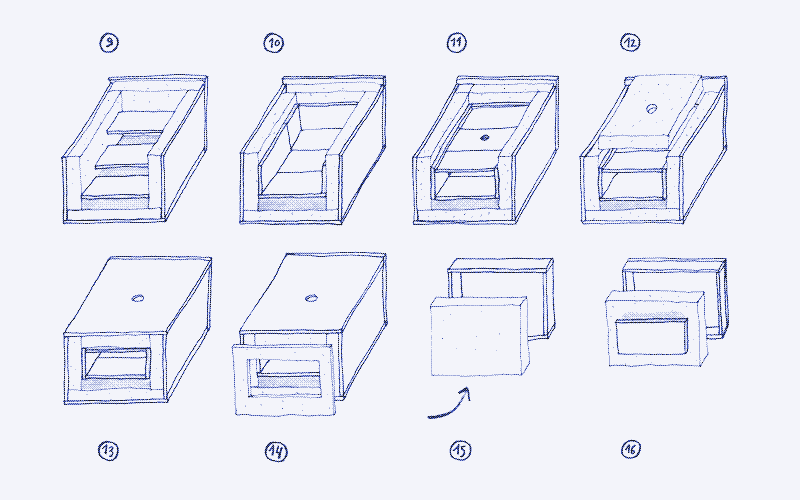
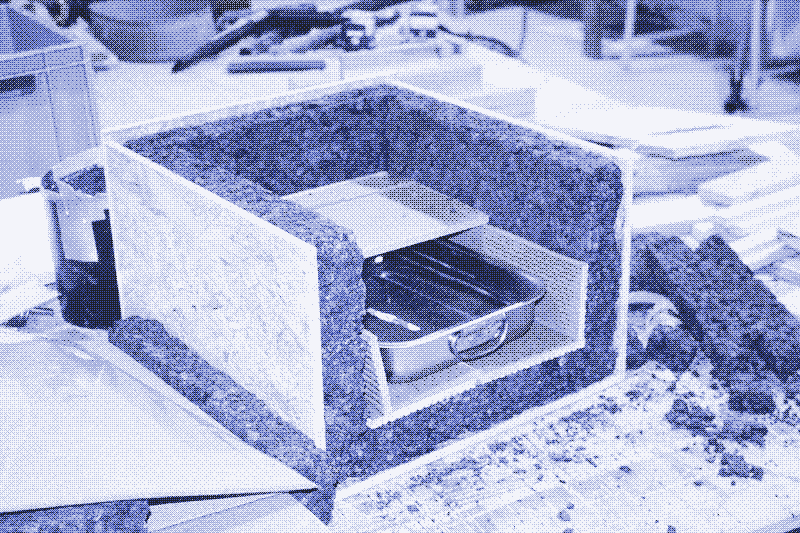
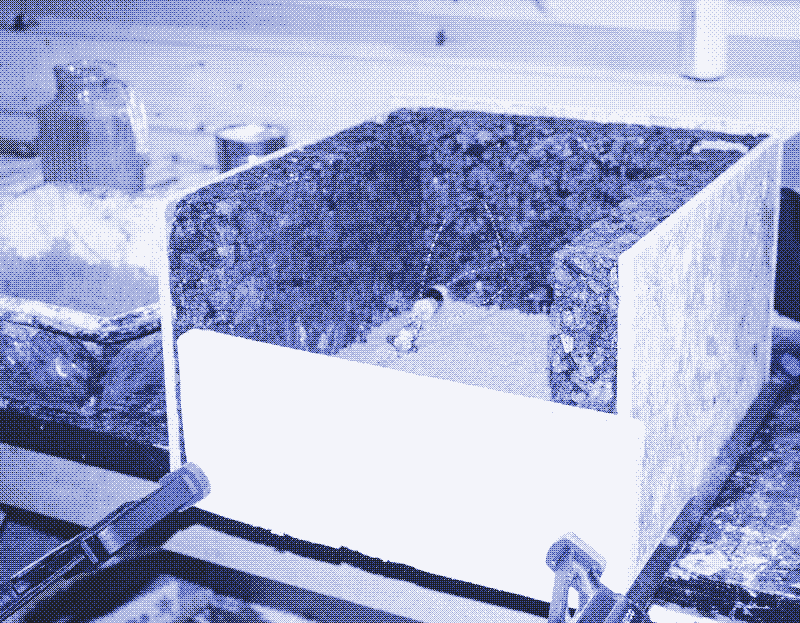
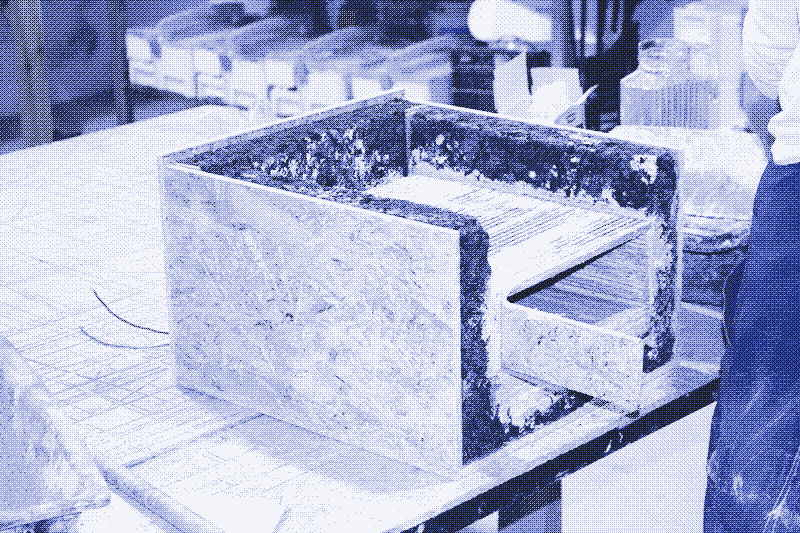
- fig 9. — Take the tiles you prepared for the inner chamber. Place some mortar at the back of the bottom tiles and press them onto the mortar bed.
- fig 10. — Using adhesive mortar, fix the remaining tiles to the sides and back of the cork boards, recreating the oven chamber that you taped together in step 1.
- fig 11. — Using a drill with a concrete drill bit, make a 10-12 mm hole in the center top tile to fit an air vent chimney.
- fig 11. — Lay the remaining top tiles to rest on the edges of the side tiles with a bit more mortar. It is a good idea to tilt the top tiles slightly to one side to guide condensation moisture away from the food tray.
- fig 12. — Before placing back the top cork board on top of the inner tile chamber, mark the position of the chimney and drill through the cork and wooden boards.
- fig 12-13. — Place the top corkboard on the top tiles with a bit of adhesive mortar and screw back the top wooden board to close the box. If there are some air gaps, fill them in with cork scraps or sheets to prevent heat leakage.
- fig 14. — Glue 4 mm thick cork sheets to the box insulation that surrounds the oven chamber on the front. Use wood glue. This extra layer helps to close the door tightly and prevents any heat from escaping.
- fig 15. — Insulate the door by fitting a 5 cm expanded cork board inside with wood glue. Using a bit more adhesive mortar, place the last tile on the door, making sure it aligns and closes the inner chamber when the wood box is closed.
- fig 16. — Glue another 4mm corksheet to mirror the chamber’s edge.
The box is now mostly finished. Let everything dry/cure for at least 48 hours.
Step 5: Finishing touches
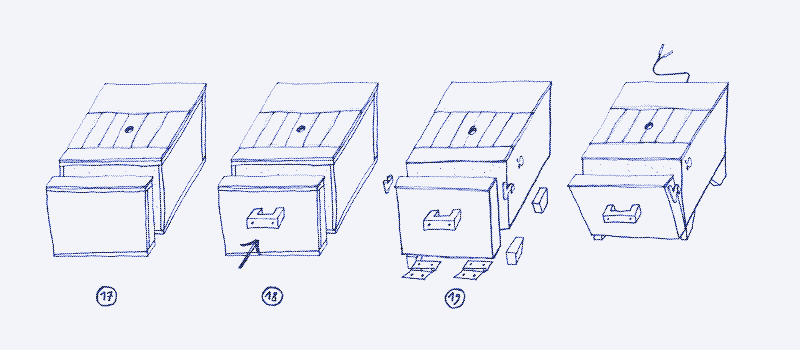
- fig 17. — Tile the box top to make it waterproof and heat-resistant (you can put the oven tray there when it comes out of the oven). Ensure that you leave a hole for the chimney.
- Make and insert the chimney. Fit it into the hole you made.
- Grouting. Seal the inner tile chamber with grout to prevent moisture from entering the cork insulation. Do the same for the exterior tiles and for the joint with the chimney. We also added plaster on the sides to protect the wood.
- fig 18. — Add a handle to the door.
- fig 19. — Add hinges to attach the door to the oven body using screws. Place a metal latch on each side to tightly lock the door during operation.
- Add small feet to the oven to make it easier to lift and to protect it against water damage.
- The oven is finished!
- Connect the heat-resistant cables sticking out of the oven to the wires of the solar panel. Insert an on/off switch between them (on the positive wire).
Credits
- Concept: Kris De Decker, with input from Marie Verdeil.
- Design: Marie Verdeil, with input from Anna Mareschal de Charentenay.
- Construction & documentation: Marie Verdeil, with assistance from Hugo Lopez.
- Design & construction of two earlier prototypes: Vaiva Vinskaité, with input from Kris De Decker and Marie Verdeil.
- Thanks to: Samira Allaouat & Alexandra Tollefsrud for the tiles. AkashaHub Barcelona for the workspace. Living Energy Farm & Cal Poly for their pioneering work on insulated solar electric cookers.
Reactions
To make a comment, please send an e-mail to solar (at) lowtechmagazine (dot) com. Your e-mail address is not used for other purposes, and will be deleted after the comment is published. If you don’t want your real name to be published, sign the e-mail with the name you want to appear.
Reactions
ingo
Hi, just read your solar oven article. What about adding a layer of phase change material, paraffin would fit the temperature range? The main problem would be the addition of complexity
ingo
A Baldo
This heat-retention electric cooker is a really good idea! I enjoyed the article very much.
I was surprised, however, to read that cooking was the biggest energy issue for you going off grid; In my own off-grid existence, it is refrigeration which uses up the most electricity.
So much so, that of all my appliances, only three are on a DC circuit (to avoid the electric costs of inversion), and two of those three are my refrigerator and my chest freezer, both specifically designed for off grid use. The third appliance is my large house fan which circulates warm air from my rafters through a heat mass under my floor.
In my own experiments with solar ovens, I have noticed that condensation really is one of the biggest problems. When I bake bread in mine, I have to leave the glass open a crack to let moisture escape and I have to flip the loaf over in the pan halfway through, to bake the underside. It turns out that much of baking involves dehydration as well as heating. Yet leaving an opening also decreases the insulation of the system.
It is a Catch-22. I usually just bake in my toaster oven in the summer and my woodstove in the winter.
Similarly, my thermal cooker also cooks wet meals like soups, stews, legumes, and porridge most successfully. So if I were to implement something like the system you have described, I think I would opt for a heated haybox that can accommodate a soup pot with a well-fitting lid, rather than something that is oven-shaped.
Chuck
Truly bizarre project. Its great that the price of solar panels has dropped. You might consider using a picnic cooler as an enclosure. I found a couple discards on the street near home. Also, have a look at “hay boxes”. Used in the olds days to keep foods hot and finish cooking. In modern times use plastic packing “peanuts”? Chuck
Bob Riley
Hi Kris, Thank you for the latest edition of LTM. Your solar oven will be useful for many, but have you considered a low tech solar induction stove. They are dirt cheap now costing $79 in NZ and you can buy the guts from Ali Express for under 20. I use mine for many things other than cooking. Fill a plastic bowl with water and a metre of chain and you’ve got hot water to wash the car. Slow-cook an insulated pressure cooker with two layers of silicon rubber or aluminium or copper plate and you can dial down the temperature below the 60watt minimum. No heat or flame to burn on the pc. As their electronics are low voltage DC, induction stoves are easily modified for solar panels with your insulated box on top to make an oven if needed. A solar pizza? A coil of brake pipe might even make a continuous water heater. It’s worth experimenting with? I’m retired now in Rarotonga but still tinkering thanks to Ali.
Kind regards,
Bob Riley
Kris De Decker
@ A Baldo
Cooking is not my biggest energy issue; it’s the biggest power issue. See note 1: https://solar.lowtechmagazine.com/2025/10/how-to-build-a-solar-powered-electric-oven/#fn:1
Refrigeration is indeed a bigger energy issue - lower power use but 24 hours per day. We plan to make a refrigerator based on the same principles.
For condensation we have the chimney. It works well in most cases but sometimes we have moisture on the cork layer of the front door. Leaving the oven running for a while with the door open quickly dries that out, though.
@ Bob
We did not try induction stoves but it’s surely worth the experiment. What’s the power use?
Foldi
Nice design, though I would change one thing - do not embed just a single nicrome heating element in the base but an array of them all seperated with leads to the outside. Then put a small cover over the exposed points and “electronics box” of sorts. That way you can switch to an alternative loop if your current one dies, or chain multiple together easily after construction to tune the performance of your oven for the available solar panel at the time! I’d suggest also embedding a tiny bit of Aluminium L profile that runs through the primary insualtion layer that you can attach the thermal protection to inside that electronics box - again allows for changing it should your install change or the component fail more easily than when it is embedded in the based so the whole oven likely has a vastly longer lifespan.
p.s can also insulate the “electronics box” to mitagate the conduction losses from running more good thermal conductors through the primary insulation if its needed - I suspect it won’t make much odds, but would be worth checking.
Foldi
Nano
Hello! Very interesting article. As someone who is considering to move to a place with no oven, this can turn into a fun project. :) I have a couple ideas about how to modify the oven. First, there’s the problem of baking. Of course, if temperature is 180 degrees Celsius, it’s going to be easy to bake most things, and it can probably be pushed to 200 to make it more similar to a typical baking job. Problems begin when you want to make something that requires even higher heat, like a pizza, which at home is made in the oven turned all the way up, usually 250 degrees Celsius. Cork and mortar are out, then. Mortar can be replaced with sand. Cork is going to be tricky to replace with something cheap and natural, though. The best thing I could find so far is sisal fiber, which, from what I could find [1], can handle quite a lot of heat before degrading, but it is just shy of 250 degrees. Maybe, for safety, there could two layers of insulation - one thin layer closest to the heat and the one that tolerates heat the most, and then sisal fiber around it. By the time heat passes through the first layer, it would be low enough to not degrade the sisal layer. This oven looks quite similar to how a pizza oven works, so it’d be nice to turn it into a solar oven that can function like a conventional one. Second, it seems really easy to add some additional wiring to incorporate a bicycle generator for additional energy. Say, if you make this kind of pizza oven, but you limit it to 180 degrees Celsius for usual baking and cooking and then you’re having a pizza night one day, so you and your friends “preheat” the oven by adding additional energy into it with the bicycle generator, getting it to a higher temperature to bake pizzas. Or it could be possible to plug a battery in for that, which would have energy stored from some other source. Or the temperature could be 120-150 degrees Celsius for everyday cooking, and brought up to 180 with the bicycle generator for baking. Although, I have to ask - where do you read about these material properties? I want to see how sand compares to mortar, or how different cellulose kinds compare to each other for insulation. Maybe you or someone else reading this knows of some kind of database for this? Have a good day! Excited to read the upcoming tutorials. :)
[1] https://pmc.ncbi.nlm.nih.gov/articles/PMC8705297/
Mark
Hello,
You might or might not have thought of using glass foam granulate mixed into the mortar for insulation. There are several suppliers across Europe. A useful product might be the small beads by https://stikloporas.com (Lithuanian producer).
Also, lime based mortar might or might not be appropriate. Its behaviour under heat stress might or might not disqualify it. Considerably less energy intensive than portland cement though, so might be worth researching.
With some luck, this combination might further simplify the design thanks to less different layers.
Kind regards,
Mark
Bear Naff
One further project that might be worth considering is somewhat more complex. An electric rice cooker is an incredibly elegant electromechanical device.
I apologize if you’re already quite aware of all this, but… It uses an incredibly cheap temperature-sensitive ferrite magnet to control when the cooker shuts off. The magnet loses most of its strength at around 102-103C, causing a carefully designed circuit to temporarily spring open. When the magnet cools, its strength returns and the circuit can be pulled closed again with a mechanical switch. The cutoff temperature is set at just above 100C because while there is liquid water in the cooker, the temperature of the food should not go above the boiling point of water.
So, rice and water in an appropriate ratio go into the cooker, the element heats up, and when the water is all absorbed or evaporated, the thermostat opens the circuit and the cooker shuts off.
Your solar heating element makes use of similar components in similar ways, and a rice cooker, steamer, and electric kettle on the same scale as the oven might add some great flexibility to your kitchen.
I see one issue that will require solving and one that would be nice to solve. Unless you’re starting with a commercially available cooker and just replacing the heating element while increasing the outer insulation, creating a mild pressure seal to trap the steam inside the cooker will be a challenge. This may be a refit design more than a nearly-from-the-ground-up creation.
The thing that would be nice would be designing the rice cooker so it’s meant to be used alongside the oven. Your oven has excellent thermal insulation, so it should retain most of its heat if the door stays closed for the (hopefully) 45 minutes or so it takes the rice cooker to work.
A circuit design that automatically shunts power from the cooker to some other device when the cooker is off seems like it would make for a very effective accessory design for the 1-panel directly solar powered kitchen. It would be convenient to be able to toss something that can handle long bake times in the oven, then prep some veggies for steaming or rice for serving and have the rice cooker basically automatically disconnect the oven until it’s done using the power before hooking the oven back up.
I have enjoyed these projects and continue to enjoy Low Tech Magazine.