Readers have told me they like to build small-scale photovoltaic installations like those that power Low-tech Magazine’s website and office. However, they don’t know where to start and what components to buy. This guide brings all the information together: what you need, how to wire everything, what your design choices are, where to put solar panels, how to fix them in place (or not), how to split power and install measuring instruments. It deals with solar energy systems that charge batteries and simpler configurations that provide direct solar power.
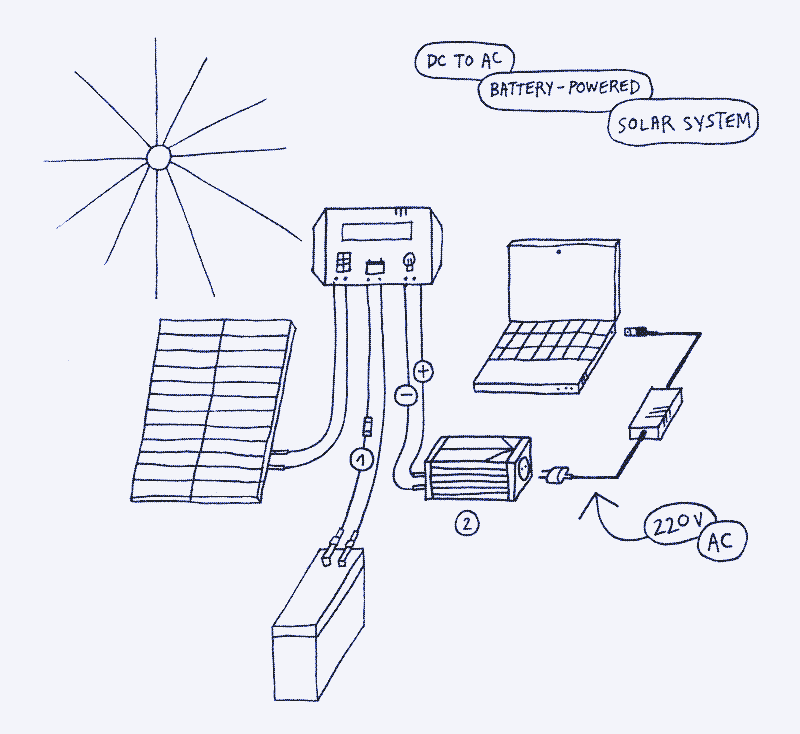
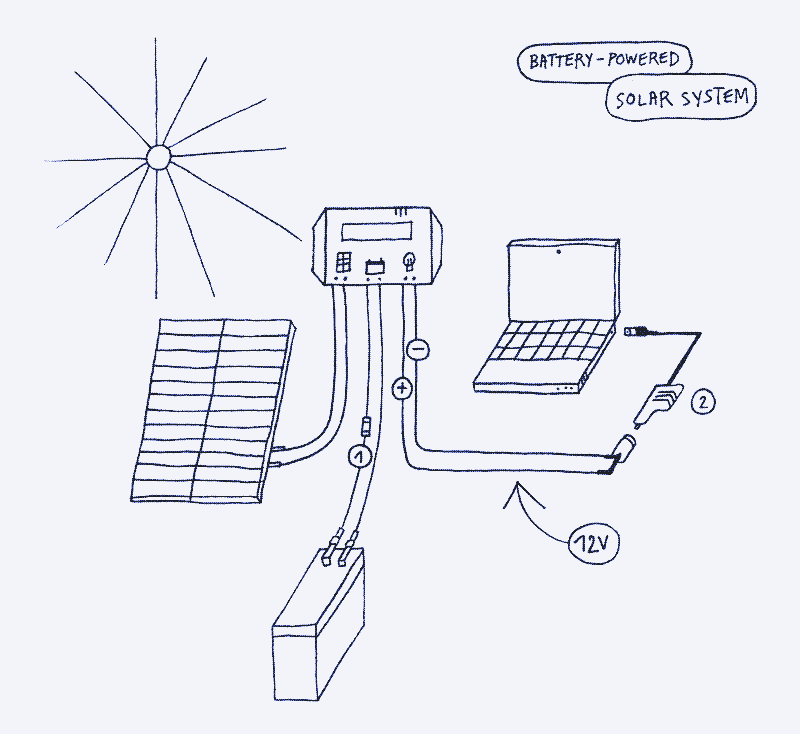
Conventional solar PV installations are installed on a rooftop or in a field. They convert the low voltage direct current (DC) power produced by solar panels into high voltage alternate (AC) power for use by main appliances and rely on the power grid during the night and in bad weather. None of this holds for the small-scale systems we build in this manual. They are completely independent of the power grid, run entirely on low voltage power, and are not powering a whole household or city but rather a room, a collection of devices, or a specific device. Small-scale solar is decentralized power production taken to its extremes.
Most of the work in building a small-scale solar system is deciding the size of the components and the building of the supporting structure for the solar panel. Wiring is pretty straightforward unless you want a sophisticated control panel. You only need a limited set of tools: a wire stripper, some screwdrivers (including small ones), and a wood saw are the only essentials. A soldering iron, pliers, and a multimeter are handy, but you can do without them.
- Before you start: safety
- Before you start: low voltage or high voltage?
- Before you start: do you really need a battery?
- What you need: the components of a small-scale solar system
- How to connect solar panels in series and parallel
- How to wire a solar power system with battery storage?
- How to wire a solar power system without battery storage?
- How to size solar panels, batteries, and other components?
- How to build supporting structures?
- How to split power and run multiple devices at the same time
- How to include measuring instruments?
- Control panels and power outlets
- How to obtain low voltage appliances?
Before you start: safety
Low-voltage DC power does not carry a risk of electrocution (a fatal electric shock). That is especially so for 12V systems. Depending on the electric conductivity of your body (and other factors), you could go up to 20-50V before an electric shock may kill you. 1
Nevertheless, solar power systems have their risks. The main dangers are electric shock (non-fatal but painful), fire, battery explosion, and component damage. However, if you stick to some simple rules, you will be OK. During seven years of solar power experiments, I have never caused a fire or received an electric shock, although I have fried some components.
- Never touch electric components with wet hands.
- Never touch the exposed part of a positive and negative wire simultaneously. You will become part of the electric circuit and receive an electric shock. It is perfectly fine to touch just one wire. The same goes for the battery terminals: it’s OK to touch one, but not two at the same time.
- Never let a positive wire touch a negative wire. That will cause a short circuit, leading to physical harm, component damage, fire, or a battery explosion. Use different colors for positive and negative wires and stick to them.
- Always put a fuse in your solar system.
- Make sure your cables are thick enough.
- Never connect a solar panel directly to a battery. Use a charge controller in between.
- Never put a lead-acid battery in an enclosed container.
Before you start: low voltage or high voltage?
Electric power (expressed in watts) equals current (in ampère) multiplied by voltage (expressed in volts). Consequently, electric power (W) can refer to a low voltage (V) with a high current (A) or a high voltage with a low current. Conventional solar installations for households always use an inverter, which converts the low-voltage DC power from a solar panel into the high-voltage AC power used by main appliances. You can do the same for a small-scale solar installation, but it’s better to omit the inverter and build a low-voltage DC solar system. 23 That is the type of electrical installation in cars, trucks, sailboats, caravans, and motorhomes.
Power (watts) = V (volt) x A (ampère)
Omitting the inverter has lots of advantages. First, it makes solar installation cheaper because inverters are expensive. Second, it makes the solar power system more energy efficient. Converting low-voltage DC power to high-voltage AC power involves energy losses as high as 50% for small-scale solar installations. High-quality inverters are more than 90% efficient when used at high capacity. However, if the electric load is far below the maximum capacity of an inverter, which is the case in many small-scale solar setups, the efficiency drops quickly. There is often additional energy loss (at least 5-15%) in the conversion from AC to DC power because many modern devices operate internally on low voltage. That energy loss occurs in the AC/DC adapter of the device, which can be inside or outside.
High-voltage AC power (220-240V in Europe, 110V in the US) results from more than a century of centralized power production. 2 Fossil fuel power plants become more energy efficient as they get larger. Therefore, installing a few large power plants and then distributing the power over large distances across a region makes sense. Because power loss due to resistance is proportional to the square of the current, high voltages are the key to energy-efficient power transmission over longer distances. Solar PV power has made this approach obsolete. Unlike a fossil fuel power plant or a wind turbine, a solar panel’s efficiency does not depend on its size. Furthermore, because solar panels can be at the point of energy consumption, there is no need to convert solar power to high voltage and transport it across large distances.
Directly coupling a low-voltage DC device to the low-voltage DC power produced by a solar panel avoids these energy losses and results in a more energy-efficient system. Practically, you can power the same device with a smaller solar panel. However, this implies that you use low-voltage appliances. Of course, you could plug in an inverter occasionally to power a mains appliance if there is no alternative. Make sure to buy one that is not too powerful, because it has to be operated on high capacity to be efficient. I have not found inverters with less than 150 watts of power capacity.
Before you start: do you really need a battery?
The sun doesn’t always shine. That is particularly so at night. You can add a battery and charge controller to your solar PV installation, and then you can use solar power when the sun is not shining. However, batteries are expensive, energy-intensive, and have short lifetimes. 4 Across the entire life span, batteries account for 80-90% of total costs and energy invested in an off-grid solar system. 5 They also introduce charge and discharge losses, which have to be compensated for by larger solar panels. For lead-acid batteries, the most cost-efficient option, these losses can be as high as 20-30%.
Batteries account for 80-90% of total costs and energy invested in an off-grid solar system.
This guide does not argue against battery storage, which is handy for some applications. However, you can often build a photovoltaic solar installation without battery storage. Such “direct” or “direct-drive” solar systems are cheaper, quicker, and easier to make. A direct solar power system allows you to use a wide variety of appliances during the day, even powerful ones. Examples are power and workshop tools, sound systems, and ventilating fans. Other devices, such as refrigerators, cooking stoves, and heating systems, can use direct solar energy in combination with heat or cold storage as a cheap and sustainable alternative to batteries. 6
Part of the money saved on batteries can be spent on larger solar panels, increasing the power supply in less optimal weather. A direct solar system can thus perfectly work in cloudy weather, even if it does not work between sunset and sunrise. It also works particularly well for powering devices with batteries, such as smartphones, tablets, laptops, bicycle lights, portable power tools, and power banks. You can only charge these devices during the day. However, you can use them after sunset.
The distinction between solar panels with or without energy storage isn’t always obvious. For example, you can connect a solar panel to a USB power bank (with a DC-DC converter in between). The system then becomes a battery storage system based on lithium-ion, taking advantage of the power management already available in the power bank. If you charge portable LED lights with batteries, a solar panel can even keep the lights on at night – a modern approach to the torch.
What you need: the components of a small-scale solar system
Solar panels are the main component of all systems we build here. Solar panels come in different voltages, usually 12V or 24V, sometimes 36V, 48V, or higher for grid-tied systems. For small-scale systems, 12V or 24V is what you want, especially to start with. You can also find small solar panels with voltages below 12V.
People often ask which solar panels to buy, but there is little advice to give. You have a choice between mono- and polycrystalline solar panels. The first are more powerful and expensive, but there is little difference. Almost all solar panels are made in China, no matter where you buy them. 7 A good advice is to compare prices and buy one that is not unusually cheap or expensive.
The other components depend on the type of installation you want to build. A solar installation with battery storage also needs a charge controller and a battery. A batteryless, direct solar system only requires a DC-DC converter. Both systems also need electric cables, fuses, and connectors. Optional components are on/off buttons and measuring devices.
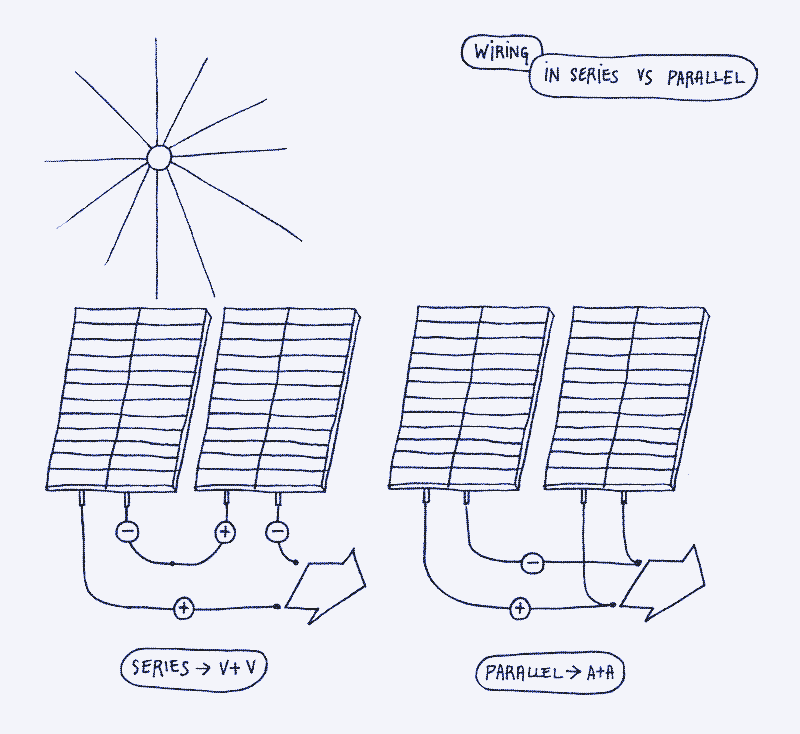
How to connect solar panels in series and parallel
Solar panels can be used individually or connected in parallel or in series. When you wire solar panels in parallel, the voltage output remains the same, but the current output doubles. That is the most common set-up. If you need (for example) 50W of 12V solar power, you can buy one 50W solar panel or several smaller panels (2x25W or 5x10W) and wire them together in parallel.
Using several smaller panels rather than one large panel is not the cheapest option because smaller solar panels cost more per watt of peak power. However, it can be the only way to fit panels where you want them. For example, my window sill is too narrow for a 60W solar panel, but I can install three 20W solar panels mounted next to each other. It would be cheaper and easier to have one 60W solar panel with a size that corresponds to the window sill, but that format is not available.
When you wire solar panels in parallel, the voltage output remains the same, but the current output doubles.
You can also wire solar panels in series. The voltage output doubles, but the current output remains the same. Wiring solar panels in series allows you to power 24V devices with 12V solar panels. Of course, you may just as well get a 24V solar panel. It’s best to connect solar panels of the same type, whether you wire them in series or parallel. Different types of solar panels may have different current outputs, which decreases efficiency.
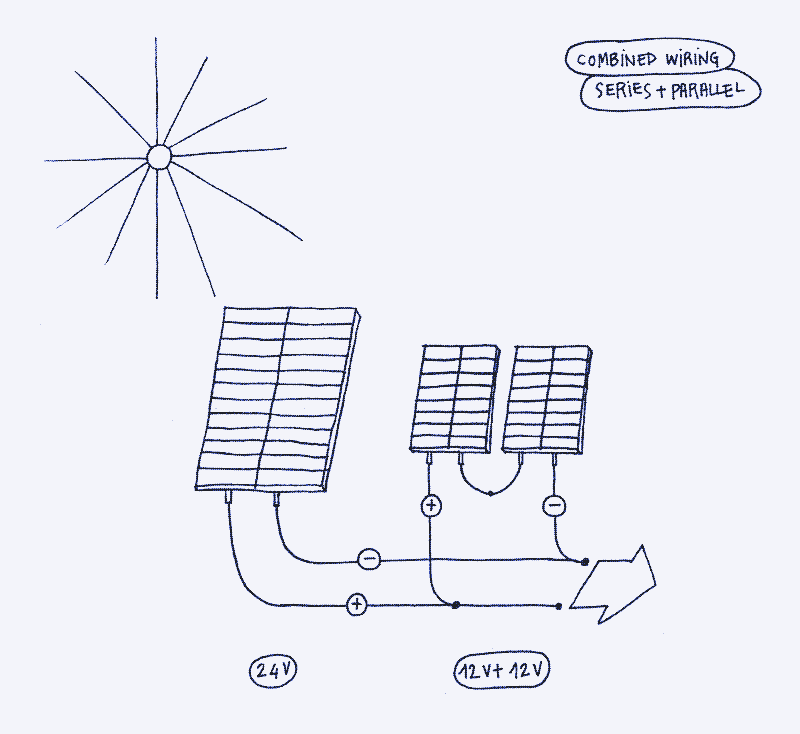
You can also wire solar panels in series and parallel. For example, you can connect two groups of three 12V panels in parallel and then wire the two groups together in series. The result is a 24V system with the combined current output of three solar panels. You can also wire batteries in series or parallel to the same effect.
How to build a solar power system with battery storage?
When building a solar power system with battery storage, you need a solar charge controller and a battery. Most off-grid solar installations run on lead-acid batteries. For portable solar systems with batteries, lithium-ion is the most practical option. Otherwise, lead-acid batteries are still the safest and most affordable option. They require less complex battery management controls than lithium-ion batteries. There are many other less common battery types, I’m not going to elaborate on those here.
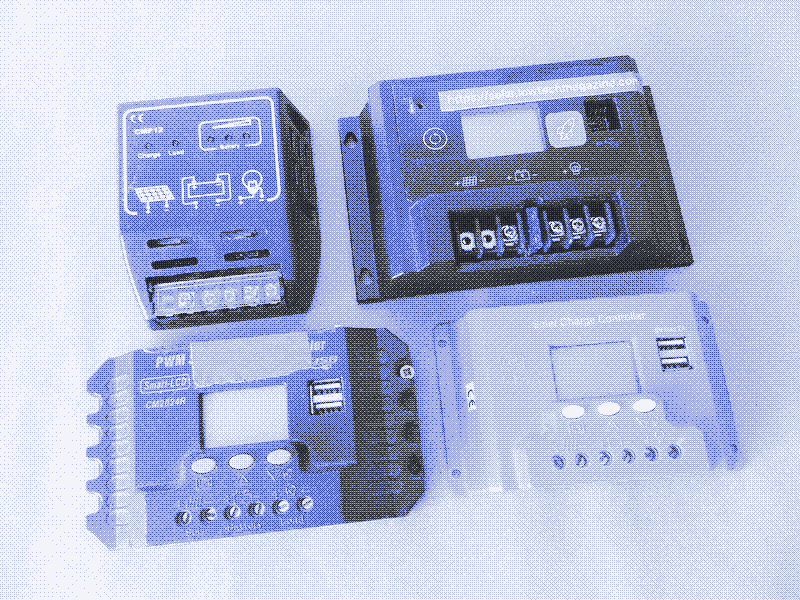
Solar charge controllers
Never connect a solar panel directly to a battery. If you want to store solar power for later use, install a solar charge controller in between. A solar charge controller regulates the voltage output of the solar panel in the function of the voltage that the battery needs during its different charging phases. It also provides a stable 12V output from the battery and shuts down the system if the voltage falls below a determined level. Most solar charge controllers offer a menu to adjust these values. Some come with a more elaborate second screen.
There are hundreds of different types of solar charge controllers available. For small-scale solar scale systems, my experience is that anything goes. The cheapest solar charge controllers work fine, but they should work on the correct voltage and have sufficient capacity (see how to size a solar system). More expensive solar charge controllers (like MPPT) are not worth it for small-scale systems. If your system works with lithium-ion batteries, you need a different solar charge controller, which is more expensive. If you are handy with electronics, you can build your solar charge controller. 8
Batteries
The type of lead-acid battery you need for a small-scale solar system is a sealed lead-acid battery. If you use a 12V solar panel, you need a 12V battery. If you use a 24V solar panel, you need a 24V battery. Handle lead-acid batteries well because not doing so can ruin them quickly. Most importantly, their voltage should not drop too much, and you should fully recharge them regularly. Never leave a lead-acid battery without charging for a prolonged time. Keep it connected to a solar panel, including when you are away from home.
Handle lead-acid batteries well because not doing so can ruin them quickly.
When coupled to a solar panel and battery, the charge controller will disconnect the battery when the voltage drops below a specified level, usually 12V. You can adjust this value in the menu. You can go as low as 11V, at the expense of a shorter battery lifetime. If you want a longer battery lifetime, you can set the value to 12.2 or 12.5V, for example. The price you pay is a lower energy storage capacity.
Do not place a lead-acid battery in a closed container. Put a fuse in the positive wire between the battery and the solar charge controller as close to the battery as possible. Monitor the voltage with a digital volt meter. If you want to know more about batteries, the Battery University is a good place to start.
Wiring
Solar charge controllers connect all other components: the battery, the solar panel, and the electric load (the devices you will power). A solar charge controller should have six wires sticking out: two to the battery, two to the solar panel, and two to the electric load. You should always join the components in the order described below.
- Connect the battery to the solar charge controller (battery symbol)
- Connect solar panel to solar charge controller (solar panel symbol)
- Connect the electric load to the solar charge controller (light symbol)
To unplug, you have to go the opposite way:
- Disconnect the electric load from the solar charge controller (light symbol)
- Disconnect the solar panel from the solar charge controller (solar panel symbol)
- Disconnect the battery from the solar charge controller (battery symbol)
Never connect the solar panel to the charge controller if it’s not connected to the battery. Think of the battery and charge controller as one unit. You can avoid costly mistakes by working on solar systems after sunset, or by covering the solar panels during the day.
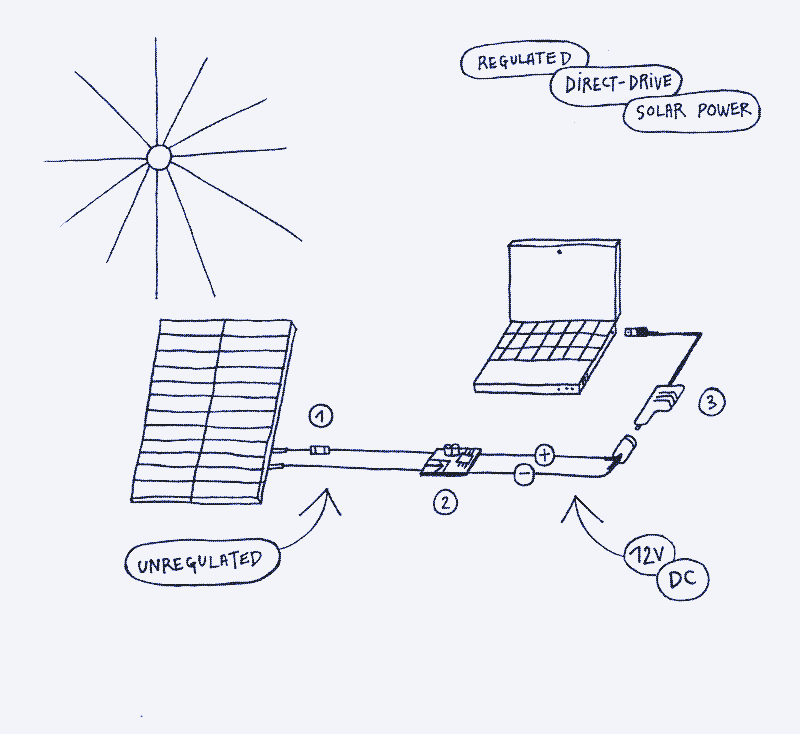
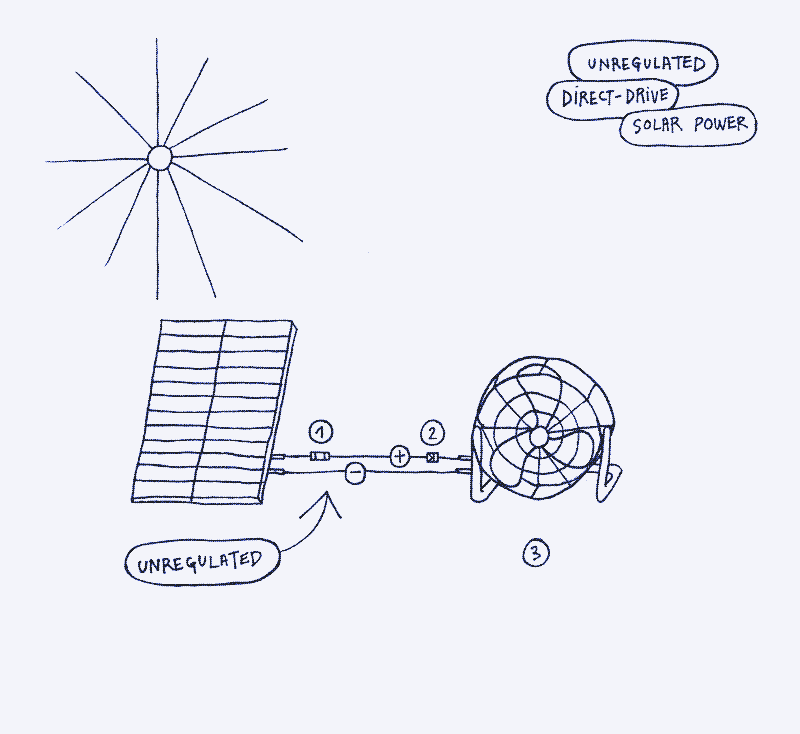
How to build a solar power system without battery storage?
In a direct solar power system, there is no need for a battery or a charge controller. The solar panel is either directly connected to the powered device or has a DC-DC converter in between. Some DC devices can work on fluctuating voltages, for example, fans, pumps, and other devices with a DC motor. The motor will run faster or slower depending on the voltage. Heating elements can also work at different voltages. However, other appliances – such as all electronics – need a precise and steady input voltage. A DC-DC (buck or boost) converter is essential to provide that stable voltage input.
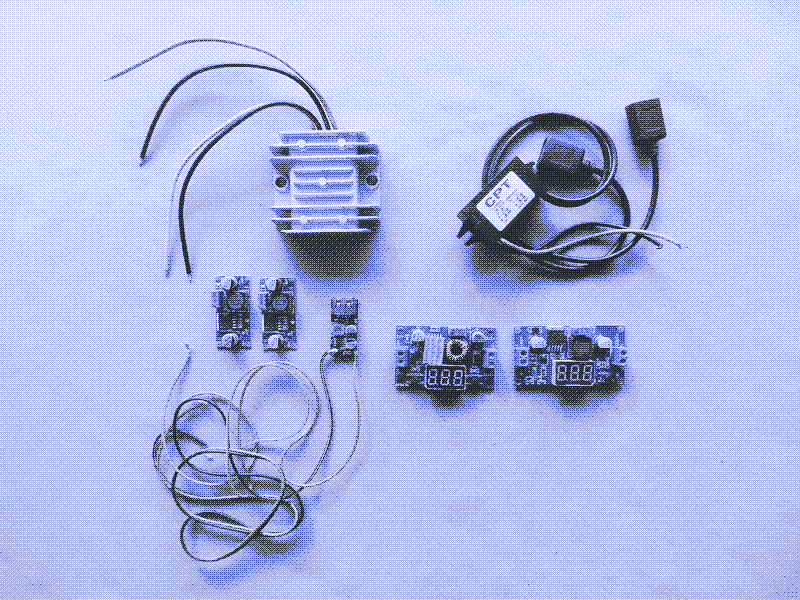
DC-DC converters
A DC-DC converter is an electronic module that converts the input voltage from a solar panel (or other power source) into a steady output voltage for a device, for example, 5V for USB gadgets and 12 to 20V for power tools. “Step down” or “buck” converters lower the output voltage compared to the input voltage. Boost converters step up the voltage in a similar fashion. A DC-DC converter introduces energy losses, but they are smaller than the losses of batteries, inverters and AC/DC adapters.
For solar systems without battery storage, you should know that 12V solar panels produce more than 12V. In full sun, the voltage output will be closer to 20V. The same goes for 24V solar panels, which will have a voltage output of around 32V. The 12V or 24V indication only refers to the type of battery system you are supposed to use it for. Consequently, if you want to run 12V devices directly on a solar panel, you need a DC-DC module that converts the 20V input into a steady 12V output (unless the appliance is happy to work on different voltages). If you want to run 5V devices, you need a module that has a steady 5V output.
Take care to get the correct electronic module. The most versatile DC-DC converter accepts a wide range of input voltages and converts these into any output voltage you want. This type of DC-DC converter can be directly connected to a solar panel and power all devices, no matter the voltage they run on. Such modules allow you to adjust the output voltage by turning a tiny screw or pressing a button. Some buck and boost converters have a small digital screen that shows the output voltage. Otherwise, use a multimeter to adjust the voltage output.
Other DC-DC converters need a precise voltage input, so they can only be connected to a stable voltage source, for example, a 12V battery. There are also DC-DC converters with a variable input voltage but a fixed output voltage. These can be directly connected to a solar panel, but get one with a specific voltage output depending on the device you want to power.
Wiring
Wiring a direct solar system without battery storage is straightforward. If there is no DC-DC converter, screw the + and the - of the solar panel to the + and the - of the appliance. Put a fuse in between. Optionally, add an on/off button. Make sure the device you power can take the voltage that the solar panel supplies to it.
If your direct solar PV system has a DC-DC converter, connect the plus and the minus of the solar panel to the plus and the minus of the DC-DC converter input. Next, join the plus and the minus of the DC-DC converter output to the plus and the minus of the device. Put a fuse in between. Some modules require you to solder the wires to them, while others have screws or plugs. If your DC-DC converter has a variable voltage output, you can use the solar panel for different types of appliances by turning the little screw. Alternatively, you can build a control panel to use several devices with different voltages.
How to size solar panels, batteries, and other components?
You need to dimension all the components of a solar installation correctly to work together. That is much easier for a direct-drive solar system than a solar system with battery storage.
Sizing a solar system without batteries
In a direct solar system, sizing the solar panel is not difficult. You need to match the power production of the solar panel to the device(s) that you want to charge or power. However, solar panels rarely reach their maximum power production, so you should oversize the solar panel a bit. For example, choose a solar panel with a power production of double the power use of the device(s) you want to connect. If you also want to make it work in cloudy weather, you should make the panel even larger. A light cloud cover has little effect on power production, while a heavy cloud cover may nearly stop it.
If you run a laptop directly on a solar panel, know that it will require much more power when charging than when its battery is fully charged (or when it’s operating without a battery). A solar panel may be large enough to power a laptop but not to charge its battery.
Sizing a solar system with batteries
Calculating the size of a solar panel for a PV installation with a battery is much more complicated – and also brings the additional challenge of picking battery size. A solar power system with a battery will need a larger panel to store extra energy for the night and periods of bad weather. You also need to take into account the conditions of the local climate. In less sunny climates with more seasonal differences, you need much larger panels to charge the batteries in winter. Furthermore, charging and discharging losses are as high as 20-30% in lead-acid batteries and around 10% in lithium-ion batteries.
Energy storage for the night
When sizing a solar panel for a direct solar system, you only have to look at power production. 9 However, when you size a solar installation with a battery, you also have to calculate how much energy you need. Energy use corresponds to power multiplied by time. For example, if you want to run a 20W lighting system for 6 hours after sunset, you need 6 hours x 20 watts of power = 120 watt-hours of energy.
Energy (watt-hours) = power (watts) x time (hours)
Finding the right-sized battery and solar panel can seem tricky at first because to calculate the size of one, you need to know the size of the other, so where do you start? The best starting point is usually to determine the battery size you need. If we stick to the example above, keeping the lights on for six hours requires an energy storage of 120 watt-hours.
However, you cannot discharge batteries completely. Lead-acid batteries should not drop below 50% of their maximum capacity, and for lithium-ion, that’s 15%. If you need 120 watt-hours of storage capacity, you thus need a 240 watt-hours lead-acid battery (or a 138 Wh lithium-ion battery). Second, you should also take into account the charge and discharge losses, which add at least 20% (or 48 watt-hours) to the total, resulting in a lead-acid battery storage capacity of 288 watt-hours (10% for lithium-ion batteries, 152 Wh). To find the right battery size, you need to convert this value to ampere-hours because this is how the storage capacity of batteries is specified. For a 12V lead-acid battery, 288 watt-hours corresponds to 24 Ampere-hours (Ah) (288/12=24) battery storage capacity.
Now that you know the size of the battery, you can determine the size of the solar panel. At a minimum, it has to be large enough to fully charge the battery during clear weather on the shortest day of the year. That is a minimum because lead-acid batteries regularly need a full recharge to maintain their health. If you live in an area where clouds are common, you better size the solar panel to fully charge the battery with a moderate cloud cover. If there’s also solar energy use during the day, this adds to the total solar panel surface.
In the case of lead-acid batteries, this calculation should start with a value of only half the battery capacity. You are not discharging the lead-acid battery below 50%, so the solar panel only needs to charge 50% (or less) of the storage capacity. For example, fully charging a 288 watt-hour battery requires the solar panel to supply 144 watt-hours.
Then, start with a random solar panel size and see what it gives. In the example above, a 50 watt solar panel working at half of its output (25W) will produce 144 watt-hours in less than 6 hours, which sounds like it could fully charge a battery in the place where I live. In contrast, a 20 watt solar panel working at half its capacity would need 14,4 hours, which won’t happen.
Energy storage for bad weather
The battery storage above will only get you through the night following a full battery recharge. However, it will not keep the lights working in the evenings if the weather during the day is working against you. In order to solve that, you can extend the battery storage or the solar panel surface.
The most energy and cost-efficient option is to install more or larger solar panels and keep the battery storage capacity unchanged because solar panels are much cheaper and less energy-intensive than batteries. As your solar panel surface gets larger, it will fully charge the battery even with a cloud cover. However, you need enough space for the extra solar panel surface, which may not always be available.
If you want reliability thanks to a more extensive battery system, multiply the required battery capacity by the number of bad weather days you need power. For example, if you need a 24 Ah battery to keep the lights working for one evening, you need a 3 x 24 Ah = 72 Ah battery to compensate for three days of no power production. That is a worst-case scenario, and instead of adding storage capacity you can also reduce energy demand by using less light or using it for a shorter time. Battery size is always a compromise between reliability on the one side and costs (both financially and energy) on the other, so some demand-side response is inevitable. 10
After you decide what battery you need, you also need to increase the solar panel surface. All those batteries need to be charged. Calculate in the same way as above.
Online Tools
I have sized all my small-scale solar installations using back-of-the-envelope calculations as above, and by experiment. However, you can also use online calculators, for instance, this one. After selecting the type of system (choose “off-grid”) and your latitude, enter the values for installed peak PV power (in Wp), battery capacity (in Wh), discharge cutoff limit (in %), energy consumption (in Wh), the inclination angle of slope (in degrees) and azimuth (in degrees, the position of the PV panel relative to the direction due South). You get a daily energy production estimate for all the months in the year. You can then play with the different variables to get the minimum energy production and storage you need.
Sizing other components: charge controllers, DC-DC converters, cables, connectors & fuses
Once you have determined solar panel and - if needed - battery size, you can size all the other components: charge controller, DC-DC converter, cables, fuses, connectors, and switches. Here, “size” refers not so much to actual size but rather to the amount of power that can flow through a component. Each component requires the correct voltage (V) and current (A) rating. Choose the right “size” of DC-DC converter in a direct solar installation. Pick the right “size” of solar charge controller in a battery storage solar system. In both cases, get the right “size” of cables, fuses, connectors, and switches.
Charge controllers and DC-DC converters
Both charge controllers (for use with a battery solar system) and DC-DC converters (for use with a direct solar system) need to be compatible with the voltage produced by the solar panel. If you use a 12V solar panel and a 12V battery, you also need a 12V charge controller. On the other hand, if you use a 12V solar panel without a battery, you need a DC-DC converter input that corresponds to the voltage output of the solar panel (19-20V in full sun).
If your solar panel produces 3A of current, you need a DC-DC converter or solar charge controller that withstands at least 3A of current.
However, equally important is that both components can withstand the amount of current (A) that flows through them. That requires you to know how much current is produced by your solar panel(s), information which you can find on the backside. You can also measure it with a multimeter. For example, if your solar panel produces 3A of current, you need a DC-DC converter or solar charge controller that withstands at least 3A of current. With two of these panels connected in parallel, you need components that can take 6A of current. The cheapest DC-DC converters only take 2A to 5A, while the lowest-cost solar charge controllers take a maximum of 5A. Charge controllers and DC-DC converters get more expensive as their current capacity increases.
Wires
Electric cable is available in many diameters. Be sure your wires are thick enough for the current that flows through them. Otherwise, you risk an electrical fire. Low-voltage electric systems need larger diameter cables than high-voltage systems because more current flows through them. Making the right choice can be confusing because of several standards, none of which are easy to understand. A solution is to wire all components with a relatively large diameter cable, such as 20AWG (maximum 11A) or 18AWG (max 16A). Choosing a thicker wire allows you to extend your solar installation later without upgrading the cables. The only downside of thicker wires is that they are more expensive. A cheap solution is to reuse electric cables from discarded main appliances, which you can cut open to expose the positive and negative wires.
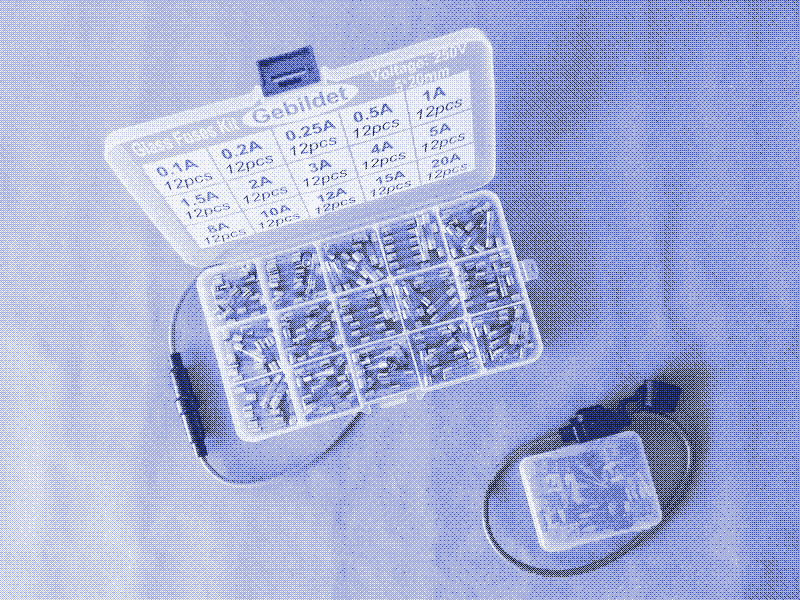
Fuses
The fuse is an essential safety component that interrupts the flow of electricity in the circuit. You can build a solar installation without fuses, but then you risk an electrical fire or component damage in the case of a short circuit. A fuse needs to have a maximum current capacity that slightly exceeds the peak current flow in your system. If there is a short circuit, the current will increase, and the fuse will blow. Once you have solved the problem, you can replace the fuse.
A fuse needs to have a maximum current capacity that slightly exceeds the peak current flow in your system.
If the maximum current in your system is 5A, get a 6A or 7A fuse. The maximum current of your system is determined by the solar panel and the battery. In a battery solar power system, be aware that the current that flows between your battery and the electric load may be higher than the current that runs between the solar panel and the battery. That is the case if you connect a high-power appliance to the battery (via or bypassing the charge controller). Therefore, you may need thicker wires and heavier fuses between the battery and the device. Finally, if you want to use power meters in your circuit, dimension them to the voltage and current that flows through your system.
Fuses should be close to the power source (solar panel or battery), but additional fuses can protect devices from problems with DC-DC converters. There are two types of fuses: the old-fashioned ones that consist of a small glass tube put into a fuse holder or the more recent ones that look more like cards and are easier to replace. A circuit breaker can be an alternative to a fuse.
Connectors
You need connectors if you connect two wires, like when you put a fuse in a circuit. There exist many different types of plugs. Some of these require you to screw the wires into the connector. Others work without a screwdriver. I have used connector strips and lever connectors for most systems. You can also solder the wires to each other. 11 A handy tool is a wire stripper to remove the protective coating at the end of each wire, exposing the copper. Connectors often have a maximum power capacity of 10A or 20A, so they are suited for most small-scale solar power systems.
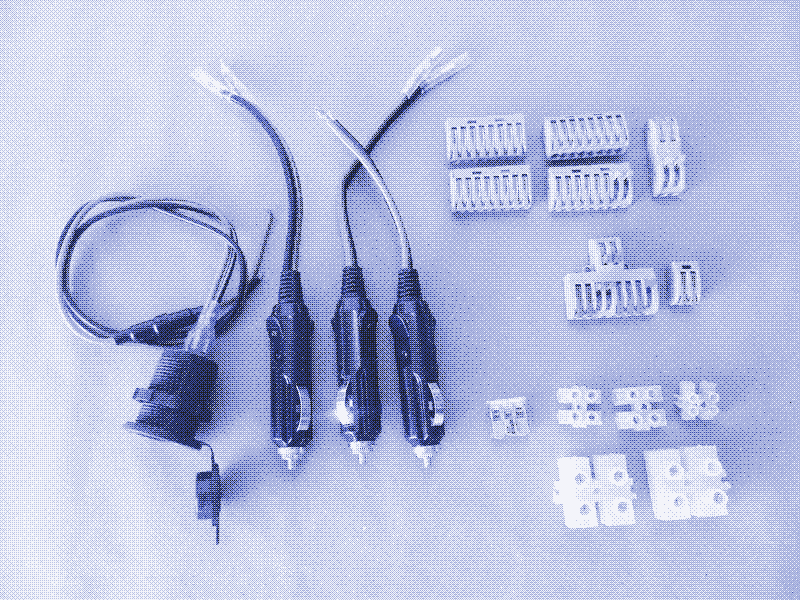
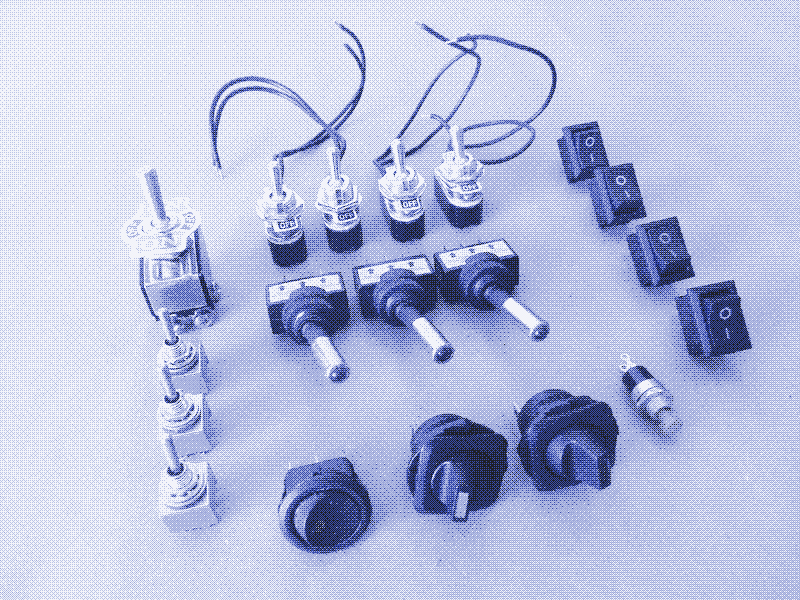
Switches
Switches allow you to open and close electric circuits. They are useful when splitting power, sending electric current to some devices but not others. The simplest type of switch has one input and one output (“single-pole, single-throw”, or “on-off” switch). It is placed in the positive wire, just like a fuse. On-off switches that light up when active are a bit more complex to wire. 12
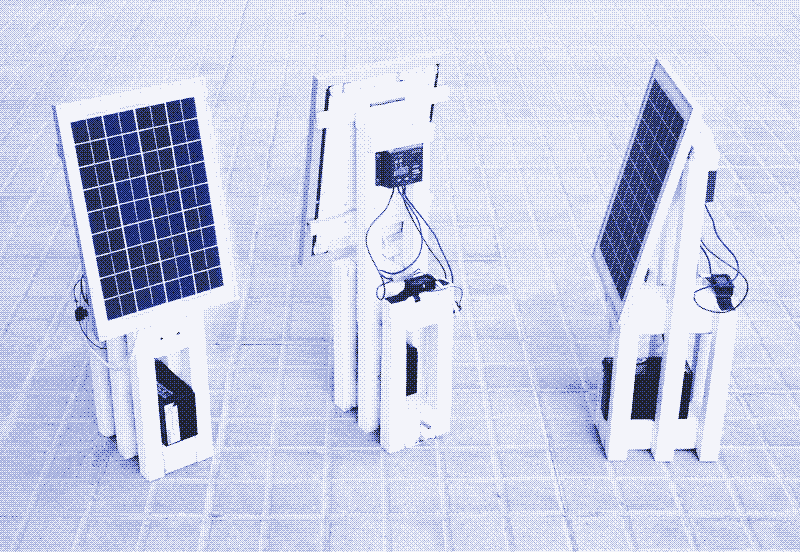
How to build supporting structures?
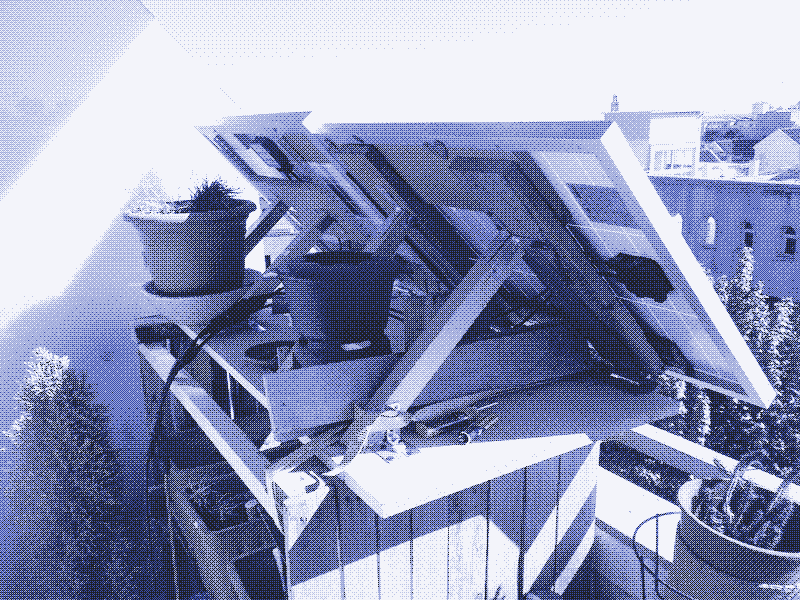
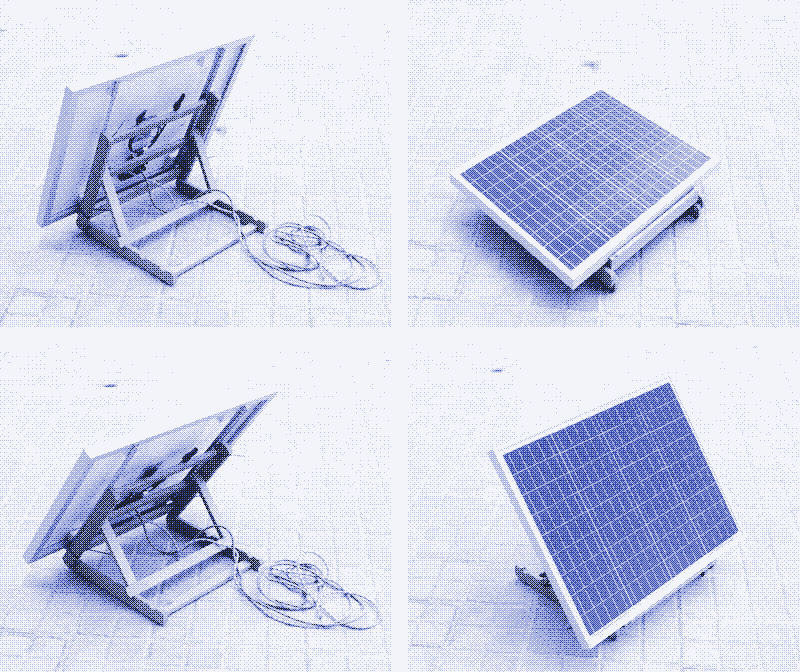
It’s a good idea to fix a solar panel onto a stand. That makes it more useful and offers protection to a device that should last for 30 years or more. Commercially available support structures for solar panels often cost more than solar panels. That is one reason to make the structure yourself, but another is that it allows you to customize it to a specific location. There are many ways to build support structures for solar panels, either for stationary or portable use. I merely document the (stationary) designs I have made myself, using mostly scrap wood and metal joints. You can also fix solar panels to existing structures, such as an easel, an old bed frame, or whatever you can find.
How to fix the panel to the frame?
I use two methods to attach solar panels to structures. The first method is to search for wood pieces that have more or less the same thickness as the solar panel, slide them inside the frame, and screw them into the four premade holes of the solar panel’s aluminum frame (smaller panels only have two holes). Ideally, you fit one wooden piece per two holes, but four bits of wood also work.
Next, connect these wooden pieces with two more wooden parts placed crosswise on top of them. The solar panel is now firmly fixed to a wood structure. Put enough wood under the solar panel where you will attach the hinges (see further), which fasten the solar panel to the lower part of the structure and allow you to set it at different tilting angles. The lower support structure has to remain stable even if the panel is upright (unless you don’t want that).
Be careful because solar panels are delicate. When you screw wood into the solar panel, make very sure that the screw is not too long so that it penetrates the solar panel. Even a tiny puncture in a solar panel can be sufficient to make it stop working forever. Also, be very careful when handling a solar panel with its front side lying flat on a surface, which happens, for example, when you screw it against a wood support. Make sure no screw or anything else lies hidden under the solar panel when you exert pressure on it.
The second method consists of building a frame around the solar panel as if it were a painting. The backside of the frame is a thin board of wood, slightly larger than the panel on all four sides. You make a hole in the middle of the board to put the cables from the solar panels through. Then you screw wooden slats on the side of the board so that the solar panel fits in. Finally, you add some metal or wood pieces on the top of the frame to ensure that the solar panel remains fixed inside the frame. You can then add a hinge and connect the upper structure to a lower support structure.
How to adjust the tilt and rotation of the solar panel?
Because the elevation and orientation of the sun vary throughout the day and the year, a solar panel with a fixed position does not make optimal use of solar energy. It will only generate its maximum capacity if perpendicular to the sun’s rays.
Most conventional systems have solar panels with a fixed angle and orientation. Small-scale solar installations can also work with fixed angles. However, unlike for rooftop systems, the solar panels are usually within reach, which makes it possible to add a manual mechanism that allows to vary the tilt and perhaps also the rotation of the solar panel. Adjusting the angle could happen for every change of season, while the solar panel can rotate a couple of times daily. All this can happen automatically using electronics, but also manually. You can also adjust the orientation of a solar panel by turning the whole support structure towards the sun if it is mobile enough. That is especially useful when direct-drive solar power runs an appliance that demands your attention, such as a power tool.
Adding both mechanisms complicates the design. However, a support structure that allows the panel to vary its tilt according to the seasons is usually good enough. Tilting the panels into an almost vertical position is the key to harvesting sufficient solar power during winter when energy shortages are most probable.
The optimal angle of a solar panel depends on the season and the location. You can calculate this quickly with online tools. For example, for Barcelona in Spain (41 degrees latitude), the optimum tilt of solar panels varies from 26 degrees (from vertical) in December to 72 degrees in June. A fixed angle of around 40 degrees from vertical is a compromise in which the panels are better positioned for winter than summer.
For solar panels with a fixed tilt, I use large hinges and supporting beams of wood pieces with metal joints. I decide the angle and then calculate the length of the wood beams using geometry. For solar panels with a variable tilt, I use different methods. For larger solar panels that remain outside in all weather, I replace the wooden support beams with others that are longer or shorter, depending on the season. Of course, you could also design a more sophisticated system that allows you to adjust the tilt of the solar panel without changing the beams.
For smaller solar panels, I use hinges to attach support beams of differing sizes, or I use a butterfly screw to loosen and change the tilt. However, these methods are not suited for outdoors in windy weather.
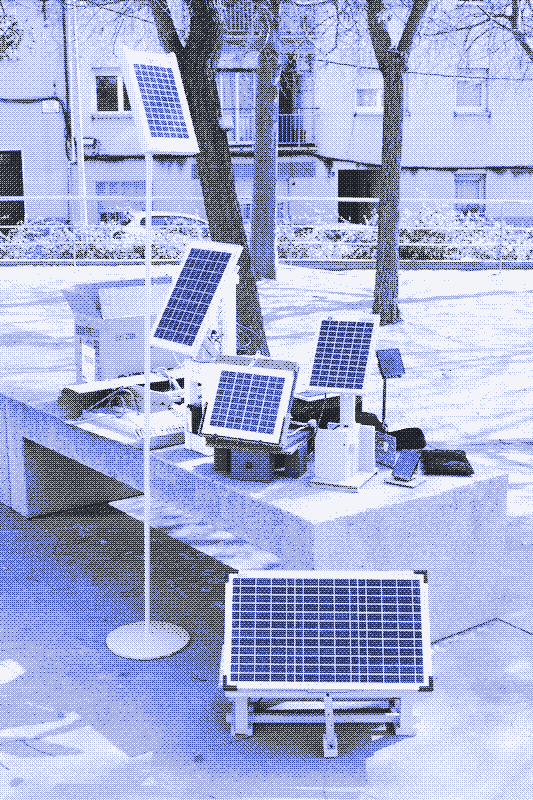
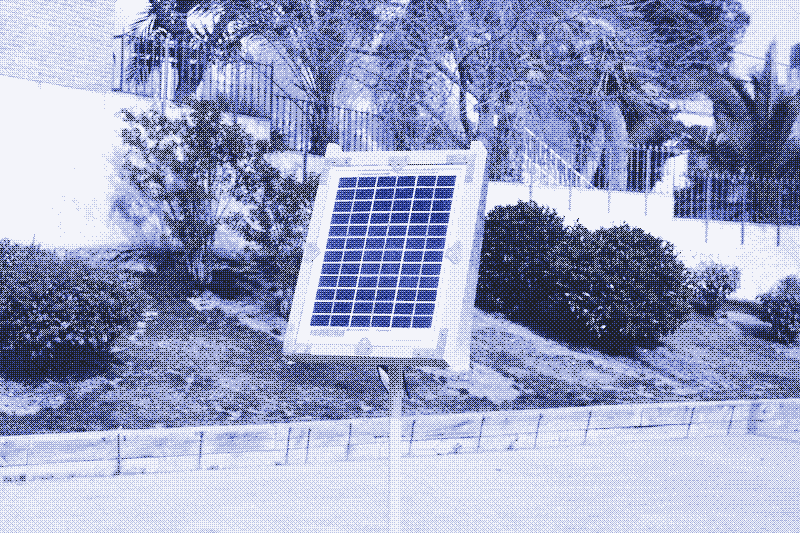
Where to put solar panels?
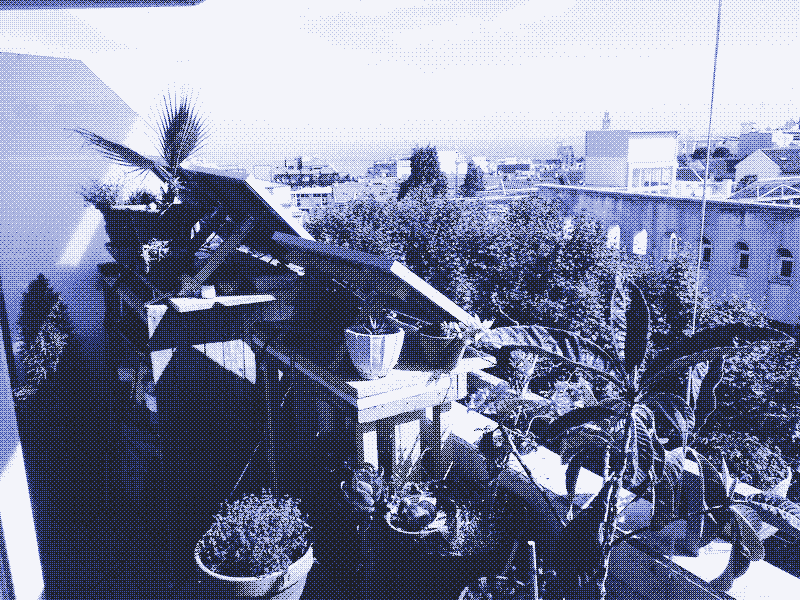
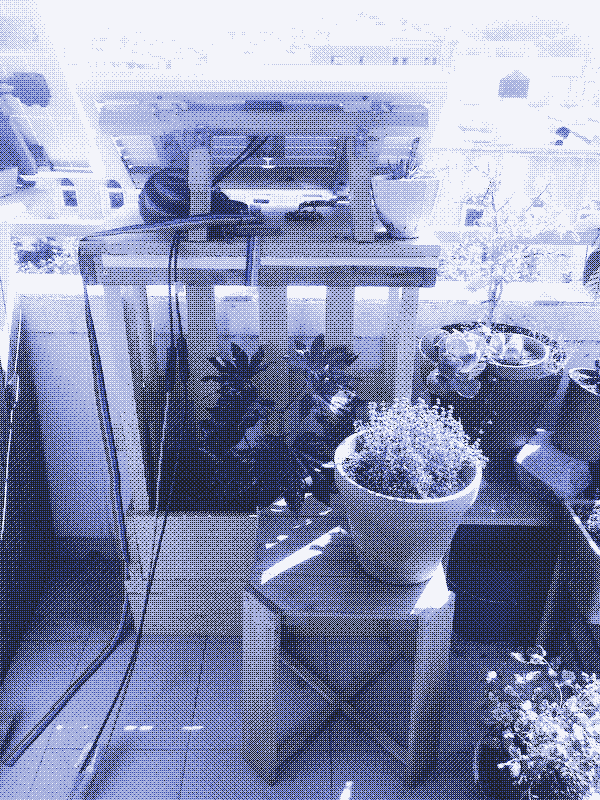
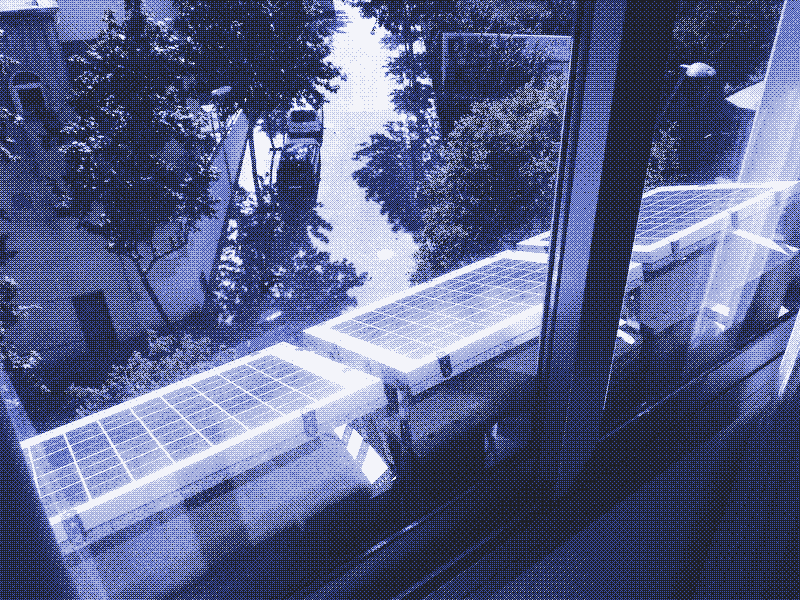
Small-scale solar power systems can be mobile or static. You can place them on window sills, balconies, terraces, and patios. You can put them in a backpack and take them with you. They can also be inside, close to a window. I have one such panel at a desk in front of a window. It connects to a battery, charge controller, and a built-in light. It works well in winter when the sun is low in the sky, and sunlight penetrates deep into the room. Harvesting solar energy inside a building may not be the most efficient, but the structure of the solar panel doesn’t need to withstand wind and rain.
Keep in mind that in some cities and towns, authorities may have outlawed the use of solar panels on the facade of a building. In Barcelona, for example, it’s only allowed if the solar panels are not visible from the street.
How-to safely fix solar panel structures in place?
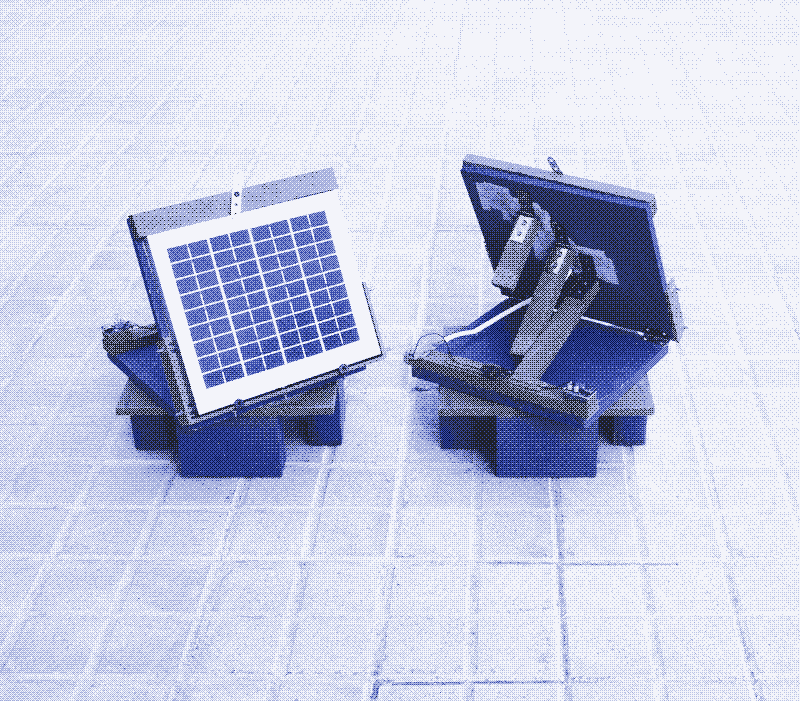
Your solar panels cannot fall off the window sill or balcony. Build the support structure sturdy enough. It should remain in place even during a storm. I have pressed my support structures between the window frame and a metal plant holder, and I probably would not have dared to install the panels on the narrow window sills without this holder. I have also made the bases of the structure heavier with rocks and defunct lead-acid batteries. Finally, I have strapped the support structures to the metal railings. Better safe than sorry.
Solar panels on balconies usually carry less risk of falling off the building. Nevertheless, make them heavy or strong because solar panels are good wind catchers. I have made two large structures, one for a 30W solar panel (which runs this solar-powered website) and one for two 50W panels, which power the living room. The smaller structure holds a large plant container, while the larger support structure doubles as a storage chest full of stuff. All my solar panels have survived several storms without any damage.
How to split power and run multiple devices at the same time
When you have built a solar power system, you can connect an electric load to it. If the solar installation has only one purpose, connect the electric device to the solar charge controller, the DC-DC converter, or the solar panel. You may also want a switch to turn the system on and off.
However, in other cases, you may want more flexibility. For example, you may want to split the power to run several appliances simultaneously or alternately on the same solar installation. That is straightforward if all devices run on the same voltage. You only need a connector with two inputs (plus and minus) on one side and multiple outputs on the other. You may also want to add on-off switches for every circuit instead of (or in addition to) a switch for the whole system. On the other hand, if you want to use appliances that run on different voltages, you split the power and then put the appropriate DC-DC converter in each circuit.
Splitting power works for direct solar installations and solar systems with a battery. However, build them slightly differently. When you use a battery and solar charge controller, the output voltage is a stable 12V or 24V. If all your devices run on 12V or 24V, dividing power can happen without any DC-DC converter. If you also want to include a circuit that needs a different voltage (for example, 5V for charging USB devices), you can use a DC-DC converter with a stable input voltage (12V/24V) and a 5V output voltage.
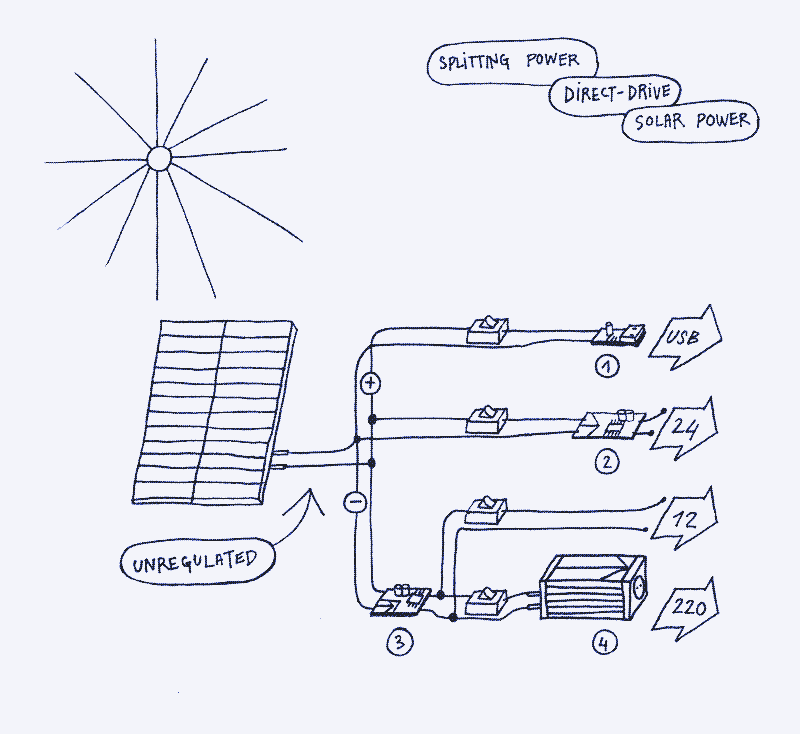
In contrast, when you use a solar panel directly, the output voltage depends on the solar conditions. Furthermore, it is often higher than what your devices need. When all your appliances run on the same voltage, for example, 12V, you install a DC-DC converter which accepts a variable input voltage and produces the desired output voltage. Next, you split the power. When your devices run on different voltages, first split power and then put a DC-DC converter in every circuit. Divide power again if you want a second output with the same output voltage.
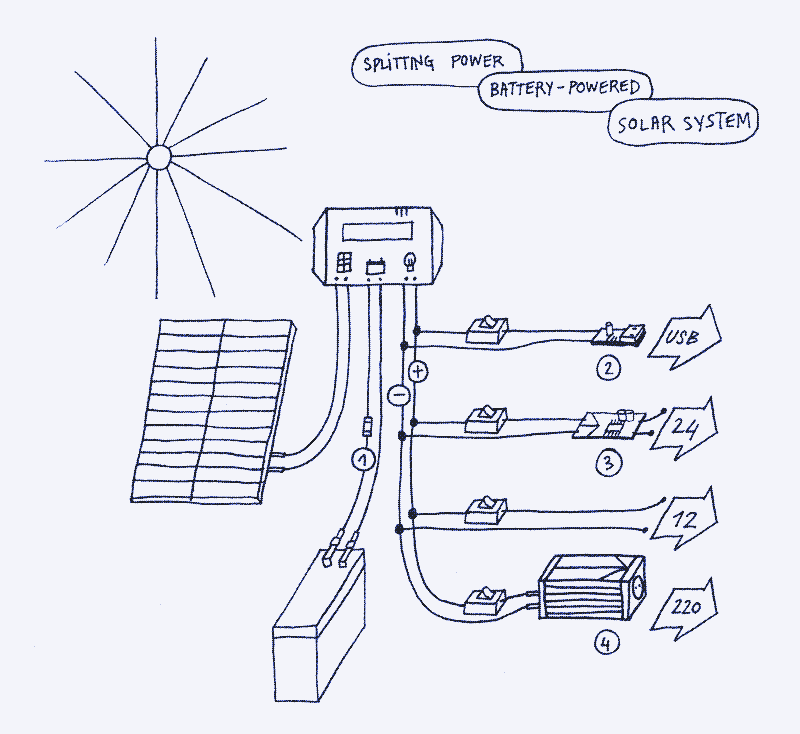
If your solar system has a battery and charge controller, and all your devices run on the same voltage, you can also use typical 12V/24V connectors. You plug them in or out depending on the appliance you want to use. If you have multiple power outlets, you can use several devices simultaneously.
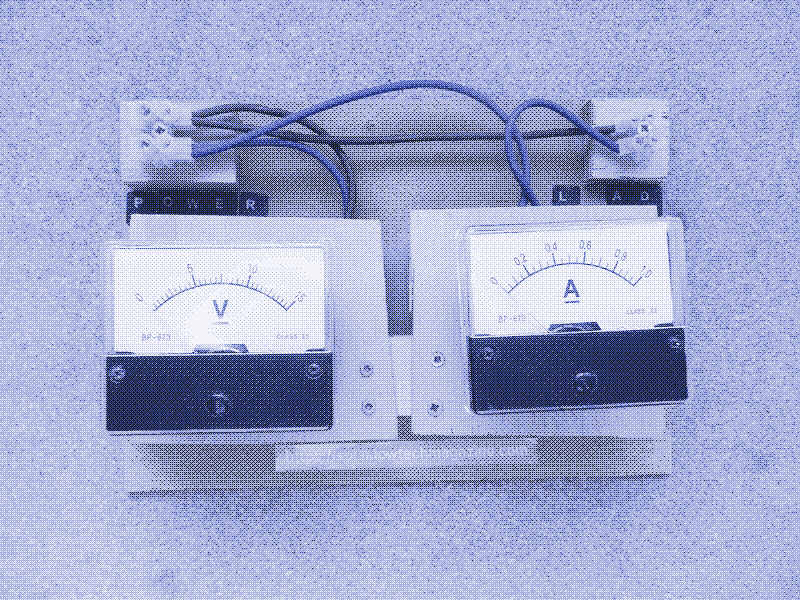
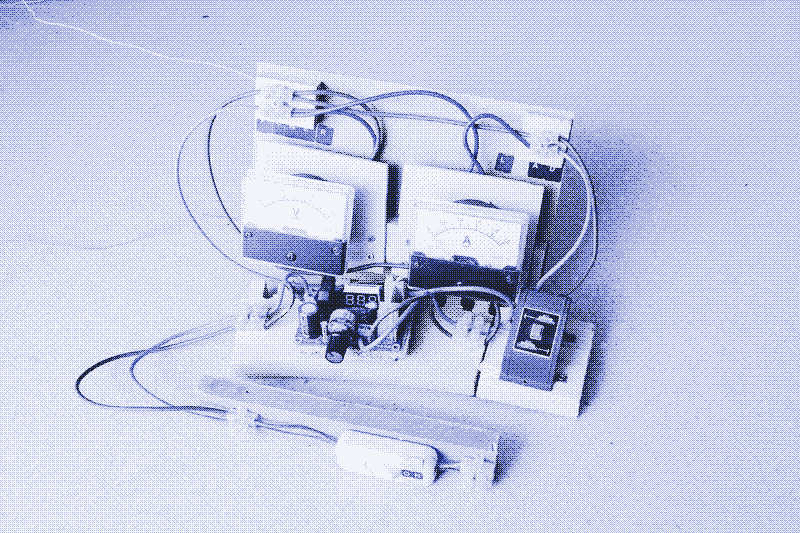
How to include measuring instruments?
A solar installation works perfectly without measuring instruments, but they are handy for understanding and maintaining your system. They also help you to optimize energy efficiency.
Battery voltage meter
If your solar power system includes a battery, add a voltage meter. Although most charge controllers will display the battery voltage, you often need to press a button to show it. In contrast, when you add a voltage meter directly to the battery, you always know the state of your battery in the blink of an eye. Digital voltage meters can be very bright, so if you want to be able to shut it off at night, add an on-off switch.
Reading a battery voltage meter takes some practice.
Reading a battery voltage meter takes some practice. In principle, the battery voltage should not go below 12V (24V in the case of a 24V battery). However, the battery voltage reflects the correct storage capacity only when there is no active power supply (the solar panel doesn’t work) and no electric load (no device connected). If your battery meter reads 12V in this situation, you should not discharge it further to prevent premature aging. If it reads 12.9 or 13V, the battery is fully charged. As the battery ages, this latter value will gradually decrease (12.6V is a typical value for a fully charged older battery).
If you turn on an electric load, the voltage decreases and no longer reflects the battery storage capacity. If the solar panel is active, the battery voltage increases and no longer corresponds to the storage capacity.
In full sun, the battery voltage will quickly surpass 13V. If you connect a power-hungry device to the solar charge controller at night, the battery voltage may drop below 12V. However, in both cases, the battery storage capacity may be the same, for example, 12.4V. Therefore, to know the battery storage capacity, you should check the voltage at night with the electric load turned off. It takes a while before the voltage stabilizes, so give it time to get an exact recording.
That sounds cumbersome, but once you know your system better, you can estimate the storage capacity even when the battery is charging or discharging. For example, when I turn on the lighting in my office, the battery voltage will drop from 12.9 V to about 12.1 V. After a few hours of use, it will be at 11.7 V or 11.8 V. However, when I turn off the lights at the end of the evening, the voltage rebounds to 12.5 V or 12.6 V. When the battery is charging during the day, the voltage reading indicates the state of the charge. For example, when its voltage goes up and down repeatedly (between roughly 13 and 15V), the battery is fully charged.
Watt, voltage, and current meters
Other practical instruments are watt, voltage, and current meters. You can put them between the solar panel and the solar charge controller but also between the solar charge controller and the load. In the first case, they measure the power produced by the solar panel. In the second case, they measure the power used by the electric appliances. Most solar charge controllers include these measurements in their menu, but navigation is often cumbersome.
In a direct-drive solar system without a DC-DC converter, the power use of the electric load will always be equal to the power production of the solar panel. Therefore, one measuring instrument suffices. However, when using a DC-DC converter, you can put a measuring device before and after. These data will reveal the energy losses of the converter.
Measuring instruments can be digital or analog. I prefer my battery voltage meters to be digital because they are visible from a distance. V&A meters that show fluctuating values can be both. Watt meters are difficult to find in the analog version.
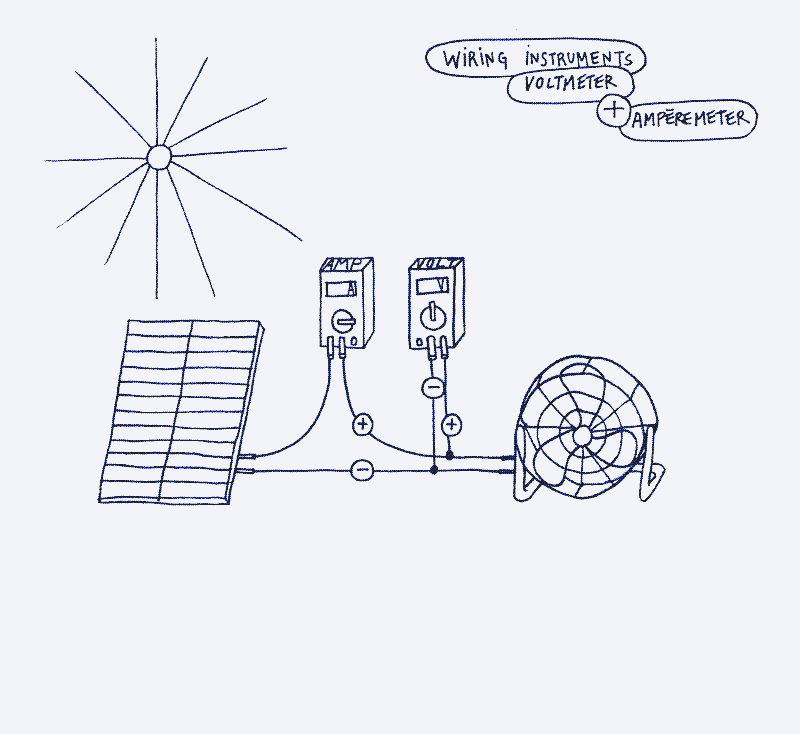
Wiring
Volt meters are wired in parallel. For example, you connect the positive and negative wire of a volt meter to the positive and negative terminal of a battery. Digital watt meters have two wires going in and two wires coming out. Current meters are a bit more complex to wire, see the illustration below.
Many people are more comfortable with watts than with voltage and current. Still, although a watt meter is a valuable addition to a solar installation, it also serves to have voltage and current readings as they provide more data in case of troubleshooting. A voltage meter is handy for control purposes, especially in direct solar systems. For example, to check if a DC-DC converter produces the correct voltage output or to know the exact voltage output of a solar panel.
Current meters are helpful to optimize energy efficiency. In a battery solar system, having current meters on both sides of the solar charge controller allows you to take advantage of as much excess solar power as possible. If the battery charging is nearing completion, the solar panel will no longer produce its full power, and you will see the current meter go down. That means you are wasting solar energy. However, from the moment you connect an appliance (or turn on a switchable circuit), you will see the current meter of both the electric load and the solar panel go up until you hit a limit – you are then using all available solar power that the solar panel produces. In that way, solar energy that would otherwise go to waste can charge a laptop or operate a power tool.
Control panels and power outlets
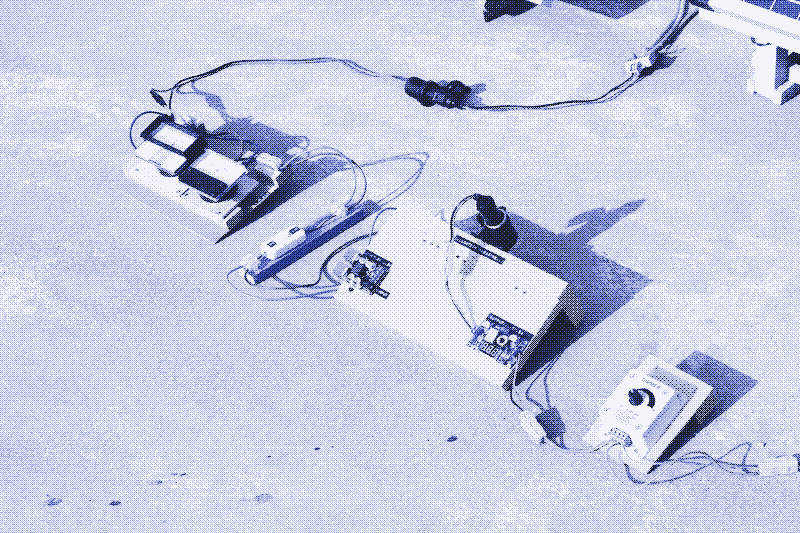
If you add on-off switches and measuring instruments, you also want to organize these components onto some control panel, preferably all in the same place.
Start by wiring the system without a control panel to ensure everything works, then take it apart again. Next, measure all the components and sketch the control panel. Then, pick a material (cardboard, wood, metal, plastic), cut out all the holes for the switches and the measuring instruments, and insert all components. Finally, wire everything and build a box around the control panel. DC-DC converters can go behind the control panel unless you want to be able to adjust the voltage output regularly. If you have measuring instruments and on-off buttons, the solar charge controller can also go behind the control panel. Make the casing so you can easily open it for maintenance, repair, or adjustment.
Also, think about the power outlets. Where do you want to be able to plug in your devices, and what type of connectors are you going to use? The 12V counterpart of the power outlet (the so-called cigarette lighter plug) is the most common type, but there are alternatives. If you want to use the standard ones, add female plugs to your solar system (one for each circuit) and male plugs to all your devices. You can embed the female connectors in a control panel or buy commercial products that you can screw onto something. You can also connect devices to your solar system by screwing the wires into a terminal block or by soldering them directly to the power output. That is not for appliances that you often plug in and out, but for loads that are always connected (for example, an LED strip). Of course, you need an on-off switch to close the circuit.
The biggest drawback of low-voltage power is its relatively high energy loss during transmission, especially for powerful devices. Therefore, the power outlets are as close as possible to the rest of the solar system. Install multiple systems rather than a centralized system with many meters of distribution cables. Choose thicker electric wires if you distribute low-voltage power over longer distances. 3

How to obtain low voltage appliances?
Omitting an inverter implies using appliances and devices that run on low-voltage DC power. That is not as complicated as it sounds. First of all, many devices are internally running on low-voltage power. That concerns all USB appliances, solid-state lighting (LEDs), other electronics, and wireless power tools. Any device with an adapter – the counterpart of the inverter – can be plugged straight into a low-voltage network by simply replacing or modifying the power cord. For example, you can run a laptop on low voltage if you replace the standard adapter with one that works on 12V for use in cars. 13 In most situations, there is no need to adapt any of your devices.
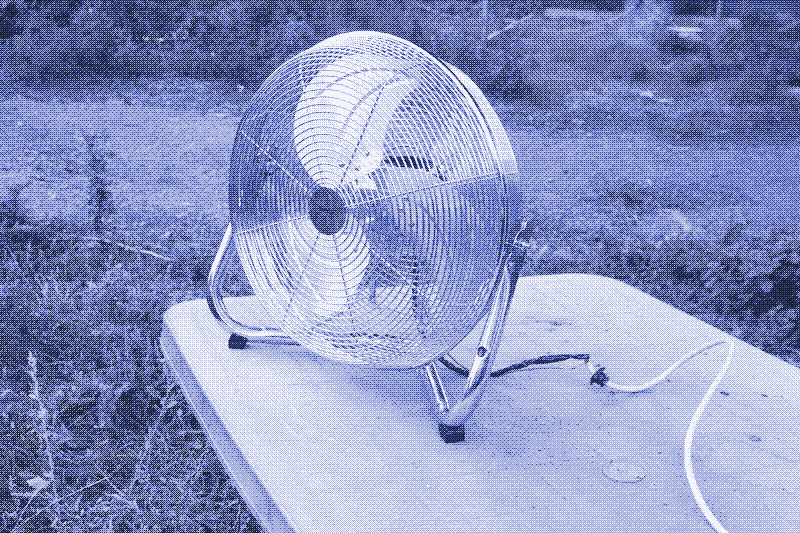
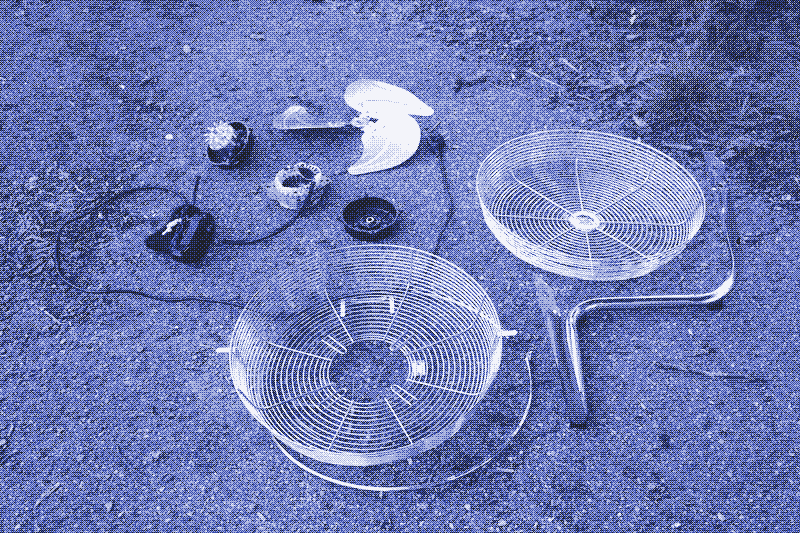
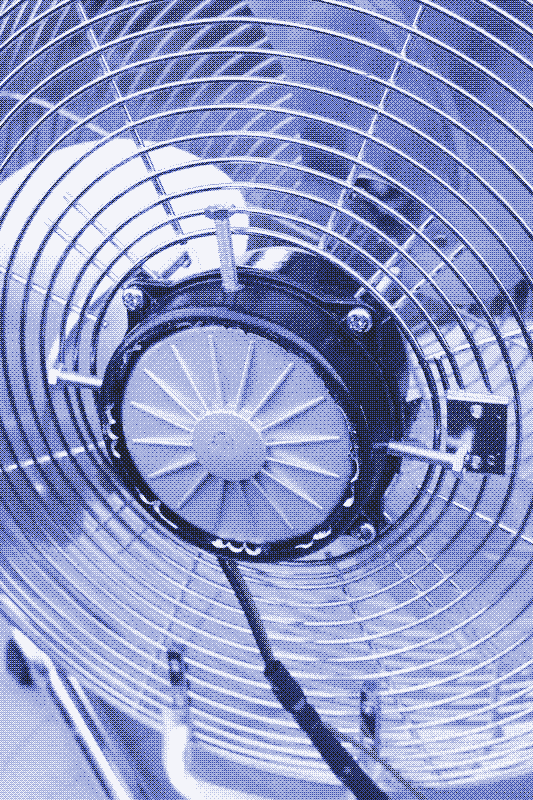
In other cases, adjusting an appliance to 12V/24V demands more work and knowledge. Some devices – such as digital TVs and LED fixtures – can have the AC/DC adapter inside, which requires you to open them and remove components. Or, you may need to replace an AC motor with a DC motor. How to modify and make low-voltage devices is too broad a topic to discuss in detail in this guide. Low-tech Magazine will go deeper into it in future manuals. For example, Marie Verdeil converted an industrial ventilating fan to work on 1V to 24V, supplying up to 250 watts of cooling power. It can be powered directly by a solar panel (see video) or from a battery.
Finally, you can buy a wide assortment of commercial 12V or 24V devices aimed at the users of cars, trucks, sailboats, and motorhomes. They vary from ventilating fans over electric kettles to refrigerators. However, these products are relatively expensive and not always of quality. Furthermore, they are for use in small spaces, so they are often too compact to be practical in more common household situations. It is often better to adjust an existing device or to build one from scratch.
Reactions
To make a comment, please send an e-mail to solar (at) lowtechmagazine (dot) com. Your e-mail address is not used for other purposes, and will be deleted after the comment is published. If you don’t want your real name to be published, sign the e-mail with the name you want to appear.
Reactions
Jan Steinman
Hi Kris!
Since this fine article was about small, even portable installations, you might want to include this simple positioning hint:
Simply position the panel so it makes the largest possible shadow!
In my experience in camping with solar, I’m terrible at estimating the proper positioning “by eyeball,” making sure the panel is perpendicular in two axes fro the sun.
But simply looking at the solar panel’s shadow as I move it around, I can achieve a very high degree of perpendicular orientation.
Another method I’ve used which is more unwieldy, is to put a voltmeter and a small precision load (a hundred ohm resistor will do) on the panel, and position for maximum voltage. I used this method to verify my “shadow” approach, and they agreed quite well.
Keep up the good work! I love what you do!
Jan Steinman
Wim
Hi Kris,
thank you for the low-tech magazine and all the effort you put into it. The solar panel article has made me wonder if a small solar setup would not be useful in my (near) Lisbon, West facing balcony. It might help at night to bring some light in the darkness after I switch off the main switch for health reasons. A number of battery powered small Led lamps with movement sensors are doing fine for my needs right now, but experimenting with a more sustainable option could make sense, though the savings on non-replaceable batteries most likely will not outweigh the costs of the solar setup for the next 20 years.
As a former programmer, High-tech has been my source of income and illness at the same time. Are you aware of the health impact of all things AC or Wireless? The German Building Biology Institute has been providing info and courses regarding EMF’s for many years. DC in general is regarded safe for humans, animals and plants, within reason. AC and WIFI are regarded as unhealthy in most cases, except for very well designed and shielded systems.
What about LED’s? Any ideas? The cold light makes me a bit nervous, like the old Fluorescent tubes. When run on AC, they seem to create nervous issues as well, although the filament warm white LED lamps are, at least for me, fairly tolerable. The whole EMF world is going a bit against the grain of ever more, ever faster, ever more wireless; as such it may feel familiar to you.
Any thoughts on the subject?
Kind regards,
Wim, Lisbon.
Frank Mann
Dear Mr Decker
Is your DIY Solar Guide, as shown in Low Tech Magazine newsletter, available to buy in book form ?
The article in Low Tech mag doesn’t state how many pages it is, as regards printing it for easier reference when carrying it around, than on the laptop.
Thank you. Yours faithfully Frank Mann
Kris De Decker
@ Frank
This guide will eventually appear in book form, together with other articles. But this will take some time. Meanwhile, do try our print feature, cause we made a template that prints the article in a very compact form.
@ Wim
Indeed I have read that DC is a much better option regarding EMF. However, I have not looked into that subject yet, so at the moment I cannot say more about it.
@ Jan
Thanks for the tip!
Dominic
Hi Kris,
many thanks for another great article on this website. I’m always looking forward to new articles.
As I’m coming from a power conversion background ,there are a few things I would like to add with respect to electrical safety and reliability of the small solar power systems:
–> “Safety first”: Whenever a conductor carrying current, is interrupted/ broken, an electrical Arc is formed. This applies to wires, switches, fuses,… essentially anything.
Fuses are designed to protect the wiring installation (and the source of power), however cannot reliably protect the load itself (by design). Every Fuse has breaking capacity, that must not be exceeded, as otherwise the fuse may continue to conduct (by having an arc between its open wire end). If the load is powered from a battery, very high fault currents can occur: To give an example: Assuming a total 10m of 11 AWG cable, one obtains 44mΩ of resistance for the sum of + and - cable. Assuming a lead acid Battery to have another 25mΩ, the total impedance is 69mΩ. With a (dead) short circuit at the end of of the cables at 12V, this yields: 12V / 69mΩ =174A of fault current. Hence, the fuse must be able to disconnect (break) at least 174A . Glass type fuses may just have some 30A breaking capacity. Hence, a fuse with higher breaking capacity must be selected to guarantee (!) the disconnection of the energy source. Ceramic type fuses can safely disconnect 1000A+ (at moderate voltages).
At the same time, the breaking capacity must also include the maximum possible DC voltage in the system. Depending on the fuse, the DC voltage breaking capacity (both Voltage and/or current) can be lower than the AC breaking capacity. Please keep both, maximum voltage AND current rating in mind when selecting the right fuse.
–> Reliability: Switches: Just a fuses, switches can only bear a certain DC voltage and current across their terminals (in on and off state, but especially during the switching event). Every time a load (especially inductive loads as a fan) are switched (off), the arc formed in the switch wears out the contacts a bit (but also “cleans” it from oxides formed by humidity, etc). If the current is higher than the rated current, the switches wear out quickly and will eventually run hot due to too little contact area. The DC current (and voltage!) capacity is very often (much) lower than the AC capacity. For currents >5A one might use relays (e.g. I like using the bulky Automotive relays. They easily switch up to 60A) for the load and use the switch only to control the relay. But once again: These relays have a range of permissible voltage and current as well!
–> DC DC Converter: The electrolytic capacitors of the DC DC converter (the bulky aluminium cylinder with the black bar on its top) wear out with the time. Every 10K temperature increase (internal of external) reduces the lifetime by a factor of 2. With many (read: all inexpensive) DC DC converters using standard capacitors, their lifetime is around 100 -2000 h at 85°C. So if the average component temperature was 45°C (say in its enclose in sunlight and often full load scenario), the total lifetime was just 16000 h - 32000 h, which is just around 2 -4 years. This means time, NOT operation time! When the parts have reached their “end of life”, the converter could potentially still produce the desired voltage (even with a a higher AC voltage riding atop of it), but it also could become unstable creating an overvoltage on its output and thereby damage sensitive equipment (Smartphone, tablet, ect.) So it’s a wise idea, to keep the DC DC converter cool. Improving the lifetime would be just a matter a few cents (5- 20 Cents) for the manufacturer. But as essentially all DC DC converters (that can be bought by end customers!) are cheap chineses parts (sorry), the chances of finding something better is very slim. I want to further point out that some of the cheapest offers come with the risk of counterfeit components with greatly increased failures rates. Just saying…
There are many newer designs available (with features, that e.g. allow the protection of the load, higher efficiency and smaller components) to the professional market. However, if one was to sell just some few 1000 of such parts to “makers”, the price would be much higher (as all the individual parts become more expensive, as you just buy “few” of them) than the chinese modules available today. I wonder, if customers would pay the resulting price. Might by a niche market to look into… ;-)
–> Fuses (again): Be careful when selecting fuses (and compare their ratings carefully!): There are two type of definitions of the “rated current”: IEC type definition : Fuse can can carry the printed value (e.g. 3A) for 100% of the time (at 25°C) without tripping. UL type definition : Fuse can carry only 75% of the rated value without tripping. Also temperature and history of the fuse (inrush currents, very brief short circuits, age, etc) can change the tripping point of the individual fuse (hence manufacturers give a a range chart for the tripping current and time. This chart applies to new fuses). So choosing a too low a rating may lead to false tripping of the fuse.
–> Solar panels: When wiring solar panels in parallel, It is good practice to have a (Schottky) Diode from positive output of each panel towards the common ‘+’ connection. It prevents reverse currents through a (partially) shaded panel (while the other panel is in full sunlight). It also prevents (slowly) discharging the battery during the night through the solar panels. The amount of these currents also depends on the quality of the panels. So ideally, one would not need it…. When having the panels in series, the diode would connected across the panel: Anode of the diode to the ‘-’ connection, cathode (Where the Bar is on the diode) to the ‘+’ connection of the panel. Once again it’s about (partially) shaded panels. The current of the first panel could then “bypass” the shaded second panel without high losses or the risk of damaging the solar cells. When both panels receive full sunlight, the diode blocks and is “out of the picture”.
–> One thing I found interesting when it comes to adjusting the orientation of the Solar panel relative to the sun was this (also quite low tech approach): https://hackaday.com/2018/11/18/self-powered-sun-tracker-takes-a-cue-from-nasa-solar-probe/
Indeed a bit of an hack, rather than a sophisticated device, but surely does its job :-)
Best regards
Dominic
Jim Bennett
Hi Kris,
very inspiring article. Can I ask: is it ok to leave a solar panel in the sun when it is not connected to a load? For example if you have a system without battery storage and no devices connected, or a system with battery storage, but the battery is fully charged? Or do I need to cover up the panel when not in use?
Jim Bennett
Kris De Decker
@ Jim,
Thanks. Yes it is OK to leave a solar panel in the sun without anything connected to it. It will simply not generate any electricity.
@ Dominic
Thanks for the detailed additions!
Mario
Hello Kris, Thanks a lot for the great article! Not fully on topic for what you describe in this very good how-to-guide, but anyways: for everyone that may have concerns about electromagnetic fields (EMF) as raised by Wim’s earlier comment, I can recommend the website of the German federal office for radiation protection (BfS) as a halfway neutral resource. Link to english-language version of their website: https://www.bfs.de/EN/topics/emf/emf_node.html. While some may think that generally there is no trusting a state-run organization, I do not see what interest they would have to tell you lies. Just taking the time to look at some of the content they provide gives a fairly good idea - I find them to be a good source of information. For typical household installations, there are people that are somewhat sensitive to low-frequency magnetic raditation as it is emitted by 220V 50Hz power cables. While the energy density of this kind of radiation drops very quickly with distance from the source, this may be the reason why it is not a good idea to place 220V extension cords or even phone chargers too close to the head of your bed. A distance of at least 50cm may be a good idea here. DC electrical installations like you describe them should be phisiologically neutral. However, the magnetic coils and higher intermediate conversion frequencies in DC-DC converters and charge controllers (especially if these are less reputable “I-just-found-this-on-the-internet” products) may be tricky, so also keep these away from your head. Kind regards and keep up the great work, Mario (…who used to work in an electromagnetic compatibility testing lab in a former life)
David
Thanks for your excellent piece on How to Build a Small Solar Power System.
You discuss nearly all the important components and steps, but it struck me that one broad issue is missing: how to get the power from the outside panels to the inside loads.
Could you please consider adding a section that addresses issues like these:
how to penetrate the building shell with your cabling in a way that’s resistant to water infiltration and heat loss, considering not just the materials used in the walls of single-family homes but also those commonly used in apartment buildings
for outside batteries, charge controllers, and control panels, strategies for protecting them from the elements, especially since their metallic components will certainly rust in the rain and snow, and plastic casings may not fare so well in direct sunlight either
Thanks!
Jai
Hi Kris,
I recently came across your article on how to build a small solar system and found it very informative and enjoyable, thank you so much for putting so much thought effort into the article. I was hoping to pick your brains for what I would like to build for my house.
I am on my personal journey to decarbonize my home, (heat pumps, EVs, induction cooktop etc) and of course solar is (or will eventually) will play a big role in that final transition. For now, I don’t have rooftop solar panels as it is a rather large expense, but I hope to have them installed over the next 2-3 years.
What I am hoping to do for now is to install a small set of panels to charge my EV (Tesla). Living in Georgia, I know my grid is not using the cleanest sources of energy generation, so anything that I can get off the grid would be beneficial.
I would like to charge my car directly from solar panels without using a battery. Given that I will be installing rooftop solar in the next 2-3 years, I don’t want to buy a big, expensive battery for this (relatively temporary system). As you point out, 80+% of the cost of a solar system is the battery itself, I was hoping to avoid buying one for my usage. My hope is to install solar panels on my deck roof myself (direction is perfect for southern exposure and I have an almost 200sq ft deck roof that I can use for these panels) and run the wire to my garage and charge the car directly during the daytime. Since I work from home, most of my driving is on the weekends, even if I add 5-10 miles of range a day, that’ll give me enough miles over the weekend to almost never have to plug my car into the grid.
So I guess my questions are Is it doable (without damaging the Tesla battery, lord know replacing one of those will cost more than a few pennies) What components will I need? I will have to convert DC from the panels to 120 or 240 AC to charge the car. Can I use user solar panels to further reduce cost and environmental impact? I am not looking for anything high efficiency Is it advisable? As in worth the trouble and expense
Any help you can provide would be greatly appreciated. I would be happy to pay you for help with designing the solution. Thank you in advance.
Regards, Jai