
There are many different methods for making coffee, some more energy-efficient than others. However, there are no coffee makers that you can power with a small solar PV panel. For example, a commercially available 12V DC drip coffee maker requires a solar panel of 300 watts to brew coffee and keep it warm.
The key to making a more energy-efficient coffee maker is insulation. Regardless of which conventional coffee maker you purchase, it will typically have little to no heat insulation, and most of the heat generated by the energy source will be wasted into the environment. Therefore, we made an insulated solar electric coffee maker ourselves.
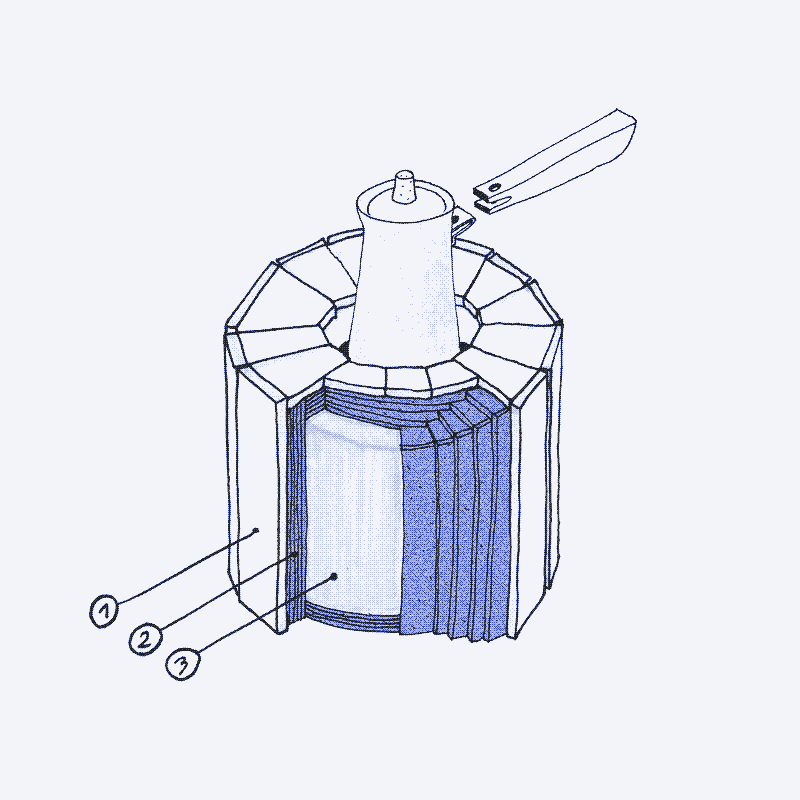
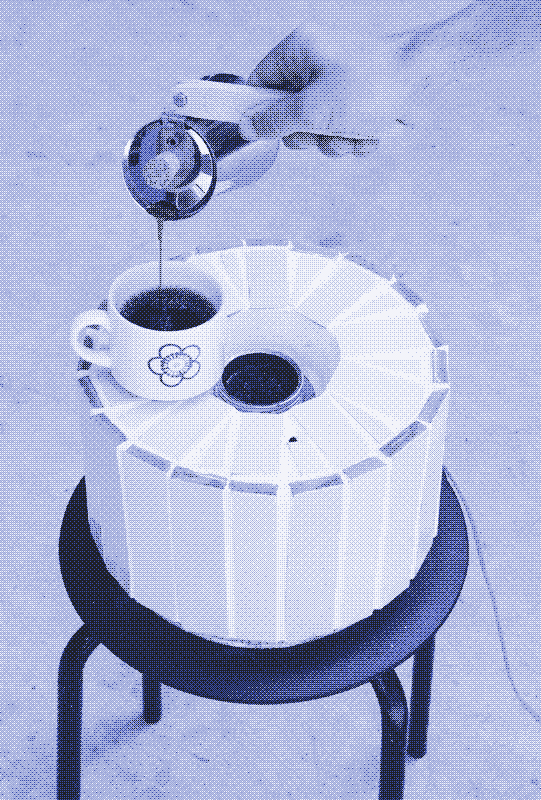
Our coffee maker operates on the same principles as our solar-powered oven and runs on a 100W solar panel. We embedded an Italian coffee maker—a moka pot—in a mortar slab, surrounded by cork insulation and a layer of ceramic tiles.
We embedded an Italian coffee maker—a moka pot—in a mortar slab, surrounded by cork insulation and a layer of ceramic tiles.
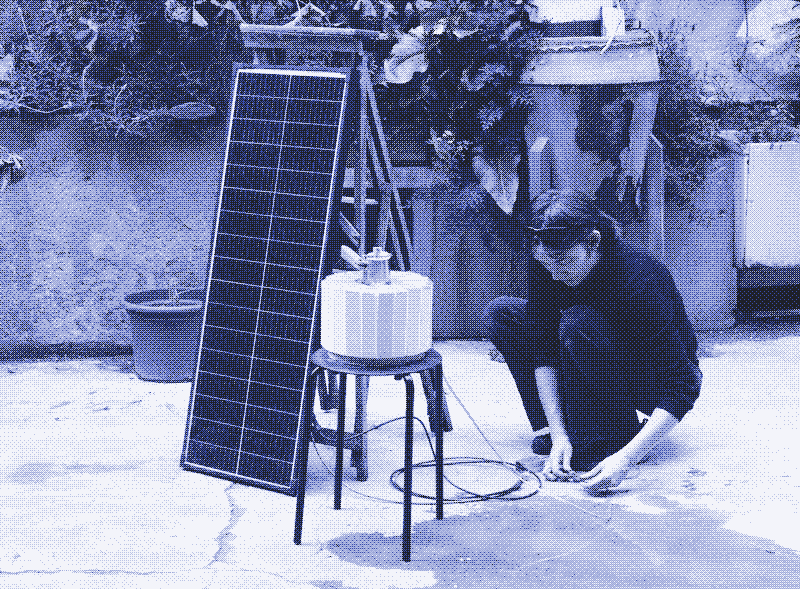
The cooker has an electric resistance heating element integrated inside, which is directly connected to the solar panel without a battery, solar charge controller, or voltage regulator in between. Although it’s solar-powered, the coffee maker can be located inside your kitchen or next to your bed—only the solar panel needs to be outside.
Although it’s solar-powered, the coffee maker can be located inside your kitchen or next to your bed—only the solar panel needs to be outside.
The moka pot was invented in 1933 and uses pressure rather than gravity or a pump to brew coffee. It consists of a bottom chamber (a boiler that acts as a base), a funnel filter with a plate and a rubber joint, and an upper chamber where the coffee is collected. Just before the water boils, the steam increases the pressure inside the heating vessel, pushing the water through the filter and the ground coffee. The moka pot is an energy-efficient appliance, comparable to a pressure cooker for food.
How to brew solar-powered coffee
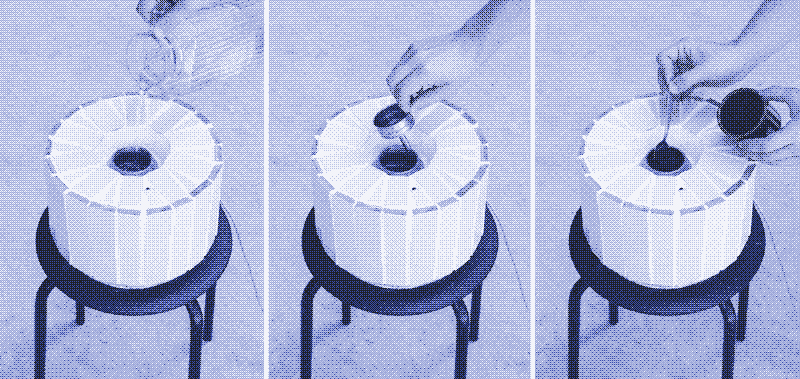
Once the solar panel receives sunlight in the morning, the coffee maker will start heating up. Consequently, if you put water and coffee in the machine in the evening, the sun will brew your coffee in the morning. Coffee is often a collective beverage and our coffee maker is most practical when several people use it. The first coffee takes roughly one and a quarter hours to make. However, once the mortar slab is warm, subsequent brews take only 20-25 minutes.
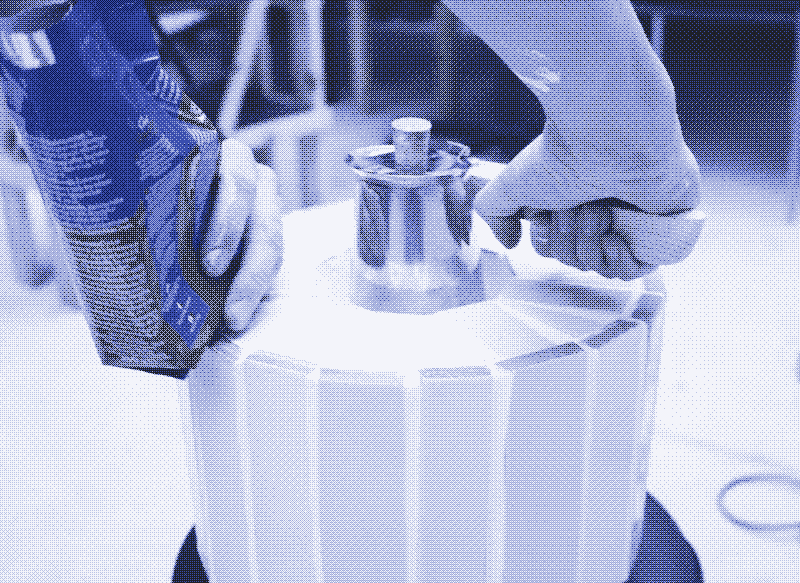
Preparing the coffee works similarly to a regular moka pot. You unscrew the top part and remove the funnel, fill the bottom part with water until the valve, place the funnel back, fill it with ground coffee, and then screw the top part back on. To serve the coffee, you unscrew the top part using the longer handle we attached to the moka pot. The handle was inspired by the Arabic raqweh.
Our coffee maker is the first insulated cooking device we built, and there is room for improvement. It doesn’t produce the characteristic gurgling noise when the coffee is ready, probably because the temperature isn’t high enough.
Also, not all water evaporates. Therefore, cleaning involves placing the base under the tap, letting water run in, shaking, and then turning the coffee maker upside down to empty the base. That’s a bit impractical, because the appliance weighs 10 kg.
Because the coffee collects in the upper chamber, it is not kept warm by the mortar slab and the cork insulation. We solve this by wrapping one or more towels around the top part to keep it warm. Alternatively, you could incorporate heat insulation into the design, for example, with a tea cozy.
What you need

-
Moka pot. Choose the size you need. If you get a second-hand device, make sure that the rubber seal is still in good condition. Also, ensure you can easily take off the handle to replace it with a longer, straight handle.
-
Mortar. Any construction mortar will work. Make sure it’s not too coarse. Read more about mortar in our solar oven manual.
-
Metal reinforcement. We pour quite a big chunk of mortar, so we reinforce it with a metal mesh to prevent it from breaking. We use a frying sieve. Chicken wire mesh shaped in a cylinder will work as well.
-
Cork. For thermal insulation, we use cork sheets available at home decor shops.
-
Tiles. Read more about tiles and tiling in our solar oven manual.
-
Chimney. Because the water chamber of the coffee pot is sunk in mortar, you need a way to maintain an opening around the valve to release pressure if the coffee maker overheats. We use a metal pastry bag tip, but any metal tube will work. You can also cut a piece out of an aluminum can and roll it up.
-
Nichrome wire, heat-resistant electric cable. These are the components for building an electric resistance heater (see our separate manual).
Step 1: Thermal mass and electric resistance heating
-
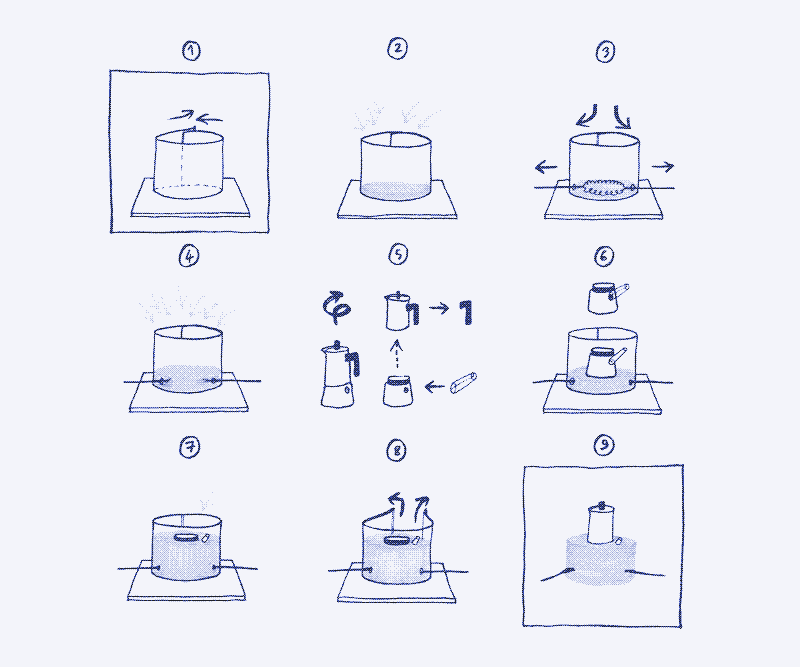
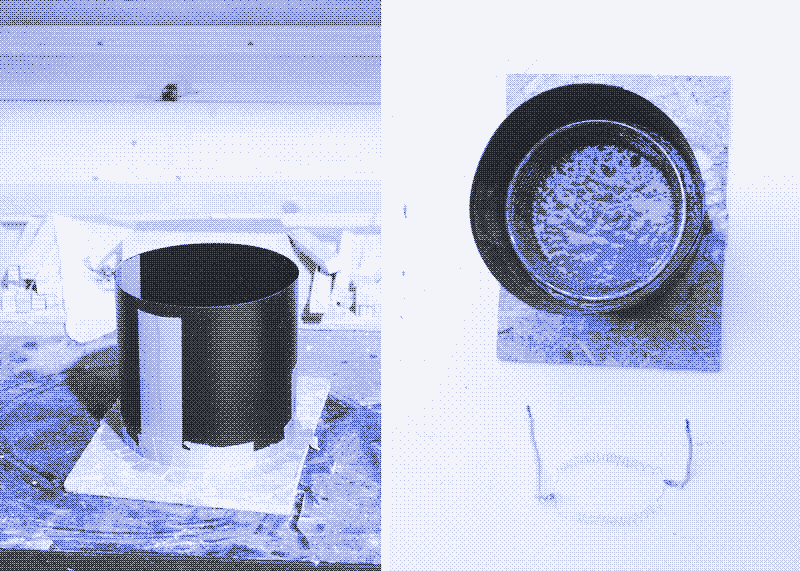
fig. 1 — Start by making a mold for the mortar base. Since the moka pot is circular, we decided to shape our cooker’s heating element into a larger cylinder. Get a wooden board. Use a plastic sheet to form a cylinder and tape it to the board with duct tape. We use an old plastic office folder and shape it around a round cork pad that we place on the wooden board.
-
fig. 2 — Prepare some mortar and pour a layer of about 2 cm at the bottom of the mold. Let it cure for a couple of hours.
-
In the meantime, prepare your electric resistance circuit based on the instructions in our manual. We made a circuit with two nichrome wires in parallel (2 x 64 cm) for a resistance of 3.2 Ohms at 18V. It draws around 5.5 Amps.
-
fig. 3 — Make two holes in the plastic mold to weave the heat-resistant electric cables through. Distribute the resistance wires evenly on the surface of the mortar layer. Make sure they do not touch each other.
-
fig. 4 — Prepare some more mortar and pour it on top of the first layer so that the electric heating circuit is completely submerged.
-
Add the metal mesh. Gently press it into the mortar. Ensure it doesn’t touch the nichrome wire and that there is sufficient space in the center for the pot to fit. Add a bit more mortar if necessary so that the mesh is trapped at the bottom. Wait for a couple of hours for it to set.
-
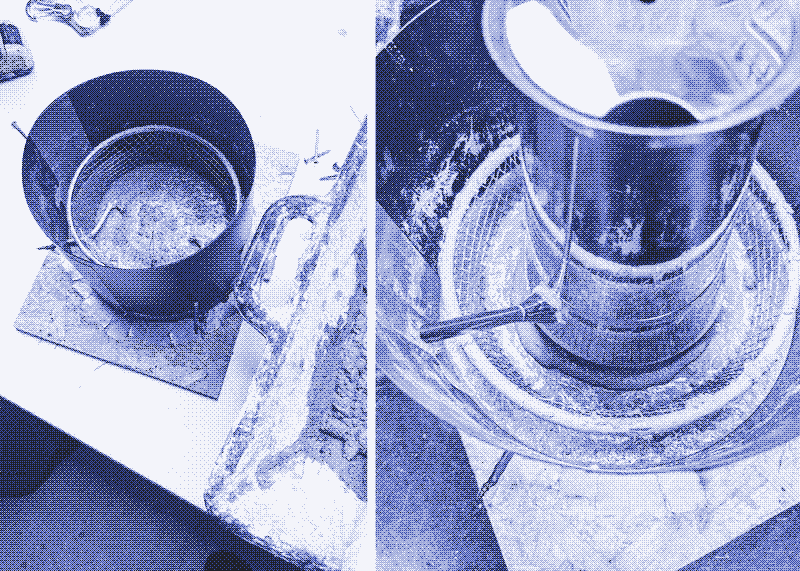
fig. 5 — Cut the chimney tube at an angle to fit snugly around the coffee pot valve while pointing up. Attach it to the moka pot body with hot glue or clay to ensure it stays in place while pouring mortar. It will later be submerged in mortar.
-
fig. 6 — Place the coffee pot on top of the mortar layer, in the center. Remove the handle; otherwise, its tip would get stuck in the next mortar layer. We’ll replace it with another handle later in the building process.
-
fig. 7 — Prepare more mortar and pour it into the mold, around the coffee maker. Fill the mold up to the screw rim of the coffee pot. Let the mortar cure for at least 24 hours.
-
fig. 8 — Once hardened, remove the plastic mold sheet.
-
fig. 9 — Let the base dry for an additional 48 hours. Position the base on top of a grid to allow the bottom to dry as well. The mortar should feel completely dry to the touch.
Step 2: Insulation
We insulate the mortar slab with a 2 cm thick cork layer on all sides (including the top and bottom). We use rectangular and circular cork sheets, 4 mm thick, which means we use five layers.
-
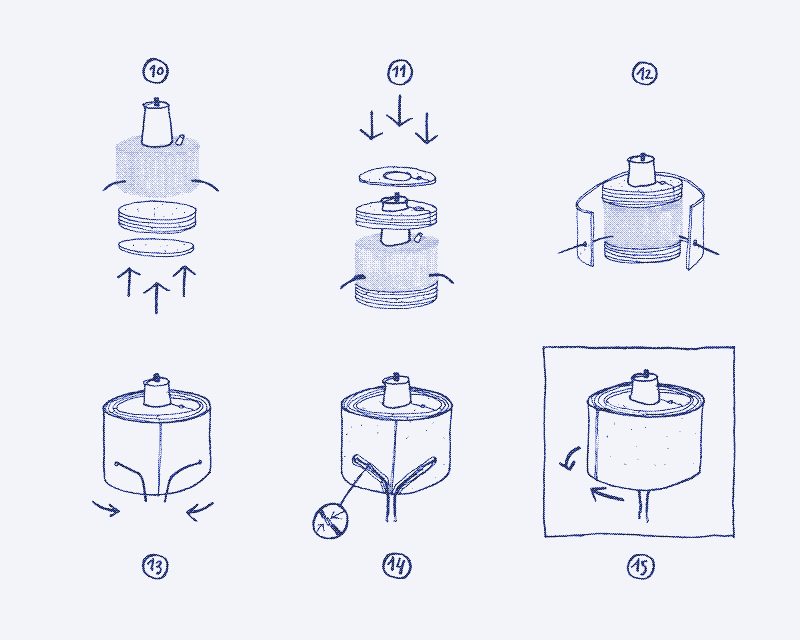
fig. 10 — Layer 5 circular cork pads for the bottom part. Use wood glue to secure them together.
-
fig. 11 — Use another five cork pads for the top. Cut out a circle in the middle, about 2 cm wider than the coffee pot, so that there is room to add a plaster protection to the cork. Glue them together.
-
fig. 12 — Start cutting and layering cork sheets around the cylinder, using painter’s tape to keep them in place. In each layer, make two holes to weave the electric wires through.
-
fig. 13-15 — Before adding the last sheet, decide where you want to route the cables from the electric heating resistance. You can cut away a path into the last but one layer of cork to allow the wires to pass. We let them out at the bottom. Add the last sheet of cork (fig 15.). Use some tape to secure it.
-
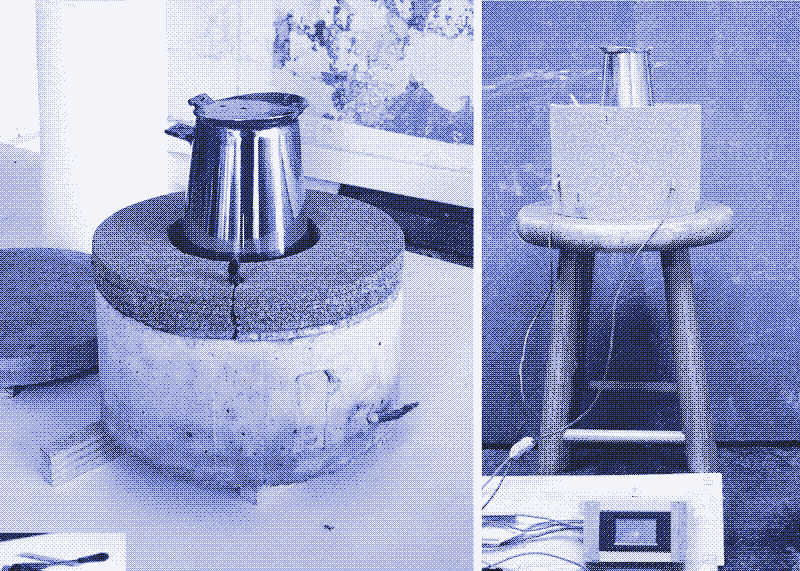
At this stage, you can run a test. We used water only, in order not to stain the cork with coffee. Test how long it takes for the water to reach the top chamber.
Step 3: Tiling
We chose to cover our coffee maker in glazed tiles. They are waterproof, easy to clean, and commonly used in kitchen furniture, walls and counter tops. Tiles are easy to adapt to various shapes and are aesthetically pleasing. Furthermore, they are easy to obtain and tiling doesn’t require expensive tools.
-
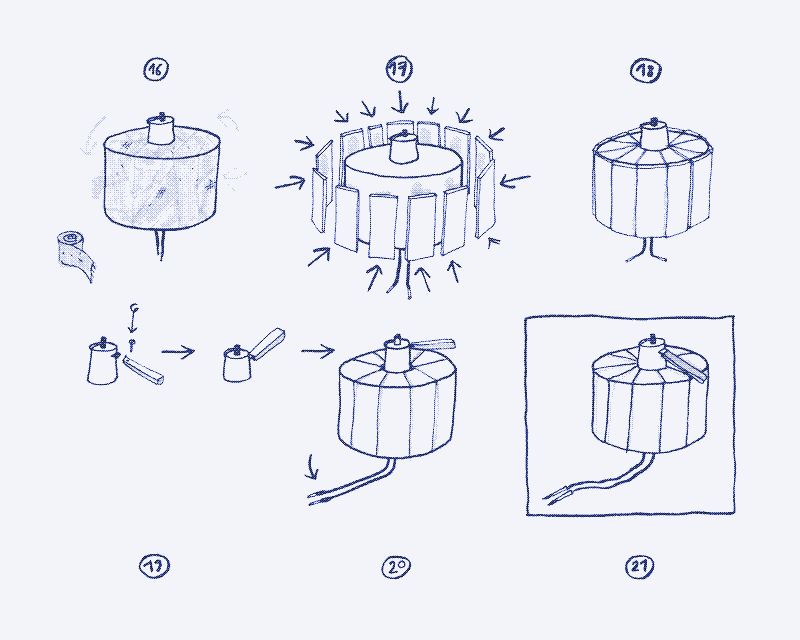
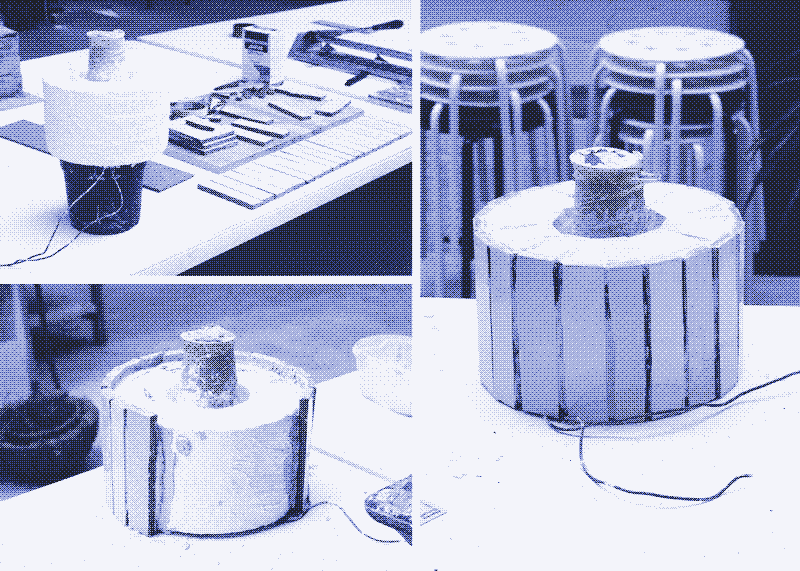
fig. 16 — First, prepare the surface for tiling. Adhesive mortar doesn’t stick well on cork, so start by covering the cork with plaster. We used plaster bands, similar to those used for medical casts. The bands also help to keep the cork sheets together and fill the air gaps. At this stage, protect the coffee maker with painter’s tape to prevent it from getting plastered.
-
Leave the plaster to dry for 24 hours.
-
fig. 17 — Once the plaster has dried, you can tile the surface. We found vintage glazed tiles on the street that we cut into strips and sanded off their sharp edges. For the top part, we use tile fragments from tiles that shattered during the cutting process. Mix approximately a cup of adhesive mortar for walls (which is stronger than adhesive mortar for floors). Using a spatula, spread some mortar at the back of each tile before pressing it against the cylinder. Leave a gap of a few millimeters between each tile for grouting. Repeat this process for the top, and ensure the chimney entrance remains clear. Leave everything to dry as indicated on the mortar packaging.
-
fig. 18 — Now it’s time to grout the tiles. The aim of grouting is to seal the joints between the tiles to avoid moisture and dirt getting in. Mix the grout with water following the instructions on the package. With a scraper, or an old plastic card, press the paste in between the tiles. After about 20 minutes, clean up the excess grout with a damp sponge. Smooth out each grout line with a wet finger or sponge. Leave everything until it’s dry.
Step 4: Finishing touches
-
fig. 19 — Add a handle. Remove the original handle of the moka pot, as it has a vertical design that would get stuck in the mortar. Replace it with a horizontal handle, which gives leverage to screw and unscrew the top chamber and helps to serve the coffee. We made a handle out of wood and attached it with a bolt and nut to the coffee pot using the metal attachment welded on the cylinder. A length of about 20 cm is ideal. Use strong wood because the handle needs to withstand significant stress.
-
fig. 20 — Wiring. Extend the short heat-resistant cable with a longer 1.5 mm² regular electric cable. Use shrink tape to prevent water or coffee from coming in.
-
Base. Add a 20 mm thick wood base and cork layer to the underside of the structure. It creates room to lift the coffee maker more easily, and protects the tiles from damaging the countertop surface.
-
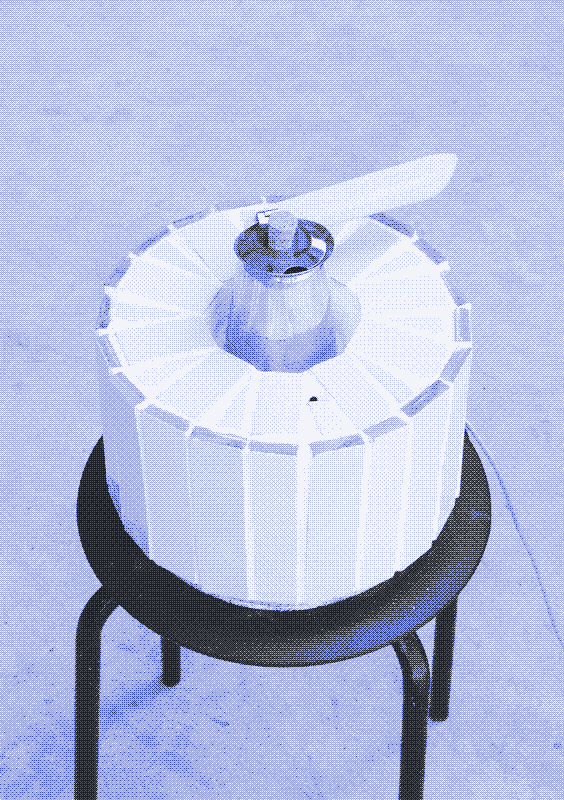
fig. 21 — Done! Brew your first solar-powered coffee.
Other ideas
You could also fit the coffee pot in mortar in an existing box, like an old wooden crate or a scavenged metal drum. Instead of tiles, you could use other kinds of coating with a cement, lime or plaster base. You could also decide to integrate the pot in the kitchen furniture counter.
Credits
- Concept: Kris De Decker, Marie Verdeil.
- Design: Marie Verdeil, with input from Anna Mareschal de Charentenay.
- Construction & documentation: Marie Verdeil, with assistance from Hugo Lopez.
- Thanks to AkashaHub Barcelona for the workspace. Living Energy Farm & Cal Poly for their pioneering work on insulated solar electric cookers.
Reactions
To make a comment, please send an e-mail to solar (at) lowtechmagazine (dot) com. Your e-mail address is not used for other purposes, and will be deleted after the comment is published. If you don’t want your real name to be published, sign the e-mail with the name you want to appear.
Reactions
Gus
Very nice! The ceramic tiles are very attractive too (which is important!)
My house uses a mechanical coffee press - the cheapest similar one (that I know of) is the aeropress.
The good thing about a handpress-style coffee machine is that it just needs hot water (I’ve boiled water using an evacuated tube kettle before, but the source can vary depending on available energy sources at the time), and the brewing process itself is very quick. It’s not so well suited for a really short espresso coffee though (and Moka machines are great for that!)
Love your magazine, been following for years, Cheers, Gus
jake
Thank you Kris and Marie for this fun project! I think this is actually a great introduction to making a solar-powered water heater/room-warmer, combining the tile stove design (as mentioned in your foot box article) with an internal water tank that can be plumbed for use in the house. Perfect for mediterranean winters. Or, perhaps better: rather than a tank, use coiled copper pipe in a few layers around the heating element, with the necessary design for pressure and heat release, as in the typical woodstove designs that make hot water for a whole house (thinking of Ben Falk’s experimentation in Vermont, u.s. – as an aside, he coiled plastic tubing in a huge woodchip pile one year to generate heated water to keep his in-earth greenhouse at temperature in the winter). I am not well versed in the details of such a design, but, with better knowledge, one might want instead to make a series of smaller heated water/ceramic boxes (this may be more realistic or efficient, given the energy input - again, I really have no idea). Could the excess heated water be released into a turbine to generate further electricity off the extra, unused heat (or coursing water, if the plumbing is set up in a such way that it gains speed and pressure without extreme heat?). Small boxes in series, with turbines between? I imagine some of the materials could be derived from building demolition sites… And, thinking about my family’s home of Sardinia, there is plenty of waste cork littering the forest during harvest time. All musings, but perhaps experiments such as these are what we need for our solar-powered futurepresent! Thanks again for all your work throughout the website.
jake currently in Vienna
Stewart
Quite a complex way to make coffee, lots of high tech (cheap solar panels made from stranded coal in China, imported via vast logistics chains etc) are not low really low tech.
Direct solar on the other hand is. Try putting a stovetop espresso maker in a sunplcity parabolic cooker , made in Albi over the border. Or even an American box sun oven which will take longer.
Save the PVs for other stuff, not resistance heating.
sunplicity.fr
A bit of fun in London …most people have never seen this stuff ever. Even the most eco minded. Solar Cooking Hot Drinks in a London Park slicksolarstove.com
If I’m ever in Barcelona again I’ll make you a quick coffee a la solar without the PV tech middle man!
Stewart
Kris De Decker
@ Stewart
Parabolic cookers are great, but you need a garden or a large balcony. Not everyone has that. Furthermore, the high-tech solar panels that power my coffeemaker also have other purposes. When I had enough coffee, I make them charge a lead-acid battery that provides me with light in the evening. For all its wonders, a parabolic cooker is not going to do that.