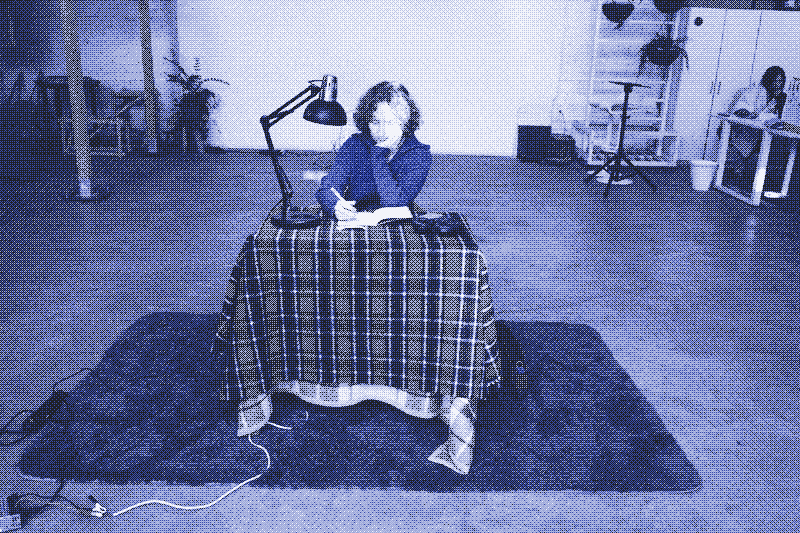
- Why build an electrically heated table?
- The table
- Heating the table
- Insulating the table
- Dressing and undressing the table
- Safety
Why build an electrically heated table?
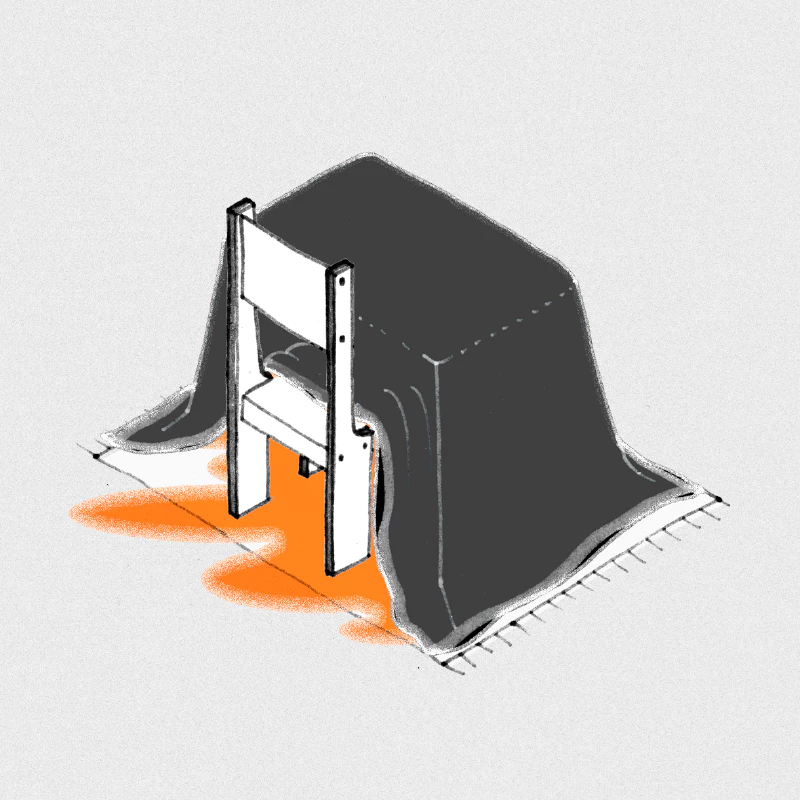
For centuries, many cultures have used heated tables for thermal comfort in cold weather. Examples are the “kotatsu” in Japan, the “korsi” in the Middle East, and the “brasero de picon” in Spain. A heat source goes under a table, a blanket goes over it, and people slide their legs underneath. The micro-climate under the blanket keeps you comfortable, even though the space in which you find yourself is cold.
The heated table is an excellent example of our ancestors’ energy-efficient way of warming: heating people, not spaces. Historically, glowing charcoal from the fireplace heated the space under the table. While that provided sufficient warmth, it also carried a significant risk of fire and carbon monoxide poisoning. Nowadays, we can use electric heating technology instead. For example, the Japanese kotatsu is still in use, but it’s now working with a small electric heater fixed under the table surface.
In this manual, I will walk you through the making of an electrically heated work desk for one person. I have built the table for myself in the co-working space in Barcelona where I have my office now. The building, an old industrial warehouse, has very high ceilings, no insulation, and little sun in winter. It can get very cold here and conventional heating systems don’t work. My heated table turns out to be a perfect solution. I can power it with a solar panel, a wind turbine, a bike generator, or a battery. I can also plug it into the power grid.
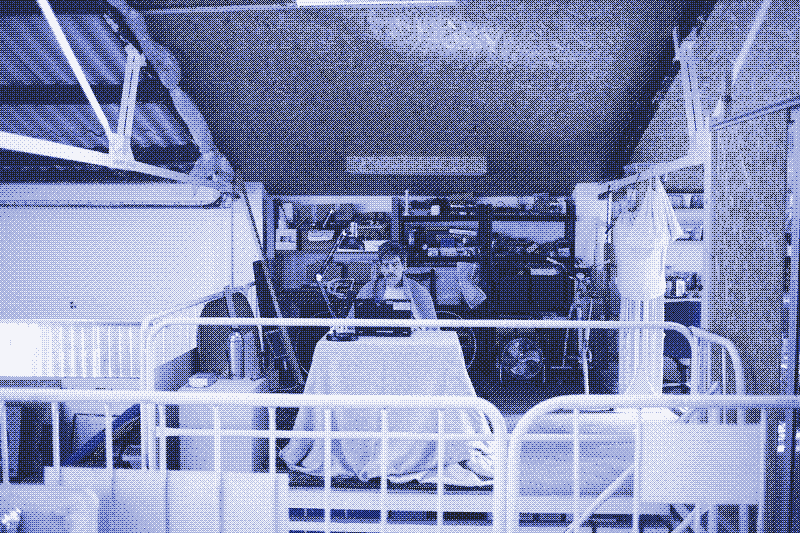
A heated table offers exceptional comfort. The lower part of your body gets immersed in heat as if you are baking in the sun or sitting in a hot bath. The warmth quickly spreads to the rest of your body through the bloodstream.
During a week of experiments in December 2024, with indoor air temperatures of 12-14°C (53-57°F), I recorded very low energy use for my freshly built heated table: between 50 and 75 watt-hours per hour. 1 Compare that to a conventional electric portable heater, which easily consumes 1,500 watt-hours per hour (and does not guarantee thermal comfort). My heated table uses as little electricity as charging a laptop or heating two liters of water for a hot water bottle (58 watt-hours per hour, assuming you reheat the water every two hours).
It takes about 15 minutes before the heat effect of the table becomes noticeable, one hour before it heats at full power, and two hours before it reaches its maximum energy efficiency. Energy use drops from 75 watt-hours in the first hour to between 50 and 60 watt-hours in the third hour, as the thermostat turns off the heating more often. The system accumulates heat in the carpet, the blankets, the table, and the human body. If you turn it off after three hours, walk away, come back 30 minutes later, and turn it on again, the table is heating at maximum capacity within 10 minutes.
The manual
Building an electrically heated table is quite a simple project, which requires few technical skills and little time. Once you get all the parts together, you can assemble a heated table in a few hours. The costs are limited, too. 2 The construction process consists of three parts: wiring the electrical system, programming the thermostat, and getting the textile layers and insulation right.
What you need:
- Table
- Carbon heating film (I used this one)
- Thermostat (for example, this one)
- Blankets
- Carpet
- Extra insulation material (I used cork)
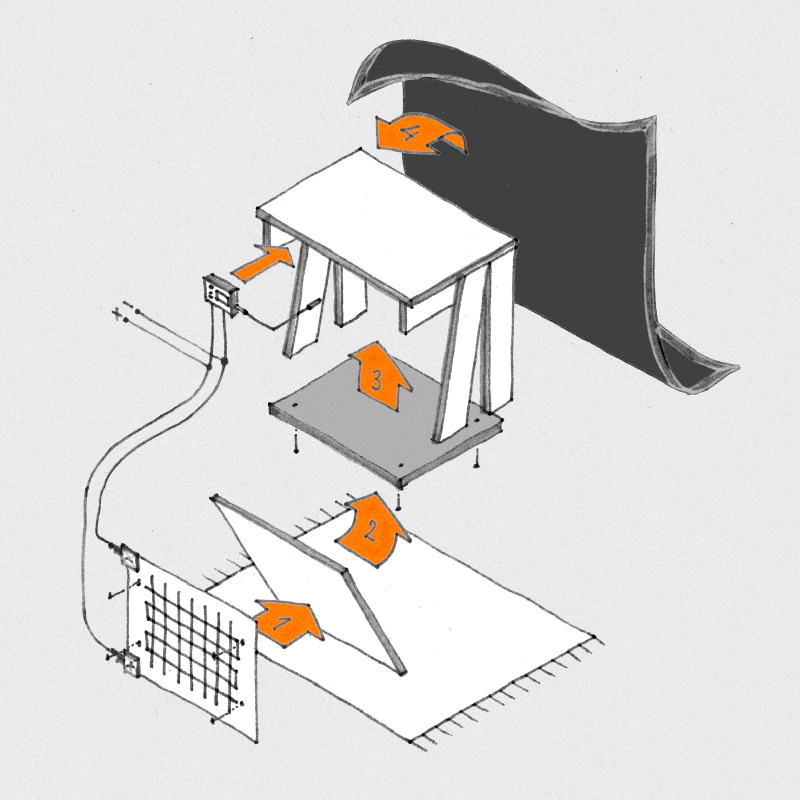
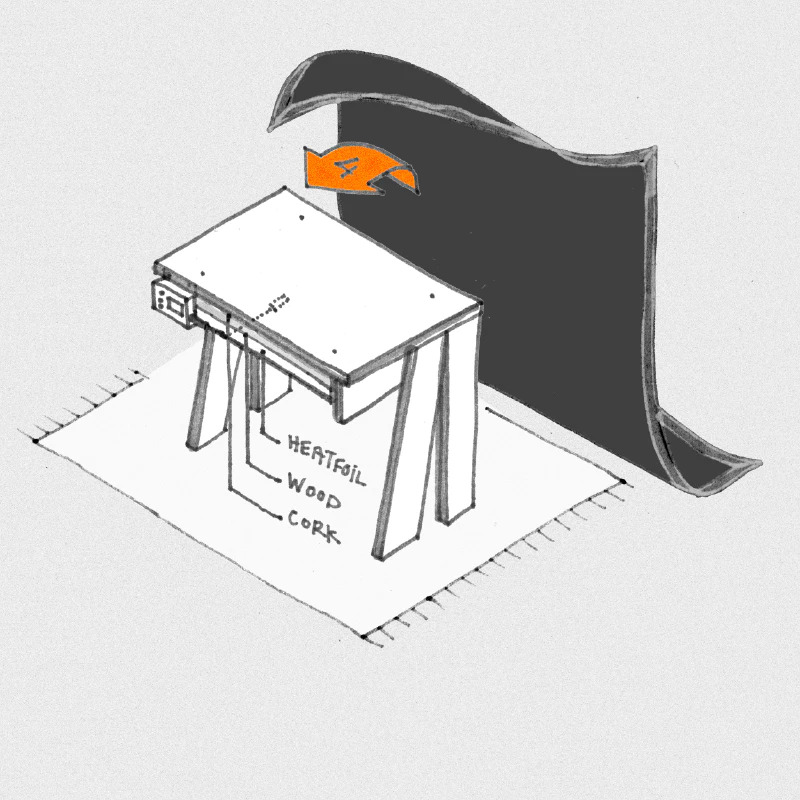
Step 1: Get a table
This manual concerns a table for only one person - my writing desk. Unlike the Japanese and Middle Eastern examples, my table is adapted to a Western-style sitting position: not on the floor but on a chair. You can turn any table into a personal heat source, but some are better suited than others. Most importantly, you should be able to screw a flat heating foil (step 2) under the table. However, structural elements may complicate that, as is the case for my table (see the image below).
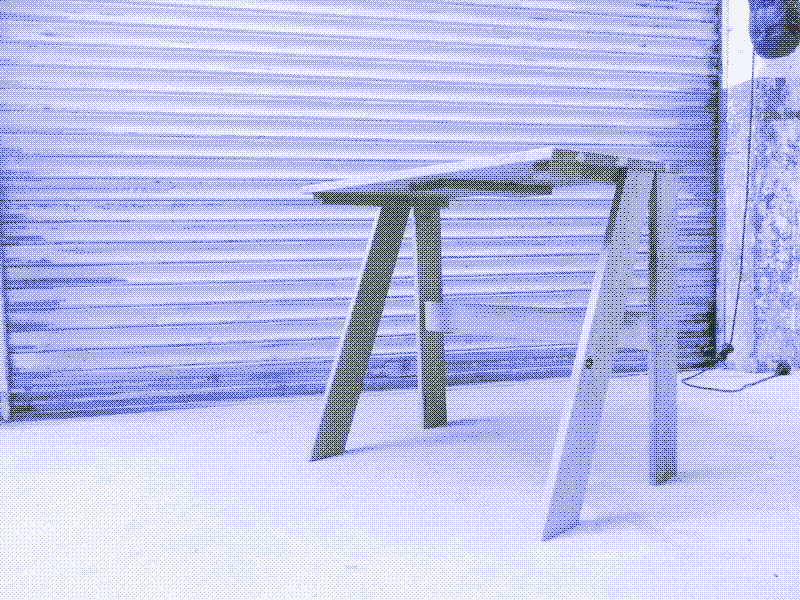
I solved this by installing the heating foil on a thin wooden board which I then screwed against the supporting elements. However, for some other tables, this may not work. Choose a wooden table. Wood insulates relatively well, so a wooden table top already provides some of the insulation you need to maximize heat production. It’s easy to screw things onto a wooden table as well. You can build a larger heated table that can seat more people, but in that case, you will have to connect several heating foils (step 2) and stitch several blankets (step 8) together.
Step 2: Choose your heating element
In principle, any electric heating device can power a heated table. However, because a heated and insulated table is so energy efficient, you need an electric heater with a very low power use. The average portable electric heater is way too powerful for our purpose. Due to its high surface temperature, it could also cause burns or provoke a fire when you put it under a table.
Carbon heating film
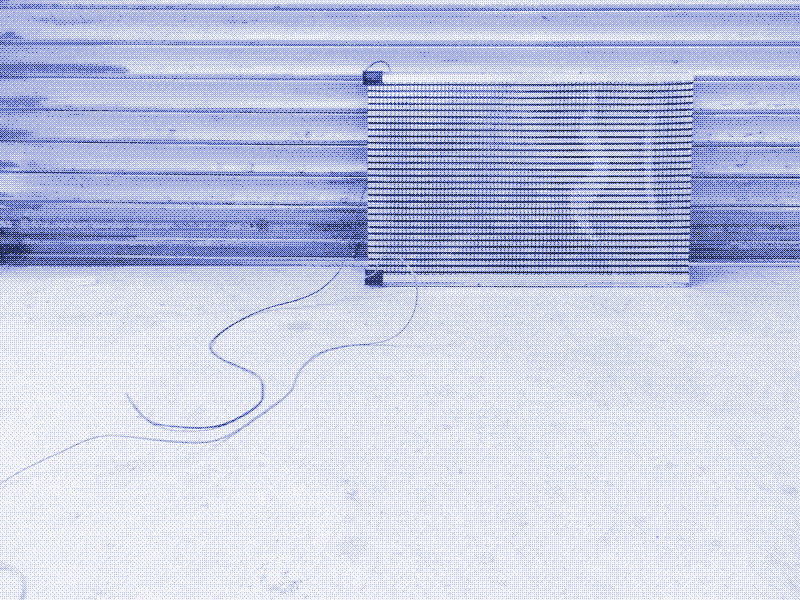
The best heating element for an electrically heated table - and the one I am using in this manual - is carbon or infrared heating film. These very thin heating foils are primarily meant for electric floor and wall heating in buildings and vehicles, for protecting batteries or water tanks against the cold, or for warming beehives and terrariums. Infrared heating films are low-temperature, large-surface heaters, so there’s no risk of burns or fire through direct contact with skin or clothes. They are meant to operate at a maximum temperature of 40-45°C (104-113°F).
Voltage
Carbon heating foils come in different voltages: 12V, 24V, and 110/220V. I chose a 12V heating foil to make my table compatible with my 12V solar installations and bike generator. If you have a 24V renewable power system, opt for a 24V heating foil.
If you want to plug the table into a wall socket, using mains power, there are two options. First, you could buy a 110V/220V heating foil, add a compatible plug, and connect it directly to the power socket. However, you really need to know what you are doing, because such high voltages carry the risk of electrocution. A safer DIY option is to use a 12V or 24V heat foil connected to a universal power adapter that steps down the voltage from 220V to 12 or 24V (comparable to the charger of a laptop). That is how I tested the table because I don’t have solar panels in my new office yet.
Size
Carbon heating film is available in different widths, for example, 20, 30, or 50 cm. You can buy it per running meter, and it’s flexible enough to be rolled up tightly for transport and storage. You can cut the foils to size in length at certain intervals. They have electric cables soldered to the positive and negative terminals, ready to plug into the power source. However, if you cut the foil into pieces, you will need to solder cables to all the new pieces. You can connect carbon heating foils in parallel, operated by only one thermostat (step 3). My table only has one heating foil, cut to size.
Power use
The power use of carbon heating foils - expressed in watts per square meter (W/m2) - varies because of two factors. First, heating foils are sold with different power outputs, mostly between 100 and 250 W/m2. Second, there’s size. If your 1m2 carbon foil reads 130 W/m2 and you cut it in half, then 0.5 square meters of heat foil will demand 65 watts. My table’s infrared heating film has a power use of 220W/m2. I first used 0.375 m2 of heating foil (50x70cm), resulting in a power use of about 82.5 watts. Then I cut off a centimeter to make it fit better under the table, and as a result power use dropped to roughly 75 watts.
Step 3: Choose your thermostat
You should only operate a carbon heating film with a thermostat. Without a thermostat, a heating foil could overheat and get damaged or cause fire. A thermostat also provides a stable comfort zone under the table. The thermostat turns the heater off when it reaches a set maximum temperature, and turns it back on when the temperature drops a few degrees lower.
The thermostat voltage must match the heating film voltage: if you have a 12V heating foil, you need a 12V thermostat. If you have a 24V heating film, get a 24V thermostat. The thermostat I use for my table is the W3230 DC 12V. It’s a widely sold device for all kinds of purposes. You need to wire the thermostat and set the temperature.
Step 4: Wire everything together
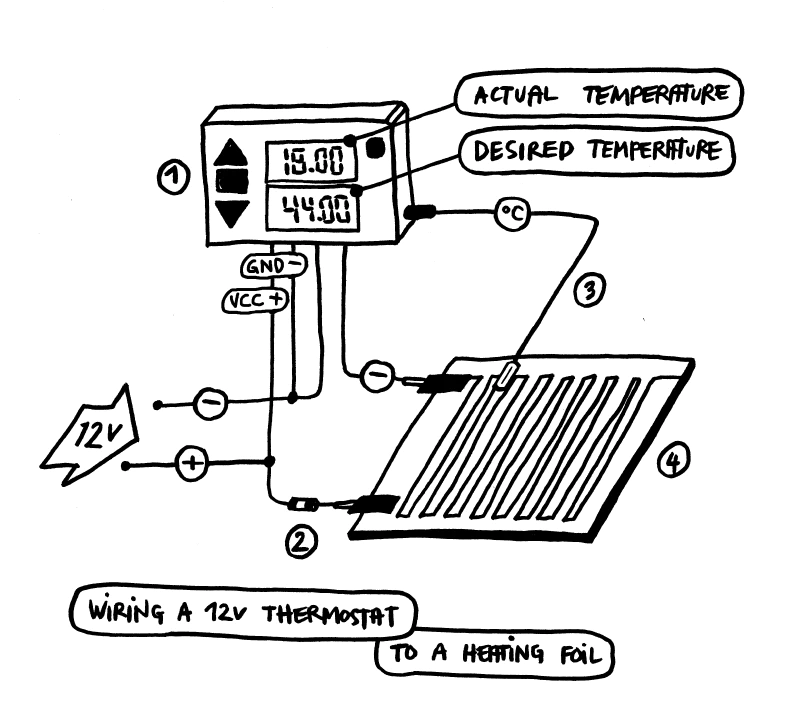
The thermostat is connected between the heating foil and the power source, as shown in the illustration below. The wiring may be different for other thermostat models.
Cable size
Your cables must be thick enough for the current that flows through them. Infrared heating foils are sold with thick electric cables included, and they are often much longer than you need them to be. You can cut them shorter and use the rest to wire the whole system. If you want to use other cables, then use a multimeter to measure the current that the heating film draws. For example, my 12V heat foil requires 6.6 Amps, so my cables - in the complete circuit - should have a conductor cross-section of at least 2.63 mm2 (that’s 13 AWG gauge, check this chart).
Fuse
Any electrical system needs fuses for safety. Once you have cut your heating film to size, measure how much current runs through it. Next, install a fuse that is at least 135% of that value. My table uses 6.6 amps and I added an 10A fuse. Read more about fuses in our solar power manual.
Switch
You can add an off-on switch in your circuit to turn your heated table on and off. Use one that has a light indicator, so that you don’t forget to stop the heating system when you leave. You could also install a motion sensor under the table. That said, if you have wired your system correctly, used the right cable thickness, and added a fuse, leaving it on accidentally will not cause any safety problems.
Temperature sensor
The thermostat comes with a temperature sensor that you should install between the heating foil and the table (touching the heating foil). Make sure to fix this sensor securely, as it is essential to the proper and safe functioning of the heating system.
Where does the thermostat go?
Before you start wiring the system, decide where your thermostat goes, because it will determine the length of the cables you need. I have my thermostat installed under the table, hidden under the blankets. Once programmed, there’s no need to access it regularly (see further). Having the thermostat on top of the table means that you need a hole in your blanket for all the cables to go through. It also complicates the adding and removing of blankets.
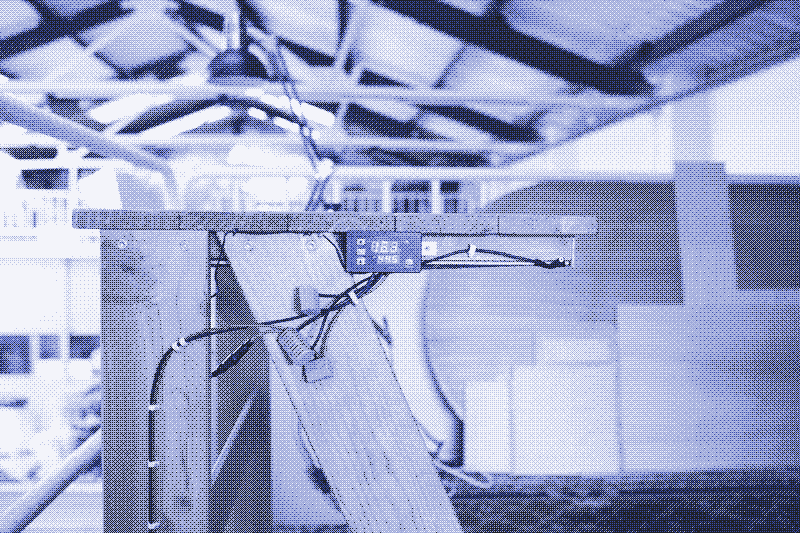
Step 5: Program the thermostat
To program the thermostat, connect it to the power source. First, select the “heating” function. My thermostat’s default setting was “cooling” and I struggled to make it work at first. Here’s the steps to follow:
- Press and hold “set” to enter the code setting menu.
- Press up or down to select “P0”.
- Press “set” again to enter the code setting
- Press up or down to select “H”
- Wait 3 seconds and the setting is saved.
Next, you set the temperature at which you want the thermostat to turn the heat foil off. Heat foil manufacturers advise 40-45°C (104-113°F) during sustained use. Here’s what to do:
- Short press “set” and the blue number will start blinking.
- Press up or down to select the maximum temperature you want
- Wait 3 seconds, and the setting is saved.
You can leave all other functions of the thermostat untouched.
Insulating the table
To build a comfortable and energy-efficient heated table, you need to understand that a carbon heating film emits heat on both sides. If you simply attach it under a table it does not get warmer than 30°C, which will not improve thermal comfort in a significant way. It’s only when the heating surpasses skin temperature (around 35°C/95°F) and core body temperature (37°C/99°F) that you start feeling the warmth radiating towards you.
To reach sufficiently high temperatures, you need to cover one side of the heating foil with heat-insulating material.
To reach sufficiently high temperatures, you need to cover one side of the heating foil with heat-insulating material. That will force most of the heat output to the other side - the side that radiates energy towards your body. The carbon heat film for a heated table is placed below the tabletop, radiating heat downwards, and so the insulation goes on top. 3 It consists of the wood table top, one or more blankets, and any additional insulation material that you add to the table surface.
When carbon heating films are used as floor heating, the insulation is below. The upper side needs to be protected by a material that is strong and easily radiates heat, such as ceramic tile. However, when you build an electrically heated table with the foil radiating heat downwards, there’s no need to protect the exposed side. It can be touched safely and nobody is walking on it.
Step 6: Insulate the heat foil
To improve the heat output of the infrared heating film, I have added 3 cm of cork insulation in the space between the foil and the table surface. I have not done any tests without the cork layer, but I am confident that the energy efficiency and thermal comfort of my table would not have been so excellent if it would not have been there. Other suitable natural insulation materials are wool, cellulose, wood fibers, hemp, and flax. You could also try radiator heat reflector foil.
Step 7: Get a carpet
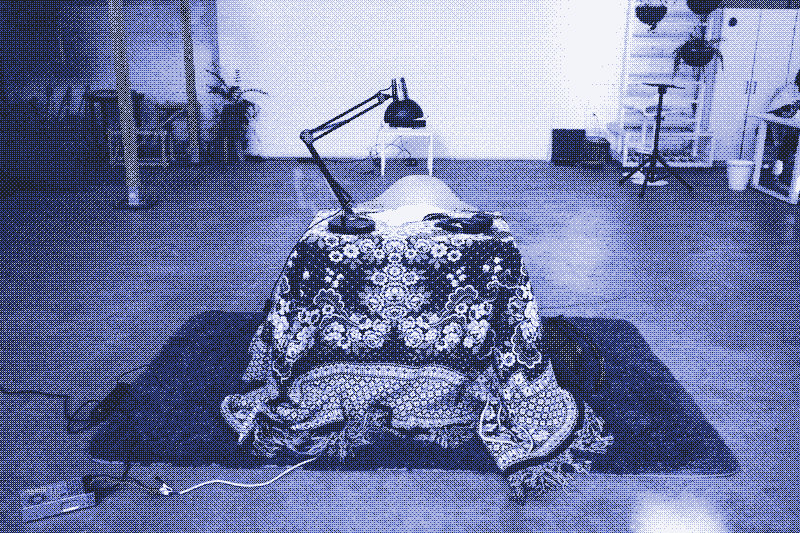
If you put an electrically heated table on a cold floor, you will not be comfortable. The cold floor will suck up all the heat from the carbon heat foil, and your feet will conduct warmth to the floor. You need to insulate the floor, and you can do that with a wool carpet (or several wool carpets on top of each other). New wool carpets are expensive, but they don’t need to be much larger than the table and they can be found cheap second-hand. I got the very large Persian-style wool rug in my office for 50 euros, and I will add a second one on top to further improve the floor insulation.
Step 8: Find your blankets
The energy efficiency and thermal comfort of an electrically heated table are in large part determined by the type and size of the blankets you put over it. The blankets form part of the heat film insulation layer, but if they are long enough to reach the ground they also trap warm air under the table.
Radiant heating systems transfer energy to surfaces - including your body - and do not warm up the air directly. However, the air temperature under the table will slowly increase indirectly due to the higher surface temperatures of the blankets, the table, the carpet, and the person who sits at the table. During the experiments, the air temperature below my table at 25 cm above the floor increased by about 10°C (18°F).
Wool
Choose a wool blanket. Wool traps heat very efficienctly, is much more flame-resistant than other textile materials, doesn’t get dirty or smelly easily, regulates humidity, and purifies the air. 4 New wool blankets can be pricey at hundreds of euros for the size we need. However, I purchased four second-hand wool blankets for 90 euros, two of them large enough to reach the ground. If you find a wool blanket that is ugly or stained, simply layer it with a nicer and cheaper cotton blanket.
Blanket size
The size of the blanket you need depends on the size of your table (length, width, height). My table measures 80 cm long, 56 cm wide, and 75 cm high. That means that my blanket should measure at least 230 cm (75+80+75cm) x 206 cm (75+56+75cm) to reach the ground. Can’t find a blanket that is large enough? You could build a lower heated table and sit on the ground, or you could sew several smaller blankets together. Smaller blankets can also be useful in combination with larger blankets, or they can serve as the only blanket when it’s not so cold (see further).
Work surface
Although it feels nice to work on a wool or cotton surface in winter, you can also put a wooden board on top of the blanket, cut to size, in order to protect the blanket from wear and dirt. Or, you drape a cotton tablecloth over the blanket, which is easier to wash than wool.
Dressing and undressing the table
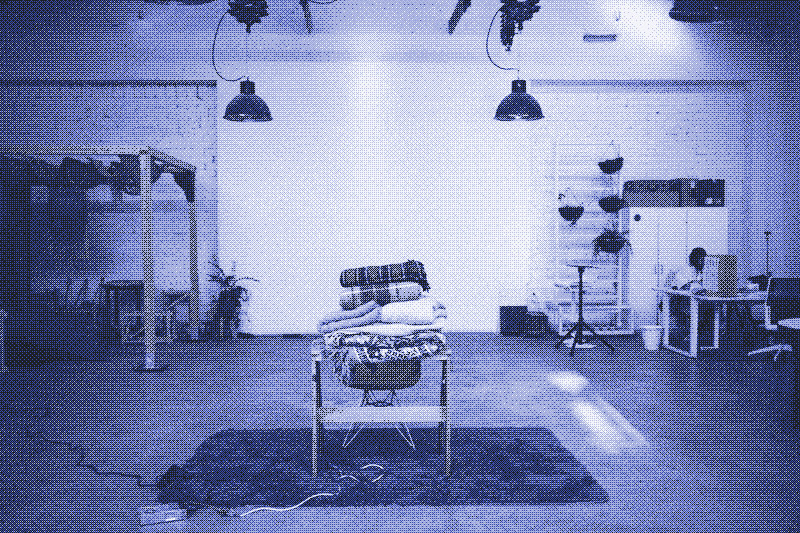
Any heating system must be able to be adjusted to achieve the desired comfort. For a central heating system, that happens by manipulating the thermostat. However, that doesn’t work so well for a heated table, because the temperature range of the carbon heating film is limited. Going below 38°C (100°F) will not provide a pleasant sensation of warmth, while prolonged heating above 45°C (113°F) may damage the heating film and make it too hot to touch. However, you can adjust thermal comfort in a wide range of air temperatures by “dressing” and “undressing” the table: by adding and removing textile layers, and by using them in different ways.
You can adjust thermal comfort in a wide range of air temperatures by adding and removing textile layers, and by using them in different ways
It’s not an exaggeration to say that the blanket becomes part of your clothing. Sitting at the table feels like wearing a very large dress that is heated from the inside. Just like we dress differently depending on the weather, adding and removing layers, the number of blankets, and how they are positioned can reflect the environmental conditions. I have tested the table with one to four blankets, and with every extra blanket energy efficiency and thermal comfort increase. On a very cold day, you could add two or three blankets hanging down the table. If you are still cold, you could drape extra blankets over your chair and shoulders. You could end up in a complete tent, heated from the inside, with just your head and arms sticking out.
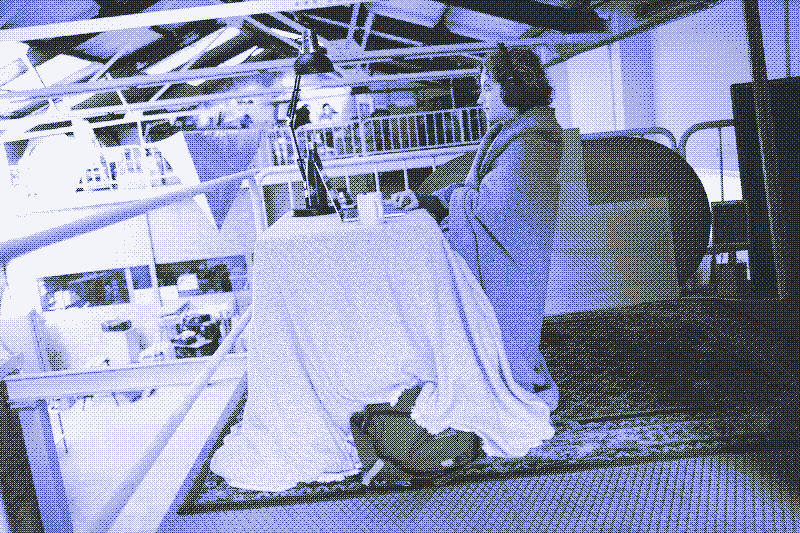
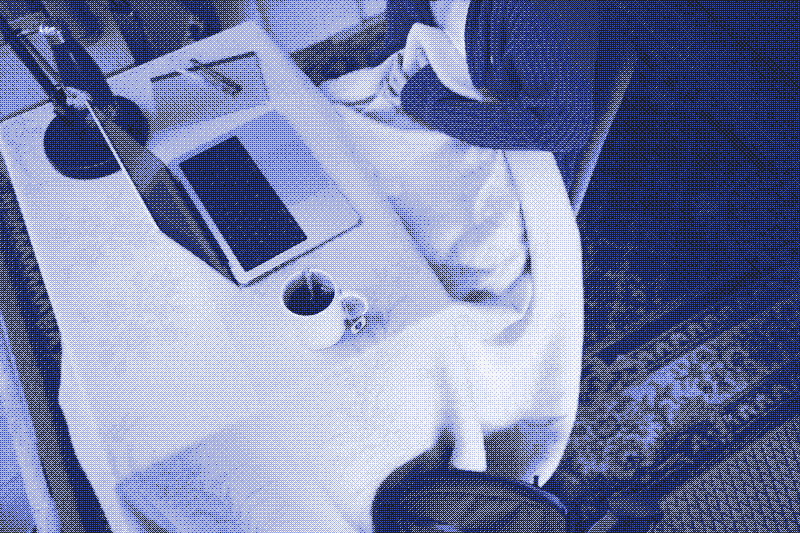
However, as you add more blankets, the textile layer becomes increasingly heavy, and it takes more time to get in and out - to “dress” and “undress”. Consequently, a lighter cover is preferable if it provides sufficient comfort. On a chilly spring evening, one or two shorter blankets may be sufficient to keep you comfortable. I have tested the table like that and it did almost as good as with a large blanket. Energy use was somewhat higher and thermal comfort somewhat lower - I especially noted cold feet. However, should it be a bit warmer, I would prefer this setup because it’s more practical to get up from the desk.
Overheating can be solved without reaching for the thermostat as well: lift a corner of the carpet with your foot and let some heat escape, or remove one of the blankets. It would be more energy-efficient to turn down the thermostat, but the energy use of a heated table is already so low that there is room for some convenience. The comfort of a heated table can be further improved by a heated chair or bench, or by putting a screen behind your chair, covered with heat foil on one side and with insulation on the other side. That’s something for a future manual.
Safety
While an electrically heated table is much safer than a table heated by fire, it does entail some risks, including a fire. However, this can only happen when you ignore some crucial rules, which I repeat below:
- Do not put a powerful electric space heater under a table with blanket.
- Never operate a radiant heating foil without a thermostat.
- Make sure your electric cables are thick enough.
- Add a fuse to your electrical system.
- Fix the temperature sensor securely: it should always stay in place.
- Avoid blankets and carpets made of synthetic fibers, which are highly flammable. Your heated table won’t catch fire if you follow the advice above, but a fire can start elsewhere in the space. The best material for blankets and carpets is wool, which does not catch fire. Cotton is flammable, but it’s not as bad as synthetic material.
- Long blankets are more energy efficient than shorter blankets. However, watch out with too long blankets because they can make you trip when you get in or out of the table.
Colophon
Heated table: Kris De Decker.
Illustrations: Marie Verdeil.
Photos: Marina Kálcheva.
Model: Anita Filippova.
Photoshoot location: AkashaHub Barcelona. Thanks to Carmen Tanaka.
Marie Verdeil and Roel Roscam Abbing gave feedback on the draft of this article.
Related DIY Manuals:
Relevant books:
Reactions
To make a comment, please send an e-mail to solar (at) lowtechmagazine (dot) com. Your e-mail address is not used for other purposes, and will be deleted after the comment is published. If you don’t want your real name to be published, sign the e-mail with the name you want to appear.
Reactions
Greg
Hi Kris,
Thank you for the heated table article! A lot of times I’ll have an idea, but because I haven’t seen it done, and I’m a coward, I decide it’s probably a bad idea for some reason I can’t foresee. When you write an article like that, and include the historical use, then I’m bolstered to try it!
You mention “Western-style seating”, and I’m wondering what you think of this problem: One problem I have with heating myself or my little space, is that I’m reluctant to move, so I sit too long. There are various health effects of that, but one I’m battling right now is sciatica that has affected almost every night of sleep for 10 months.
I’m wondering if you’ve thought about that, and if you know if people who do “Eastern-style seating” have any different outcomes?
Cheers again for the article! Greg Australia
kris de decker
Hi Greg,
Indeed I have been looking into the advantages of sitting on the ground, and they are quite significant. While I chose a western-style sitting position for my office, I am considering switching to sitting on the ground in my home. It’s apparently much better for your body, although it does take practice.
All the best, Kris
Kostas
Hello Kris,
You may want to add to the article of heated table another insulation material. Mycelium panels. More resistant to high temperatures also.
Regards Kostas
Kieran
Good afternoon,
Thank you so much for this article. It was very enjoyable to read as most of your articles are! My wife and I love Japanese culture and as such I have considered buying/making a Kotatsu. For one reason or another we’ve decided not to.
But the idea of using the underfloor heating foil is a stroke of genius. Here in the UK, you can buy low wattage “tube heaters” at a very low cost (around £35 for the 80w model). They have a built-in thermostat and run off the 230v wall supply. They are generally used for protecting a greenhouse or shed from frost but I wonder if they would be suitable for this application too? Any thoughts?
Thanks again for the articles, Kieran
Patrick 'DoctorSockrates' Camarador
I wish this guide was out before I built a prototype “desktop kotatsu” to keep my fingers warm on the keyboard and mouse in my office. Probably would be safer than what I had lying around; I used a simple lapdesk and small blanket that was short enough to not be blocking the monitors on my monitor arms. My heating source was a desktop heater that was supposed to blow hot air on your hands directly, which was uncomfortable the first time I used it since the air wasn’t being trapped and I couldn’t move my mouse hand much underneath it. While it did have a safety shut off for tipping over or overheating, I would’ve loved to have a thermostat for my desktop kotatsu instead…perhaps now with this manual, I can rebuild.
Patrick “DoctorSockrates” Camarador
Wim
The plan sounds solid. Thank you for the ideas and the time you spend on making this world Low tech minded.
One remark, for a slightly worried EHS person:
From a Building Biology point of view it depends on how you design it if it would be considered " fit for consumption" or " healthy for Human Beings". EMF’s so close to your body can give all sorts of health issues, like headaches, poor sleep, nervous system disorders etc. Running a 3 wire system (with earth) to power the pad avoids a lot of that.
The 2 wire part should be as short as possible, and ideally avoided completely. The heating pad itself should be surrounded by a metal grid connected to earth to avoid excessive EMF’s. However, the very nature of the heating pad does not allow for a design that avoids EMF’ s , as far as my knowledge goes.
(You would need to experiment with maze size and use an EMF meter to see what is practical. )
Anyway, as always, grateful for your efforts turning complex things into easy solutions.
Kind regards, Wim
Eric Wagner
I was wondering if there was any reason one couldn’t use an electric blanket instead of building an electrically-heated table. You could still have some insulation blankets laid over top of the heated blanket on your lap instead of over the table. I feel there are benefits to this version, like direct contact with the body for quicker and more heat transfer, and a heated blanket could be used in a variety of position and locations. Some people might want a hard surface on their table for certain types of work, which you could have with the blankets on your lap instead. Also, Since the blankets are only covering your body instead of a whole table, they could be smaller, and finally, I imagine it would be simpler to install. I love the kotatsu invention, but it makes more sense to me if you are disconnected from the grid, or wanting to use some other type of energy other than electricity.
Eric Wagner
Kris De Decker
@Eric Wagner I have no experience with electric blankets, never used one. So I cannot really answer your question. One disadvantage I see is that the heating system and the insulation are one. If I spill coffee over my table, I could simply switch blankets. Also, if you put an electric blanket over the table, it will mostly heat up the table rather than your body. So indeed, you would need to put it on your lap. It’s a totally different approach. Also, I don’t see why the heated table would make more sense if you are disconnected from the grid. It works just as well with grid power.
@Wim Good point, I did not think of that. I have not noticed any adverse effects after a week of use, but then I am not sensitive to EMF. I could do a test with an EMF meter.
@Kieran I didn’t know tube heaters, but had a look online. I don’t think they are suited for a heated table. I see there are some that use as little power as my infrared heating foil, but they seem to have much less surface area. That means that their surface temperature will be higher, risking burns or fire when they come into contact with skin or clothes.
@Kostas Thanks, that is something I will try for the next table we build.
Doug
Hello Mr. de Decker,
thank you for the article on the electric heated table build. Very interesting.
Responding first to Kieran’s comment - I also had to look tube heaters up. Using the Morris brand as example, it seems they can reach a temperature of (up to) 80 degrees (C) with recommended clearances of 30-50 mm off walls and floors and 200 mm below overhead. Some models have built in adjustable thermostat, with metal guards available (to keep fabrics at a safe distance). So, that would have to be installed on a cross-rail at the front of the desk, not below the table top; with the factory supplied guard around the tube. This would probably act as much as a convective air heater as a radiant source (though installing a reflective foil behind and above the tube would improve the radiant performance.) The tube probably wouldn’t work quite as well as the original heat foil design, however it could be easily done by someone who isn’t comfortable with doing electrical wiring.
Looking at the photo of Anita fully draped in blankets, it is easy to see how that could pool the warm air up and around your back. I wonder how difficult it would be to modify a blanket to function as a chair skirt - open at the front but wrapped around the sides and back, and attached to the legs so it doesn’t get tangled, and attached the top of the chair back so it can be pulled on or thrown off as needed. Also, getting your feet up off the cold floor on an insulated footrest makes a surprising improvement in comfort.
Thanks again, Doug.
Kris De Decker
@ Doug
One could indeed make a blanket with sleeves that can be draped over both the table and the body. Blankets with sleeves are for sale, but I only found them made of synthetic materials, and they are not large enough to also cover the table. However, it would be a nice project if you are handy with the sewing machine.
Joshua
I’ve recently had great success with a something similar to this. I have a knee-high bedside table, which I draped a blanket over and placed a 200w micro-heater under. There is thick sort of carpet on the floor, and I sit cross-legged on it. The blanket has a hole in it that I pop my head through, the rest of me being in what is essentially a tent of hot air. It is not as efficient or well thought out as yours, but I think the even greater simplicity is a charm point. I put it together in less than five minutes. The only thing I have left to do is to fit a little safety cage around the heater so it doesn’t shift or fall over, though at its low power I don’t see it being too much danger. Using this thing has been a real “wisdom of the elders” moment for me. This concept is ancient, and is by far the best thing I’ve tried yet. Joshua
Steve Parry
Hi Kris
Great article. I recently researched electric shawl/blankets. My sister was given one by a charity last week similar to this: https://www.onlinehomeshop.com/electric-heated-over-blanket-charcoal It is rated up to 150 Watts with 9 power settings. The default heat setting is 4 but I find 2 plenty sitting in an Ikea Poang chair with it draped over me down to my feet. I guess power usage would be 1.5 - 2 pence per hour. The room has so far dipped to 16 degrees Centigrade and I’m still warm watching TV. I think it would be fine down to 14 or 12 degrees at heat setting 4. The blanket above costs £19 post free in the UK! Here is a review by the Guardian: https://www.theguardian.com/thefilter/2024/dec/27/best-electric-blankets-heated-throws I must say I am impressed with my sisters blanket and assume the one I linked to is very similar. I also use it sitting at my desk with it draped over my belly down to my feet. It seems, because the heat rises, that my upper body and head are warm too.
Steve Parry
Antoine Dupré
Hi Kris and team,
Great article as always ! This is the first time I’m reacting to an article, yet I follow the website for a while and it’s always highly inspiring.
The idea of electrically heated table is great, and I understand the point that the thermal comfort comes from radiating heat rather than true heating. However, a thought came with my setup where I connect to an external monitor : why not use the wasted heat from the charger, and the laptop simply if one manages to fit it under the table. Not always easy to manage the cables, but my laptop (without display) typically consume around 20W even idle, and that can further reduce the consumption. In my tests, I got a 2-3° increase even if I have not yet optimised the insulation. Also, in my little experience so far, I’ve been truely impressed by the simple effect of a carpet : the feet is certainly a very sensitive part of the body. Thanks to the LowTechMag team for this research ! Antoine Dupré, Sion, Switzerland
Mario Stoltz
Hello Kris,
excellent article 😊. While today I enjoy the luxury of living in a high-insulation home, I do vividly remember past dwellings with much lower thermal comfort. Hence, two observations:
Do not underestimate how much thermal comfort you can gain from insulating the floor. Put on warm socks (if your skin is OK with that), put your feet on an insulating surface. A carpet alone is not sufficient. Just try the difference with a newspaper below and you will be surprised. If you are buying cork material for insulating the table anyway, it would be obvious to just get an extra panel of cork for your feet, this will do wonders. Second-hand foam insulation panels work as well of course. If the electrical setup for your heated table includes any conversion (e.g. from 110/220V grid power to 12V for the heating foil), then put the electronics for this conversion under your table as well (e.g. attach to a table foot). The inevitable losses in electrical power conversion (i.e. the power adapter getting warm during operation) will thus contribute to heating the space under your table and not be lost somewhere else. And of course – you guessed it – the same holds true for your laptop’s power supply. Attach it to a table leg under the blanket, so that also its thermal loss contributes to heating your table space.
David
Hi Kris, I read this article and built one. I have simplified the process for myself, probably at the expense of quality and repairability. I used a carbon film heater sold for reptile heating which is 80cm long and has a UK plug and a built-in thermostat. It only produces 40 watts, this seems to be a maximum for these products. The heater is a good size for the underside of my desk, and I have a heavy wool blanket and a thin bedsheet over the top, with a sheepswool rug on the floor. My table coverings don’t reach the ground, but the desk is pushed into a corner so a little bubble of warm air is retained quite well. I thought I would detect more radiant behaviour from it, but the heater gathers a pocket of especially warm air right under the desk, and I would have used more insulation if I was expecting this (I used a bit of polyester felt that is very thin, just to isolate the backing board from the underside of the desk). It is providing thermal comfort and was inexpensive to put together at about £50 all in. Thanks for your work, it is always interesting David, in Liverpool, UK.